
ASRock Z77 OC Formula - Intel Z77 Chipset Goes High-End
The ASRock Z77 OC Formula motherboard is built for overclocking, from its liquid-cooling points at its CPU VRM heatsinks to the manual onboard OC buttons. Bundled with extra goodies and lots of software tools, we test the board in detail to find out how it fares.

Aggressive Overclocking, ASRock Style
Motherboard manufacturer ASRock recently made news as there were rumors that ASUS may be making a bid for the motherboard division of ASRock. If the deal comes true, it would make ASUS, already the number one motherboard manufacturer globally, the largest motherboard manufacturer in the world (and also the most popular according to our Tech Awards Reader's Choice results from last year). Hence, for ASUS to consider this massive business undertaking, ASRock must be doing something right with its motherboard products.
To date, ASRock has churned out a total of sixteen motherboards that feature the Intel Z77 Express chipset. They range from the Thunderbolt-enabled Z77 Extreme6 to the top-tier ASRock Z77 Extreme11 that comes with eight SAS2/SATA3 connectors and an on-board LSI SAS2308 PCIe 3.0 x8 controller for additional PCIe Gen 3.0 bus lanes, the company is going all out to capture a wide target audience with its Z77 board offerings.
The ASRock Z77 OC Formula board is ASRock's latest attempt to address the needs of overclockers and the company appears to see them as a wholly distinctive class of users. For starters, the Z77 OC Formula is an Extended ATX (EATX) motherboard that is slightly wider than an ATX one. The board boasts of numerous high-end features and it even comes with a bundled with a syringe of Gelid Solutions GC-Extreme thermal paste. The board even comes with a pack of 10 "OC Stands" that plug into the motherboard mounting holes to get the platform up and running on your desk without resorting to use random objects (such thick packing foam or boxes) to give your setup a professional feel. It seems that ASRock has given much thought to their latest product that clearly stands out from its high-end Extreme series of motherboards.

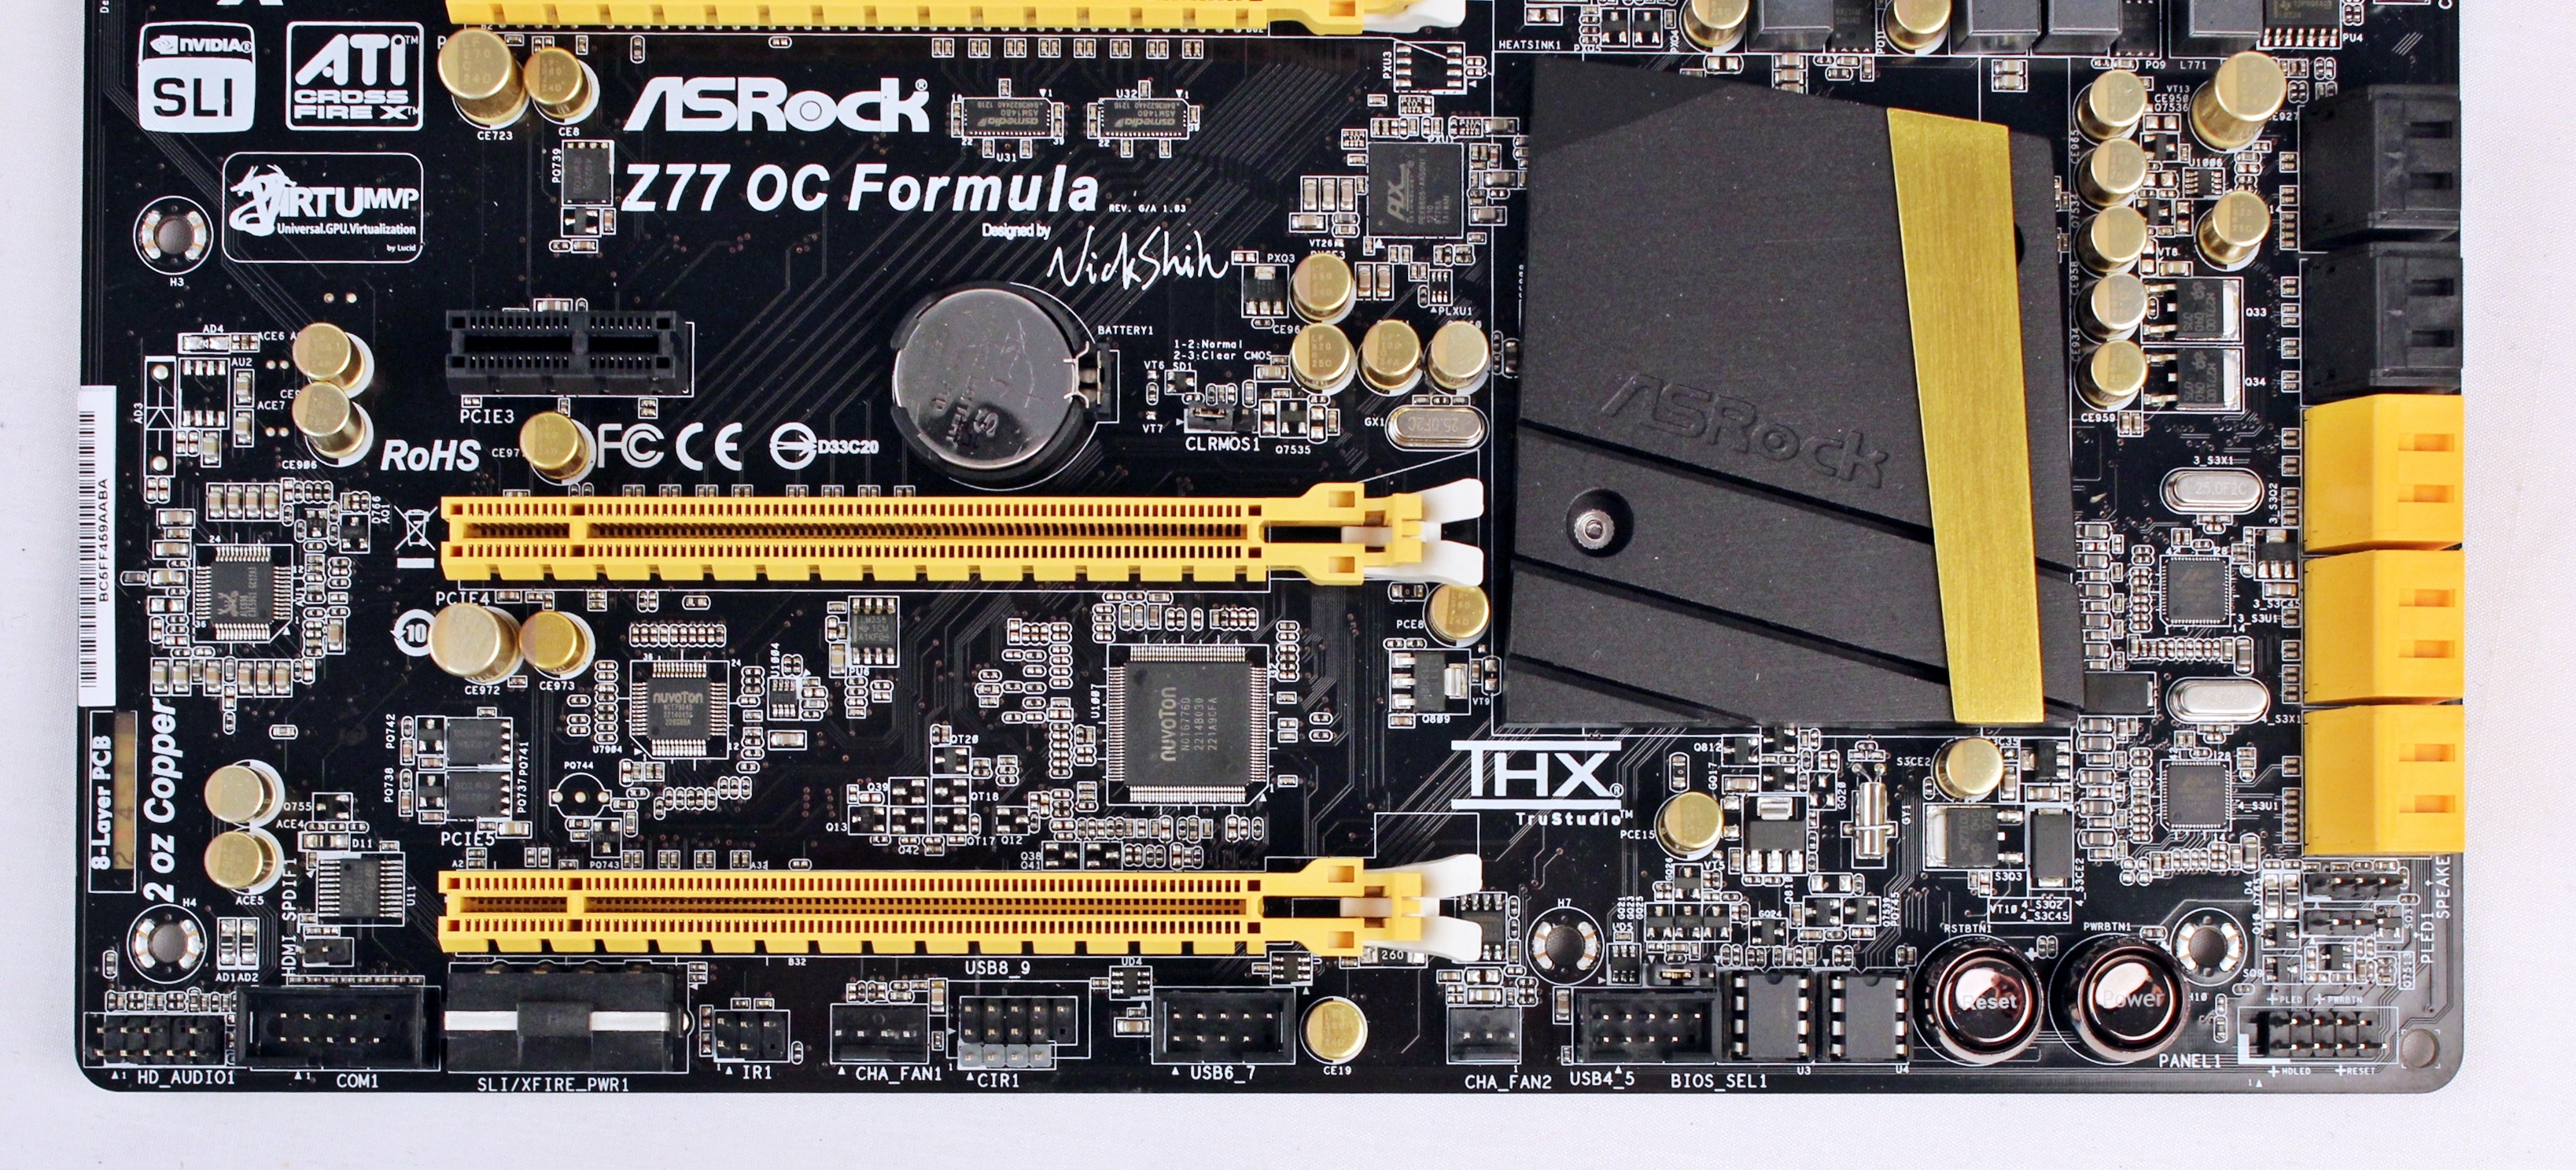
With its bright yellow streaks set against a jet-black PCB, the ASUS Z77 OC Formula motherboard is screaming out at overclockers to push it to high performance levels.
The ASRock Z77 OC Formula supports LGA1155 CPUs, such as the third generation Intel Core CPUs (Ivy Bridge) as well as overclocked DDR3 memory modules that have been rated up to 3,000MHz. As we have mentioned earlier, as a nod to overclockers, ASRock has aligned with famous overclocker, Nick Shih, to put his stamp-of-approval for the Z77 OC Formula. This is in line with the company's earlier efforts to gain traction among gamers with their Fatal1ty Z77 Professional board.
Expansion Slot Matters
There is a glaring lack of PCIe 2.0 x1 expansion slots for the board; in fact, there are only a pair of them. But we do like the ample motherboard real estate that lies in-between the first PCIe Gen 3.0 x16 slot and the second PCIe 2.0 x1 slot. There is also more than enough space between the PEG slots for a multi-graphics card configuration. Near the first PCIe Gen 3.0 x16 slot, we see a PLX PEG 8605 switch chip that will provide another four PCIe 2.0 lanes to the existing ones that are controlled by the Intel Z77 chipset.
According to the manual, the first two PCIe Gen 3.0 x16 slots are controlled by the CPU (do note that PCIe Gen 3.0 bandwidth is supported only if an Intel 'Ivy Bridge' CPU is installed); with the first PEG operating at x16 when a lone discrete graphics card is installed at that slot. If both PCIe Gen 3.0 slots are taken up, they both operate at x8 respectively. The third PEG slot operates at x4 on PCIe 2.0 bandwidth and it allows the board to support 3-way NVIDIA SLI or AMD CrossFireX multi-GPU configurations. Last but not least, you'll not find any legacy PCI slots if you are planning to reuse your old sound card.

The ASRock Z77 OC Formula features three PCIe Gen 3.0 x16 expansions slots and a pair of PCIe 2.0 x1 slots.

The PLX PEX 8605 switch chip that adds four additional PCIe 2.0 lanes to the board.
Active VRM Cooling
Northwards from the PEG slots, we see the massive VRM heatsinks of the board and one of them features active cooling in the form of a 40mm cooling fan. During our testing, the 40mm cooling fan was found to be rather quiet during its operation, thus negating our thoughts that it might add to the operational noise. The VRM heatsinks also support liquid cooling solutions; even liquid nitrogen (LN2) cooling is up this board's alley! ASRock has up the ante in terms of the electrical components used on the board. For starters, the board features a 12 + 4 power phase design and ASRock has eschewed its usual Premium Gold Capacitors and used newly-designed capacitors called Multi Filter Caps. These new gilded capacitors are touted to deliver clean power to the CPU in order to maximize its overclocking headroom. These capacitors seat in front of the chokes, which by the way are made from "premium alloy" and are tucked neatly under the massive VRM heatsinks.

Besides featuring a 40mm cooling fan, the VRM heatsinks will support liquid cooling solutions right-out-of-the-box.

We can see the Multi Filter Caps and the premium alloy chokes that make up the board's VRM solution. The VRM heatsinks are actually connected by a heatpipe that is hidden inside them.
Chock-full of Features
The area below the CPU socket is jam-packed with features, which can be a good or a bad thing depending on where you intend to have your platform set up and running. If the board is going to be outside of a chassis, the location of most of the below features shouldn't matter, but we can't say the same if you intend to reach out for these options even after the board has been installed within a chassis. We highlight the more prominent features:-
- Four DIMM slots allow installation of overclocked DDR3 memory modules that have been rated up to 3000MHz.
- In the corner of the board, near the Debug LED, there is a PCIe DIP switch. This switch allows the user to enable or disable the corresponding PEG slots. When one of the graphics cards installed on any of the slots is suspected to be faulty, the user can disable one of the PEG slots for troubleshooting without the hassle of removing it. Now while this can be touted as a "feature", most users shouldn't have any issues just unplugging graphics cards - in fact, once the system is installed within a chassis, it's actually a lot more difficult to reach out to this PCIe DIP switch. Ultimately, the feature is more useful for ASRock's own test/QC engineers, professional overclockers and reviewers using this board as their test-bed than of practical use for most enthusiasts. So it depends on your nature of use.
- There is also a pair of OC buttons (named as Rapid OC buttons, these huge and easy to use "+" and "-" buttons that seem to have been a borrowed design from elsewhere) that allow you to adjust the the CPU ratio, base clock frequency and the CPU VCore voltage for overclocking.
- The V-Probe is a set of 7 detection points that allow power users to directly measure the voltages of different motherboard components including the DRAM, CPU System Agent, chipset core and CPU core in order to ensure these components are operating within acceptable voltage levels during their extreme overclocking attempts. Just next to the PCIe DIP switch, there is a quick silk-screened guide to the electrical contacts to connect in order to ascertain the voltage of the right component.

Located just beyond the DIMM slots, there are a number of high-end features targeted at power users; the PCIe DIP switch, Rapid OC buttons and V-Probe.

The PCIe DIP switch controls the three PEG slots with the numbers corresponding with the order of the PEG slots, from top to bottom. To its left is the quick silk-screened guide for the V-Probe's different contact points.

Up close are the the V-Probe voltage test points; there is a set of indicative LEDs for CPU, DRAM and VGA for quick troubleshooting of suspected faulty components.
Other Features of the Board
According to the manual, there are Marvell SE9172 SATA controllers that add an additional four SATA 6Gbps connectors to the pair that is supported by the chipset of the board. The SATA 3Gbps connectors are supported by the board's Intel Z77 chipset.

The yellow connectors are SATA 6Gbps-compliant while the black ones support SATA 3Gbps. There is no color differentiation among the yellow SATA 6Gbps connectors to determine their controllers; the pair on the extreme left are supported by the chipset, while the remaining four are courtesy of the Marvell controllers.
As we move to the bottom edge of the board, we see another pair of on-board buttons that power and reset the board accordingly. The button have this bronze finish and is slightly depressed in their silver plastic housing to prevent accidental presses by the unsuspecting rig builder. Located along the bottom edge of the board are the usual front panel connectors, including a 4-pin Molex power connector that will supply extra power in the event of multi-GPU setups (though most people don't use this connection).

There are a pair of Winbond BIOS chips; one stores the main BIOS while the other acts as a backup. They are located just next to the board's reset button.
The front panel headers and the USB expansion headers share the bottom edge of the motherboard with some cooling fan connectors. Their monotony is broken by the presence of the on-board buttons as well as the Molex power connector for a multi-GPU setup.
The rear I/O ports of the board are rather run-of-the-mill; however, it does feature six USB 3.0 ports due to the presence of third-party Etron controllers. ASRock seems to have taken a leaf from the books of fellow motherboard manufacturer MSI, by including a keyboard/mouse PS/2 port just above a pair of USB 3.0 ports, as a nod to gamers who swear by the touted responsiveness of such gaming peripherals. There is a lone HDMI display port and RJ-45 LAN port. We ponder the reasons why ASRock has left out the usual suspects for video connectivity like DVI and DisplayPort, but it's quite likely they don't think they would be of use for motherboards of this class.

The clear CMOS button is nested between the two rear ports stacks to keep it out of reach on purpose.
Besides such visible features of the board, ASRock also touts quality build of the PCB as it features a 8-layer design and comes with four sets of 2-ounce copper inner layers, that is said to ensure lower temperature and higher energy efficiency for overclocking. Hence, with that said, we shall examine the board in terms of its performance to see if it lives up to its OC accolades.
Goodie Bag Bundled
There is a velvet drawstring bag that is bundled with the motherboard and its contents had the usual offerings of SATA connector cables plus a few other surprises. One of the interesting items is a package of rubber standoffs for the motherboard that we mentioned on the earlier page. The standoffs allowed the board to be raised from any flat surface so that system builders can set up the board without the need of a dedicated test bench. There is also a syringe of GELID GC Extreme Compound that allows for easy application of the thermal paste. Another equally valuable finding is the bundled USB 3.0 front panel that supplements what your casing might have and makes reaching to the back of the system to access the rear USB 3.0 ports a last resort.

Sporting a rather opulent look-and-feel, the goodie bag contains loot worthy of its prestigious OC branding.

These two items will appeal to hardened system builders; the GELID GC Extreme Compound for their overclocking exercises while the rubber standoffs will come in handy for setting up their rigs on any flat surfaces.

All the contents of the bag laid bare.
Bundled Software - ASRock's Proprietary Tools and Utilities

This is the GUI of the ASRock OC Formula Drive with its straightforward layout where the utilities and information screens are accessed via the left navigation pane.
There are a number of software titles bundled with the ASRock Z77 OC Formula board; they include a trial version of an anti-virus software as well as the Cyberlink MediaEspresson 6.5 for video conversion. Befitting the status of its first OC sanctioned Intel Z77 motherboard, the company has introduced its ASRock OC Formula Drive software suite that aims to provide a direct means for power users to tweak the system's settings in the operating system environment, namely in Windows, without the need to access the BIOS UEFI Utility. The ASRock Formula Drive is actually a rebranded ASRock eXtreme Tuning Utility (AXTU) that offers basic monitoring and fan selections as well as a series of basic overclocking options and power saving utilities.

From the bundled installation DVD, we installed the ASRock Formula Drive software.
The said software suite is bundled with the board's installation disc and its installation on our test system went without a hitch. After launching the software, the initial screen that greeted us was the Hardware Monitor (as shown on the first screenshot on the top of the page) where information pertaining to the temperature of the processor as well the different voltage settings of the inset components of the processor as well as the chipset of the board. The information is very similar to that offered by the H/W Monitor of the board's UEFI BIOS utility as seen below:-

This page within the BIOS resembles that of the screen your first greeted when you launch the ASRock OC Formula Drive utility.
The Formula Drive utility encompasses many sub functions and we'll run through each in the following sections below.
Formula Drive: Fan-tastic Tuning
This updated fan control utility controls the chassis fans' rotation speeds by supposedly testing each of the six controllable fan headers in terms of RPM against power supplied to each attached cooling fan. As seen from this screen shot, users can set preferred fan speeds at various temperature points and you can even test the result graph to see if that's to your liking. That's a lot of control provided to the tinkering enthusiasts to ensure their system operates exactly the way they prefer it.

The points on the graph are adjustable; this allows the user to set the required fan RPM at different temperature points. One usage of this control utility is to tune the noise levels generated by all the cooling fans inside the system's chassis.
Formula Drive: Overclocking
We liked the manner in which the Overclocking utility has distilled the essential parameter settings and put them in a simple GUI. We also awarded extra brownie points for the ability to save our OC profiles onto our local drive. The hotkey function also allowed us the convenience to overclock the system with the touch of a single button, true OC on demand!

The Overclocking utility allows us to save our different profiles to the local drive of our system. There is even a 'hot key' option.
Formula Drive: OC DNA
On the whole, we felt that the OC DNA utility could have been combined with the first utility, Hardware Monitor (as seen on the first screenshot of this page). Collectively, they could have been called the Hardware DNA Center where we could have the board's information like model number and BIOS version as well as the ability to load different BIOS Settings profiles to suit our computing requirements on-the-fly. This dedicated section felt as if ASRock was trying to find ways to 'beef' up the utility unnecessarily.

The OC DNA allows the user to save BIOS Settings profiles.
Formula Drive: IES and Multi-Thermal Sensor
The Intelligent Energy Saver (IES) offers a one-click solution to set the amount of power phases being used by the processor, while the Multi-Thermal Sensor (MTS) is almost identical to its counterpart found in the board's BIOS UEFI utility that goes by the same moniker. In fact, the MTS could have been integrated within the Hardware Monitoring portion of the utility instead up jumping around different sections. As for IES, we don't really see much use for it as we've dabbled with more advanced systems like Gigabyte's Dynamic Energy Saver in the past that handles energy saving from managing power phases more intelligently. Furthermore, the gains from using such are small and an incorrect setting could result in overworking a particular power phase unnecessarily. We would much prefer an automatic management of power phase usage.

The IES (Intelligent Energy Saver) allows the user to lower the number of power phase supplied to the processor in order to lower power consumption of the system.

The Multi-Thermal Sensor provides a convenient to gather temperature readings of all the sensors on the motherboard. Our only wish was that it should have been integrated within the Hardware Monitoring section of the utility for a holistic view of all relevant information.
Formula Drive: XFast RAM
XFast RAM allows the user to partition part of their memory off to a RAM drive, and adjusts the system setup to use this virtual drive for temporary files. This software utility is part of a three-part offering from ASRock, collectively called the XFast 555 Technology, the other two components are XFast LAN and XFast USB respectively. XFast LAN allows the user to set network priority for different applications that reside on his system. The software also allows for port management of the network, as well as traffic analysis and monitoring. We've also covered this and more in a past event with ASRock.

The XFast RAM utility is one part of the trio of ASRock's XFast 555 Technology that was unveiled at last year's Computex. This component allows the user to create a RAM drive from their systems' memory to cache data that can be quickly accessed by applications running on their systems.
Other Power User Software Utilities
The final three utilities we would like to highlight are Rapid OC, ASRock Timing Configurator and ASRock XFast USB. These are standalone software utilities to address different requirements of power users. The former works in tandem with the onboard Rapid OC buttons.

The pair of Rapid OC buttons allows overclockers to change the base frequency, CPU voltage or its CPU ratio accordingly. The buttons are only useful if the board has not been mounted inside the chassis of a PC. Else, they would be hard to reach and use.
In order to determine what the Rapid OC buttons are in control of, we had to execute the Rapid OC software utility that we had installed on our Windows 7 test system.

We launched the Rapid OC Configuration software by double-clicking the ASrock Rapid OC desktop shortcut. The other window titled Rapid OC appeared when the onboard Rapid OC buttons were pressed.
By setting the OC Mode that comprises a list of three items: BCLK, Ratio and CPU Voltage, their respective settings can be directly controlled from the physical Rapid OC buttons. In the example above, we set the OC Mode to BCLK and we could adjust the base clock frequency from our Windows 7 operating environment by pressing the Rapid OC buttons on the ASRock Z77 OC Formula motherboard. We felt that this software is useful in order to squeeze out any incremental changes in the three commonly controlled settings that may have failed at the BIOS POST. In short, this is a formidable tool for power users who need to trick out any gains to increase the performance levels of their rigs.
The ASRock Timing Configurator would also be extremely useful in their hands. This standalone software allows power users to tweak the memory timing in order to achieve optimum performance. Again, this tool also allows the power user to tweak memory sub-timings to levels that may have failed the BIOS POST and to further fine tune them.

The sole purpose of the ASRock XFast USB is to speed up USB data transfer. The software interface is mostly green and according to the instructional manual, it states that it would work best with USB 3.0 devices. Like what we've often encountered with some of Buffalo's elite portable drives, this utility will use its own USB protocols to help achieve better performance than the standard system chipset driver.

The ASRock XFast USB software utility that is able to speed up USB data transmission. It is able to detect devices that have been plugged in and boost their transfer speeds accordingly.
BIOS Settings
The UEFI BIOS Utility of the ASRock Z77 OC Formula is rather well-organized and navigating it was a no-brainer as the top menu tabs have been labeled clearly. We did appreciate the large navigation tabs; while on the right, descriptions of the functions of each menu item are available. There's also a QR code at the bottom of the description column, which when scanned with the appropriate mobile device loaded with a QR code scanner software, the user will be lead to the board's manual in PDF format.

The ASRock UEFI BIOS utility was rather well-organized with main tabs located at the top of the interface for easy navigation. Our main peeve with the utility was the lack of a screenshot tool.
BIOS Settings: OC Tweaker
The tab where we spent a large part of our time at was the OC Tweaker. It contained many settings that directly affect the performance of the processor, memory and the attached devices on the bus channel of the board. Besides tweaking these operating frequencies, OC Tweaker also allowed us to change the voltage and other timing configuration of these components; namely the CPU and the installed memory modules.

The main page of the OC Tweaker lists the predefined BIOS settings that will overclock the system to pre-defined performance levels with the endorsement of renowned overclocker Nick Shih,

Besides the usual suspects of tweaking voltage and timing configurations, the Z77 OC Formula's UEFI BIOS utility also allows us to adjust the operating frequencies of the PWM components as well as their overall power threshold.
BIOS Settings: Tool
In the main Tool tab, we were given access to several utility functions; one of the interesting tools is the Dehumidifier function of the board. When enabled, the board will operate the attached chassis fans to expel any hot air in the system's casing. This is supposed able to expel the moisture in the hot air that may damage the sensitive motherboard components. We can't really vouch for its usefulness at this point of time since most of the tropical countries are perpetually hot and have high moisture content in the air. If you're in a controlled air-conditioned environment, the environment is usually dry. So in either case, you are at the mercy of your operating environment; a single burst of air pushed out of the chassis isn't going to help much.

Hot air is purported to carry more moisture; hence, by spinning the chassis fans to expel it and its extra moisture, the board is supposedly protected from the dangers of high humidity level, especially in an environment without air-conditioning equipment.
- Tool - System Browser
The System Browser is a well-designed piece of blueprint layout of the board's schematics. By moving the mouse pointer over the relevant components, we were able to obtain information easily.

Using the System Browser, we moused over the first PEG slot where our graphics card was installed to obtain more information about it. This allows power users to retrieve such information without having to crack open the chassis of the system.
- Tool - Multi Thermal Sensor
With thermal sensors spread across the board's PCB, this utility allows us to monitor the temperatures of these PCB spots with the ease of our mouse pointer.

In order to find out the temperature (in degrees Celsius) of any thermal sensor, we only needed to mouse over a particular point and its readings will be displayed at the bottom of the window.
- Tool - OMG
The last BIOS utility that piqued our interest is the Online Management Guard (OMG) that functions as some sort of parental control for internet access. It allows users to control network access at certain times of the day. We assume this may be somewhat useful to control the system's access to the Internet; especially, if the addressed user is a gaming addict and needs to be denied online access.
The BIOS tools contained in the rest of the main tabs of H/W Monitor, Boot, Security and Exit are the usual suspects seen across any respectable BIOS. For the purpose of this review, we have highlighted the ones that we felt were unique to the ASRock Z77 OC Formula.

OMG allows the user to regulate access to the Internet.
Voltage Controls Across Different Boards
While most enthusiast class boards these days have way too many overclocking related settings, we've decided to compile the available voltage settings of the various Z77 boards we've tested. As you'll see later in our overclocking efforts, we decided to manually adjust the voltage of the CPU PLL to determine how high we can push the CPU Base Frequency. In the case of this particular board, base frequency values can be adjusted by 10KHz for finer tweaking.
Model | CPUVoltage | DRAMVoltage | Other Voltage Settings |
ASRock Z77 OC Formula | -0.3000 to 0.600V (Offset Mode)
(0.005V steps) | 1.165 to 2.100V
(0.005V steps) |
|
MSI Z77 MPower | 0.80 to 2.155V
(0.005V steps) | 1.1080 to 2.4655V
(0.0075V steps) |
|
ASRock Z77 Extreme6
| 0.80 to 2.20V (0.005Vsteps) | 1.17 to 1.80V
(0.005V steps) |
|
ASUSP8Z77-V Deluxe
| 0.80 to 1.99V
(0.005Vsteps) | 1.20 to 1.92V
(0.02V steps) |
|
Biostar TZ77XE4
| 1.000 V to 1.790V (0.01Vsteps) | 1.300 to 2.112V
(drop-down menu selection) |
|
ECS Z77H2-AX | 1.00 to 1.50V
(0.015V steps) | Voltage Offset:+0 to +0.63 V
(0.01V steps) |
|
Gigabyte GA-Z77X-UD5H WiFi
| 0.80 to 1.90V
(0.005V steps) | 1.17 to 1.80V
(0.005V steps) |
|
MSI Z77A-GD65 | 0.80 to 2.155V
(0.005V steps) | 1.10 to 2.10V
(0.005V steps) |
|
Test Setup
This is the test configuration for our Intel Z77 Express-based motherboard comparisons.
- Intel Core i7-3770K
- 2 x 2GB Kingston HyperX DDR3-1600 (CAS 9-9-9-27)
- MSI N460GTX Hawk (ForceWare 285.62)
- Western Digital Caviar Black 1TB SATA 6Gbps hard drive (one single NTFS partition)
- Windows 7 Ultimate 64-bit
- Intel INF 9.3.0.1020
Benchmarks
The following benchmarks were used to test the motherboards:
- BAPCo SYSmark 2007 Preview (ver 1.06)
- SPECviewperf 9.0
- Futuremark PCMark Vantage (ver 1.03.1, 64-bit)
- Futuremark PCMark 7
- Futuremark 3DMark Vantage (ver 1.03.1)
- Futuremark 3DMark11 (ver 1.03)
- Far Cry 2
Results - SYSmark 2007 Preview
The ASRock Z77 OC Formula doesn't shine in this productivity benchmark as it came in right behind its other counterpart, the ASRock Z77 Extreme6. It scored poorly in the Video Creation and 3D tests; hence, sealing its slightly lackluster performance.


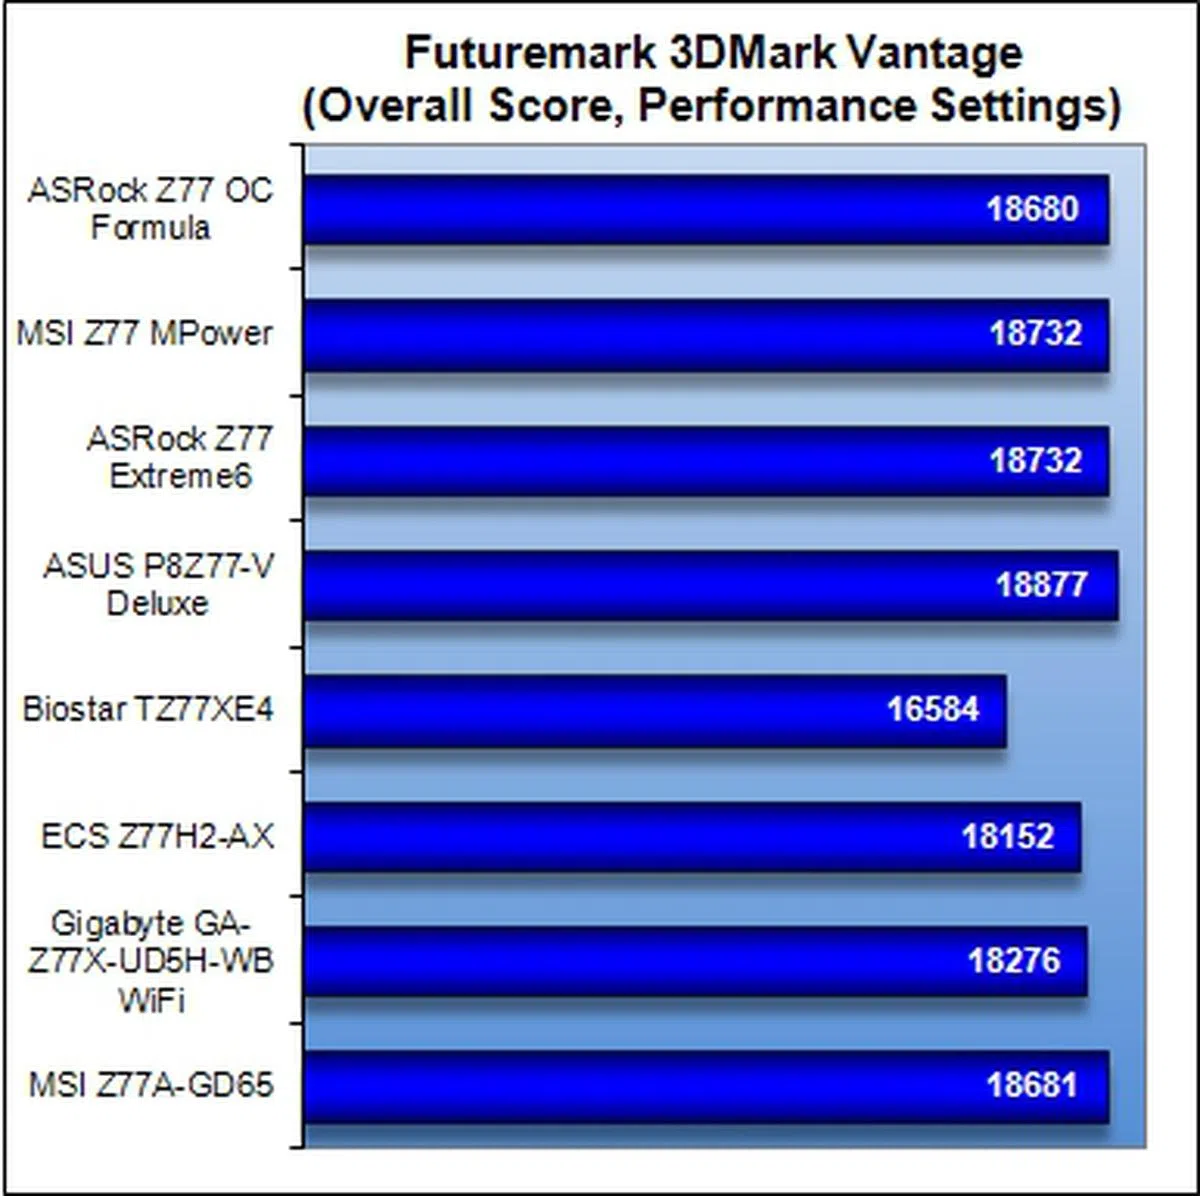
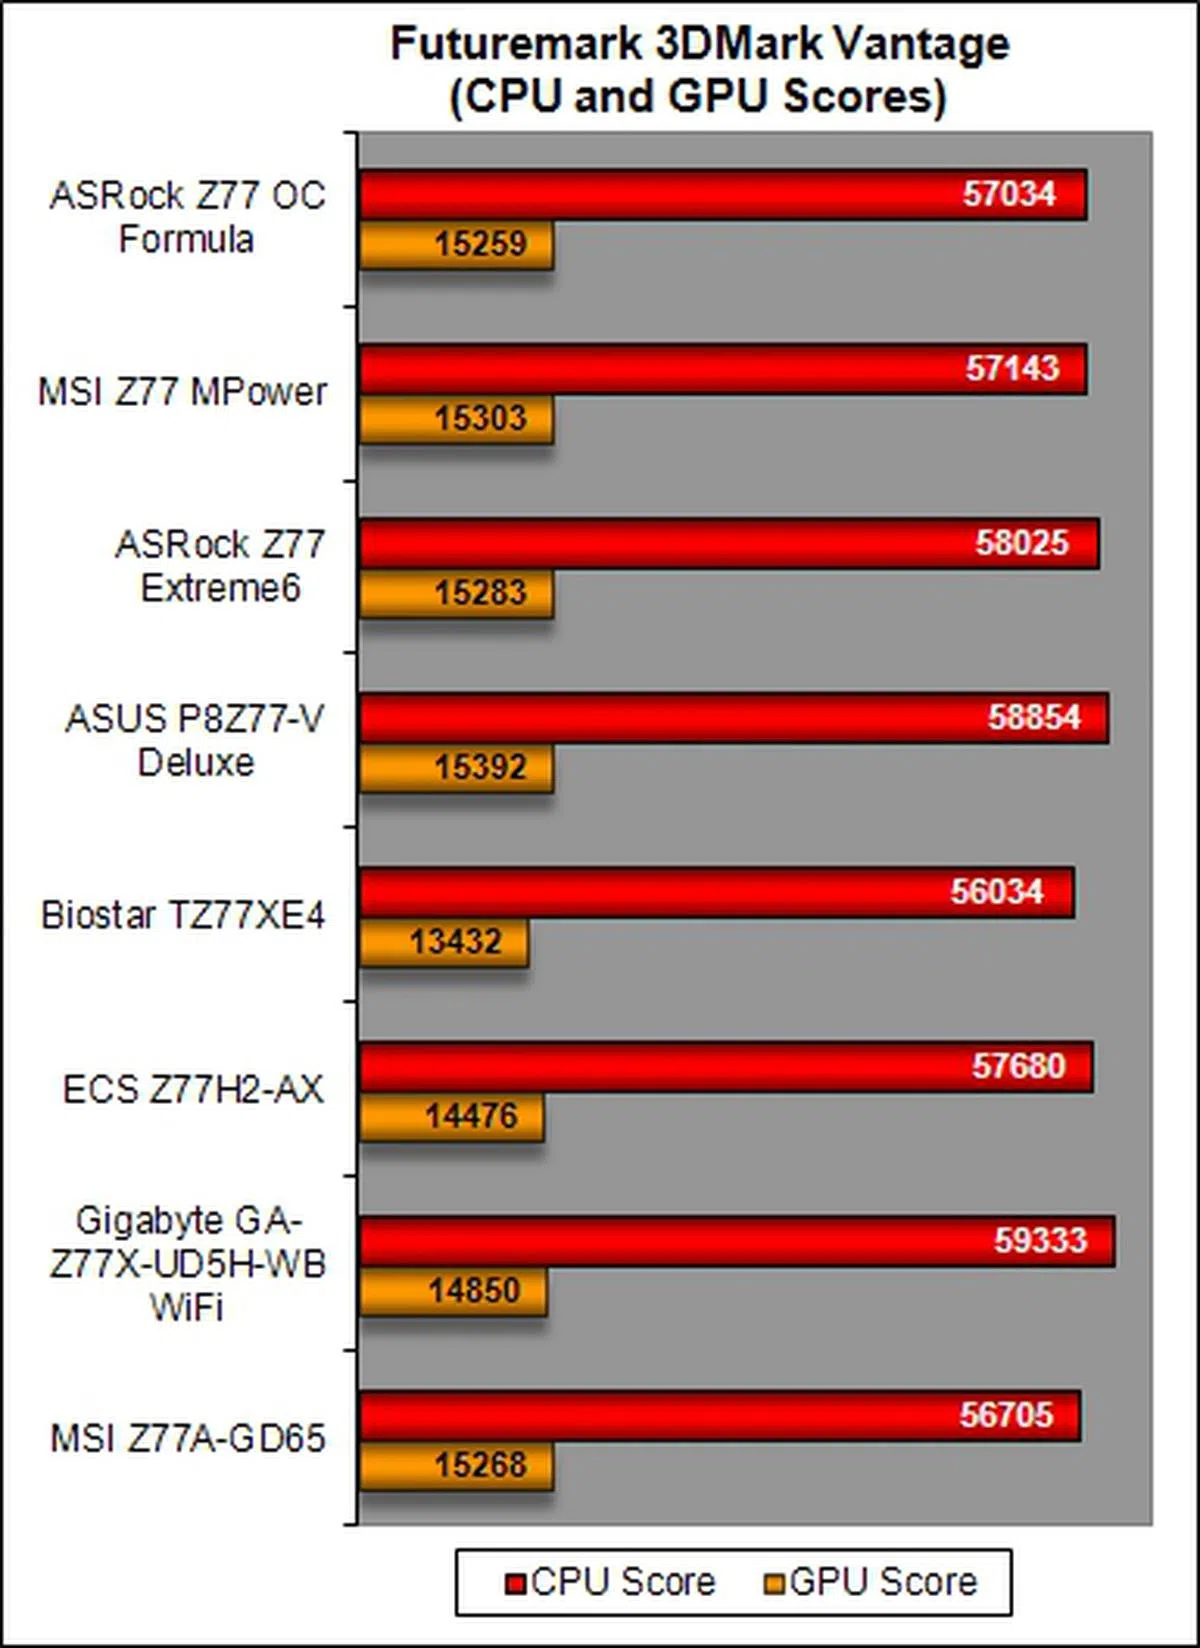
Results - Futuremark PCMark Vantage
In this system-wide benchmarking suite, the ASRock board was just 2.5% behind the MSI Z77 MPower and it came in just behind the two high-end mainstream Intel Z77 boards; ASUS P8Z77-V Deluxe and the Gigabyte GA-Z77X-UD5H-WB WiFi. When peering at the detailed breakdown of of test suites, it was found to be slower then its mid-range Extreme 6 counterpart in some tests.


Results - PCMark 7
From the overall PCMark 7 results, the ASRock Z77 OC Formula board has been relegated to the ranks of the average performers of the mainstream Intel Z77 boards. Although its score trailed the leading ASUS P8Z77-V board by a mere 2.4%, its overall performance was more on par with the mainstream boards, rather than the high-end ones. Its only consolation was that it came slightly ahead of its own Z77 Extreme 6 board.


Results - SPECviewperf 9.0
The ASRock board also tured in an expected average performance here, only managing to outclass the other mainstream ASRock Z77 board.

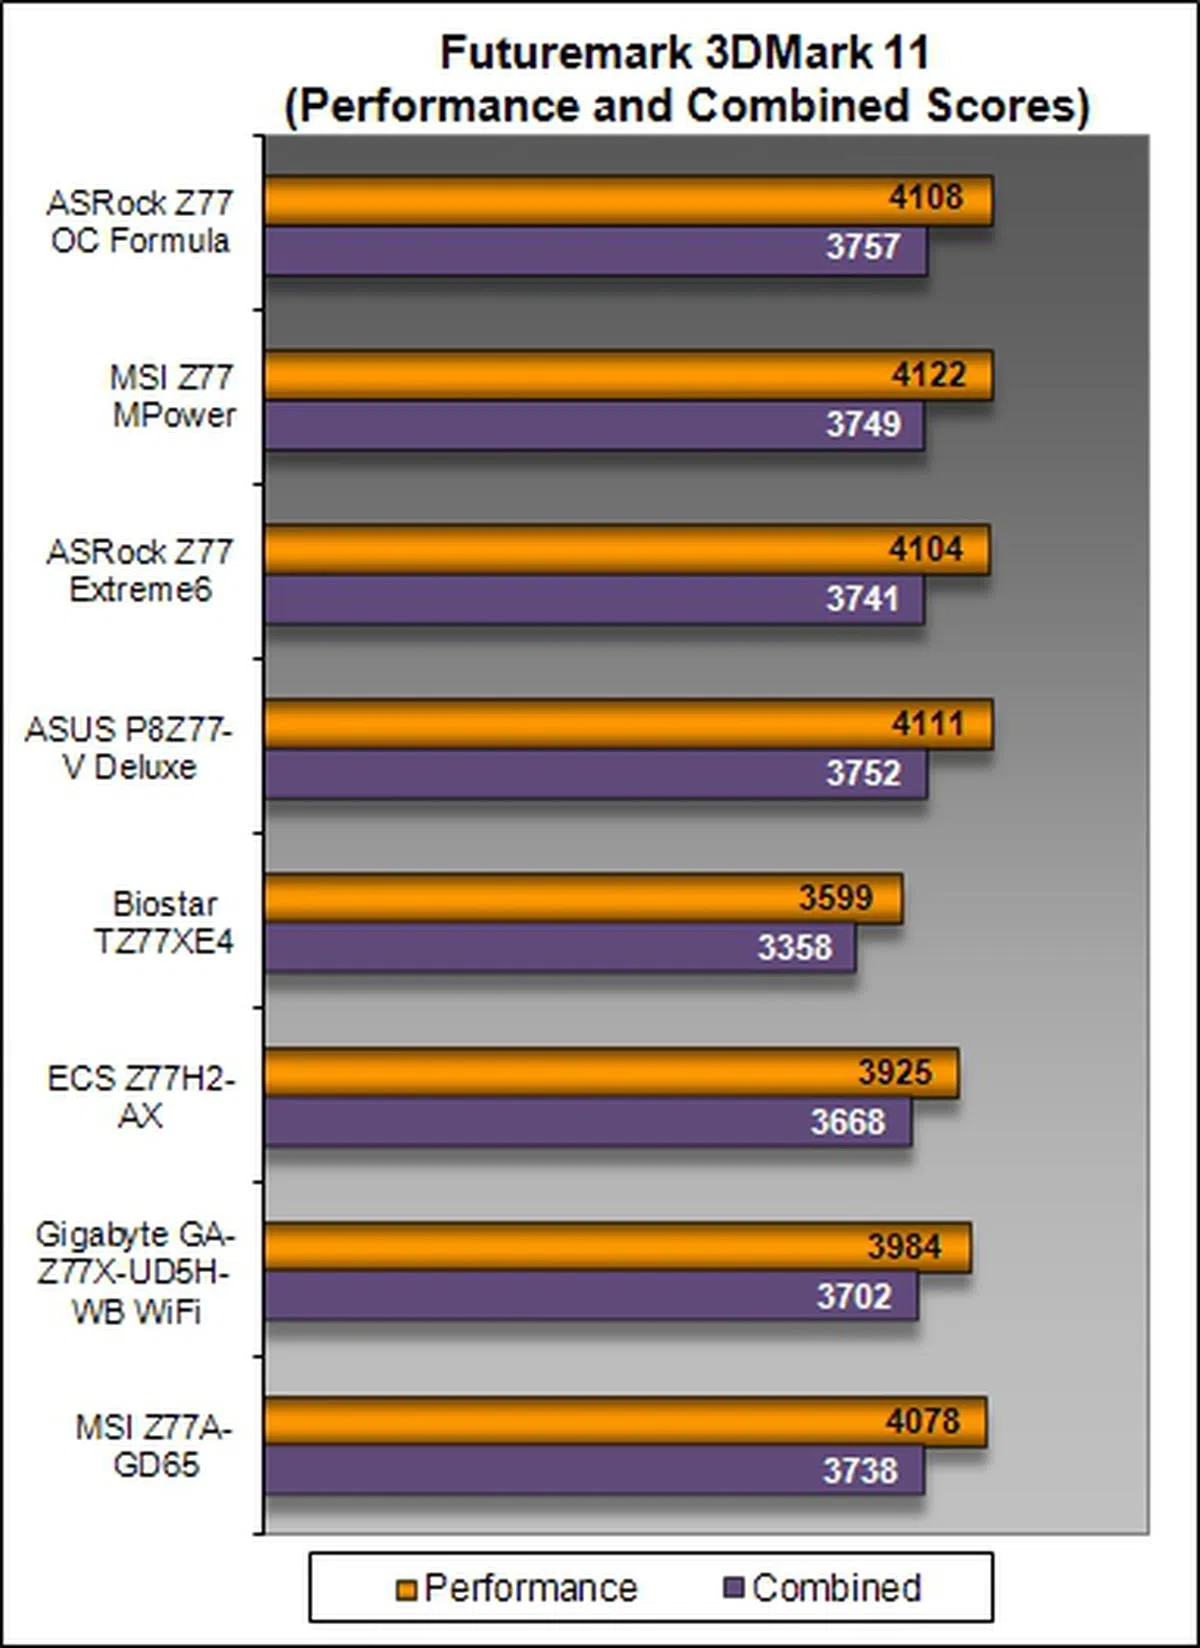
Results - Gaming
Surprisingly, its gaming performance was reasonably good, putting it just behind the top performing boards.
 |  |
 | 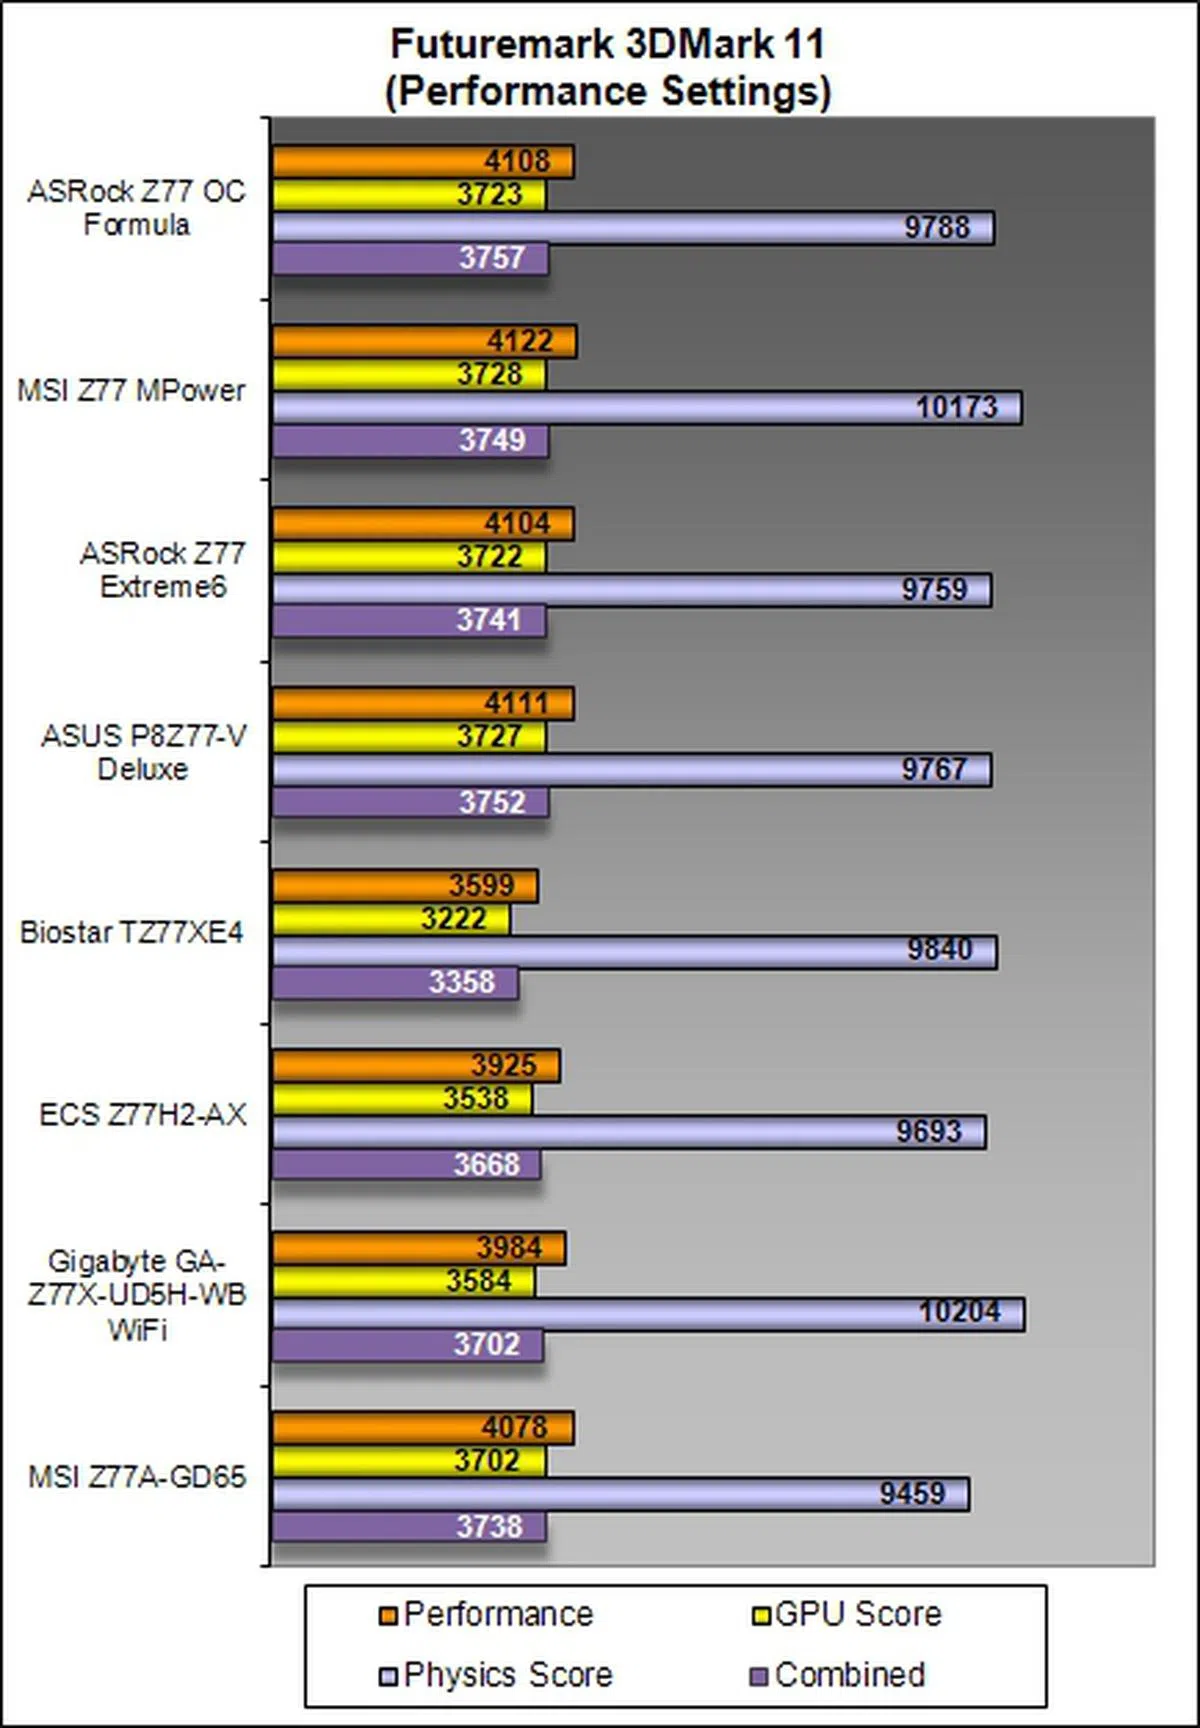 |

Temperature
The active cooling of the VRM heatsink of the ASRock Z77 OC Formula failed to prove its worth during our temperature tests. We expected it to be lower than the boards without any cooling fans at their VRM heatsinks. Sure it came out as one of the lowest in our comparison, but a 0.5 degree Celsius improvement wasn't what we were expecting when comparing against the MSI Z77 MPower. It's chipset heatsink was rather warm as well, though nothing unusual judging by our comparisons.
Our take is that the ASRock Z77 OC Formula was made to be paired with a water cooling setup, hence the heatsink design isn't the most efficient when you consider a pure air-cooled setup like what we've used it for.

Power Consumption
The ASRock Z77 OC Formula is rather energy-efficient; in fact, compared to the rest of the regular high-end Intel Z77 boards, it is actually came in third overall during our load test.

Overclocking
In our attempts to overclock the board, we approached it from three different test scenarios. For the first test, we tried to achieve the highest CPU base frequency by pushing it beyond the default value of 100MHz. At the same time, we kept the DRAM timings at the default values defined by the Intel XMP specifications that was compatible with our Kingston HyperX memory modules. We also set the DRAM voltages to around 1.65V to ensure system stability at the higher CPU base frequency.
Highest CPU Base Frequency
In this section, we managed to get a stable overclock by adjusting the voltage of the CPU PLL to a value of 1.95V so that we could push the board's CPU Base Frequency to a high of 107MHz.
Model | Maximum CPU Base Frequency Achieved
|
ASRock Z77 OC Formula | 107.00MHz |
MSI Z77 MPower | 108.20MHz |
ASRock Z77 Extreme6
| 100.00MHz |
ASUS P8Z77-V Deluxe | 108.00MHz |
Biostar TZ77XE4 | 104.00MHz |
ECS Z77H2-AX
| 104.00MHz |
Gigabyte GA-Z77X-UD5H-WB WiFi
| 109.00MHz |
MSI Z77A-GD65 | 107.86MHz |
Highest CPU Core Ratio
In the second scenario, we kept the host CPU base frequency at 100HMz while we attempted to achieve the highest CPU core ratio.
Model | Maximum CPU Core Ratio Achieved
|
ASRock Z77 OC Formula | 45 |
MSIZ77 MPower | 44 |
ASRock Z77 Extreme6
| 43 |
ASUS P8Z77-V Deluxe | 45 |
Biostar TZ77XE4 | 45 |
ECS Z77H2-AX
| 45 |
Gigabyte GA-Z77X-UD5H-WB WiFi
| 44 |
MSI Z77A-GD65 | 45 |
With the ASRock Z77 OC Formula, we managed to reach the maximum value of 45 for the CPU Core Ratio. We tried to push to a value of 46; however, our system started to lock up during our benchmarking tests. Hence, we concluded that the highest stable CPU core ratio value is 45 for this board to achieve the best possible performance gain.
Highest Overall Overclock
In the final overclocking scenario, we attempted to achieve maximum overclock on both the CPU base frequency and the CPU core ratio. Keep in mind that the numbers obtained earlier may not be possible to achieve when tweaking more variables consecutively. We kept to an average value of about 1.25V for the CPU core voltage as we would like to avoid overheating the Intel Core i7-3770K processor. Damaging this processor from excessive operating temperatures for slight performance gains is not worth the risk!
Model | CPU Core Ratio | CPU Base Frequency (MHz) | Maximum Overclock Achieved
|
ASRock Z77 OC Formula | 45 | 101.00 | 4.5GHz |
MSI Z77 MPower | 43 | 101.00 | 4.3GHz |
ASRock Z77 Extreme6
| 43 | 100.00 | 4.3GHz |
ASUS P8Z77-V Deluxe | 44 | 103.80 | 4.6GHz |
Biostar TZ77XE4 | 43 | 103.85 | 4.5GHz |
ECS Z77H2-AX
| 45 | 103.50 | 4.7GHz |
Gigabyte GA-Z77X-UD5H-WB WiFi
| 45 | 103.00 | 4.6GHz |
MSI Z77A-GD65 | 41 | 100.98 | 4.1GHz |
Unfortunately, we failed to reach the 4.6GHz mark for the final CPU frequency; however, compared to its compatriot ASRock Z77 Extreme6, the overclocking performance of the ASRock Z77 OC Formula generally acceptable for a board with high-quality components. Its results put it on par with the top-tier boards from the mainstream segment, but it fails to show off its OC-cred against them.
Our overclocking experience with the board was a time-consuming process as our usual over-voltage settings did little to stabilize its performance at overclocked levels. Although the board's BIOS UEFI utility offered a myriad of finer points in voltage settings, it quickly became a quagmire where one particular setting seem to negate the effect of a previously stable one. Our final settings had to be tricked out after a long and drawn out process. So while it did fare decently in overclocking performance, the process of getting there wasn't and you would actually have managed a higher overclock and a much more speedier process with 'simpler' boards like the Gigabyte GA-Z77X-UD5H-WB.
Even the rival MSI Z77 MPower was simpler to tackle and while it didn't outperform the ASRock in final OC outcome, test performance shows better actual raw performance from the MSI board. This is in-line with ASRock's Z77 OC Formula's overall performance which was a little behind expectations, which usually hints of some leeway in OC capability and that's exactly what we got in our actual tests. So which is the better board for overclocking? For us, the less hassle, the better.
Overclocking using ASRock Formula Drive Utility
We also attempted our overclocking efforts with the ASRock Formula Drive's overclocking utilities; however, we were unable to change the bus clock frequency from its default value of 100MHz to a higher value. We did manage to set the CPU ratio from its default value of 39 to 45. This change was reflected in CPU-Z, unlike the bus clock frequency value which failed to register our changes made via the Formula OC drive software. Of course, we also ran some tests that boosted the work load to check for any change in the outcome, but it was futile. Fortunately, we were able to tweak the voltage settings accordingly using the software.

We managed to set the bus clock frequency to a value of 100.99MHz; however, it failed to register on the CPU-Z utility.
Overclocking with Rapid OC
We also turned our attention to the Rapid OC system and tried overclocking our test system with the Rapid OC Configuration software with the onboard Rapid OC buttons.

We failed to change the bus clock frequency value from its default frequency of 100MHz. This is the same issue we faced when we tried to overclock our test rig with overclocking utility of ASRock Formula OC Drive.
In summary, we still prefer the BIOS UEFI utility to overclock the board; while the two OS-based utilities would come in handy for tweaking voltage settings or to make some changes to the CPU ratio to achieve optimal performance levels. But we believe most overclockers would just do it the old fashioned way.
Conclusion
The ASRock Z77 OC Formula board sports the right features and engineering build to target this market segment of overclockers and power users. From its 8-layer PCB board design, its revamped VRM solution featuring newly designed capacitors and chokes, its out-of-the-box LN2 cooling support, the team from ASRock has put in a lot of thought into bringing a truly well-engineered motherboard to the intended target market.

The ASRock Z77 OC Formula motherboard has targeted the OC market segment with a formulaic approach of quality build components and features, but doesn't quite live up to expectations in our usual benchmarks. Its gaming and overclocking performance proves otherwise; however, to truly appreciate its overclocking potential, only hardcore overclockers need apply.
However, we have discovered that despite its best efforts, its performance turned in at our usual benchmarks were not impressive. It performed at levels that were on par with the average performers of the mainstream motherboards. It did show its mettle during our gaming benchmarks and its overclocking performance is somewhat acceptable, given its high-end components and features that are supposed to give it a distinctive advantage in the overclocking realm.
With its 12 + 4 power phase control system, its power consumption level attests to its power efficiency. During our overclocking efforts, the myriad of voltage options did help us achieve a stable overclock when we pushed its base clock frequency to a high of 107MHz that is just behind the MSI Z77 MPower board. Beyond that, we were not able to push the rig beyond the 4.6GHz mark as our test rig started throttling the processor, leading to palpable decrease in our performance scores. However, the process of overclocking and getting a stable high overclock took much longer than expected as compared to mainstream Z77 class boards that we've tested before.
Overall, we do feel that the ASRock Z77 OC Formula has the potential to perform, perhaps when paired with extreme cooling solutions and hardcore overclocking memory modules that are rated up to 3000MHz. True to its racing car motif that is used to hawk its OC prowess, the ASRock Z77 OC Formula felt like one that was driven on normal roads, hindered by the traffic lights and unable to unleash its tarmac-ripping performance. Another speed bump is its exorbitant price tag of S$409 as a similar class boards like the MSI Big Bang Z77 MPower can be purchased at a lower price of S$339. Having said that, the good thing is that the actual retail price is much lower ans hovers around the S$370 bracket. Given the skew and functionality of the ASRock Z77 OC Formula, it's reasonably for what it offers.
In conclusion, the ASRock Z77 OC Formula is definitely not meant for anyone other than the purists of overclockers (with deep pockets) who can appreciate its features, tools and beauty. The important question is to figure out the purpose of use for the board and your cooling techniques. Unlike some others that are better designed for air-cooled setups, this board is more pro towards water-cooled setups and serious tinkering. It may not get you the best raw performance, but it will probably help you get a better than expected overclock - if you don't mind spending some time refining to get your preferred state.
If you're looking for an easy to overclock board with less complexity and mainly for air-cooled setups, there are other options that cost less and are more effective.
Our articles may contain affiliate links. If you buy through these links, we may earn a small commission.