Intel Z390 motherboard shootout: Which flagship board should you get?
The new crop of Z390 motherboards provide incremental upgrades on the chipset front, but board makers are trying to make them more attractive with a range of new designs and features. Here's a look at which flagship Z390 board you should get.
Finding a home for your octa-core chip
Intel’s Z390 chipset is everything the Z370 chipset should have been. But no matter. The new mainstream flagship is here and board makers are out in force to woo gamers looking to upgrade to Intel’s new 9th-generation desktop processors with a flood of new board models.
I’m talking of course about the Core i9-9900K, the 8-core/16-thread beast that is Intel’s best gaming chip yet. Board makers have a wide range of Z390 motherboards that span the gamut from affordable to eye-watering expensive, but it seems to me that anyone looking at the Z390 chipset would be more inclined toward a higher-end board.
As a result, we’ve rounded up the flagship boards from ASRock, ASUS, Gigabyte, and MSI to help you make your decision and tease out the best Z390 motherboard you can buy. There’s just one caveat – these boards are generally quite expensive, and they are for those of you who intend to put together a super powerful gaming rig, and have the budget for it.
To recap, the Z390 chipset is actually really similar to Z370. Still, it adds key features like native support for USB 3.1 (Gen 2) and integrated Intel Wireless-AC with support for Gigabit Wi-Fi, which you can expect on the boards reviewed here.
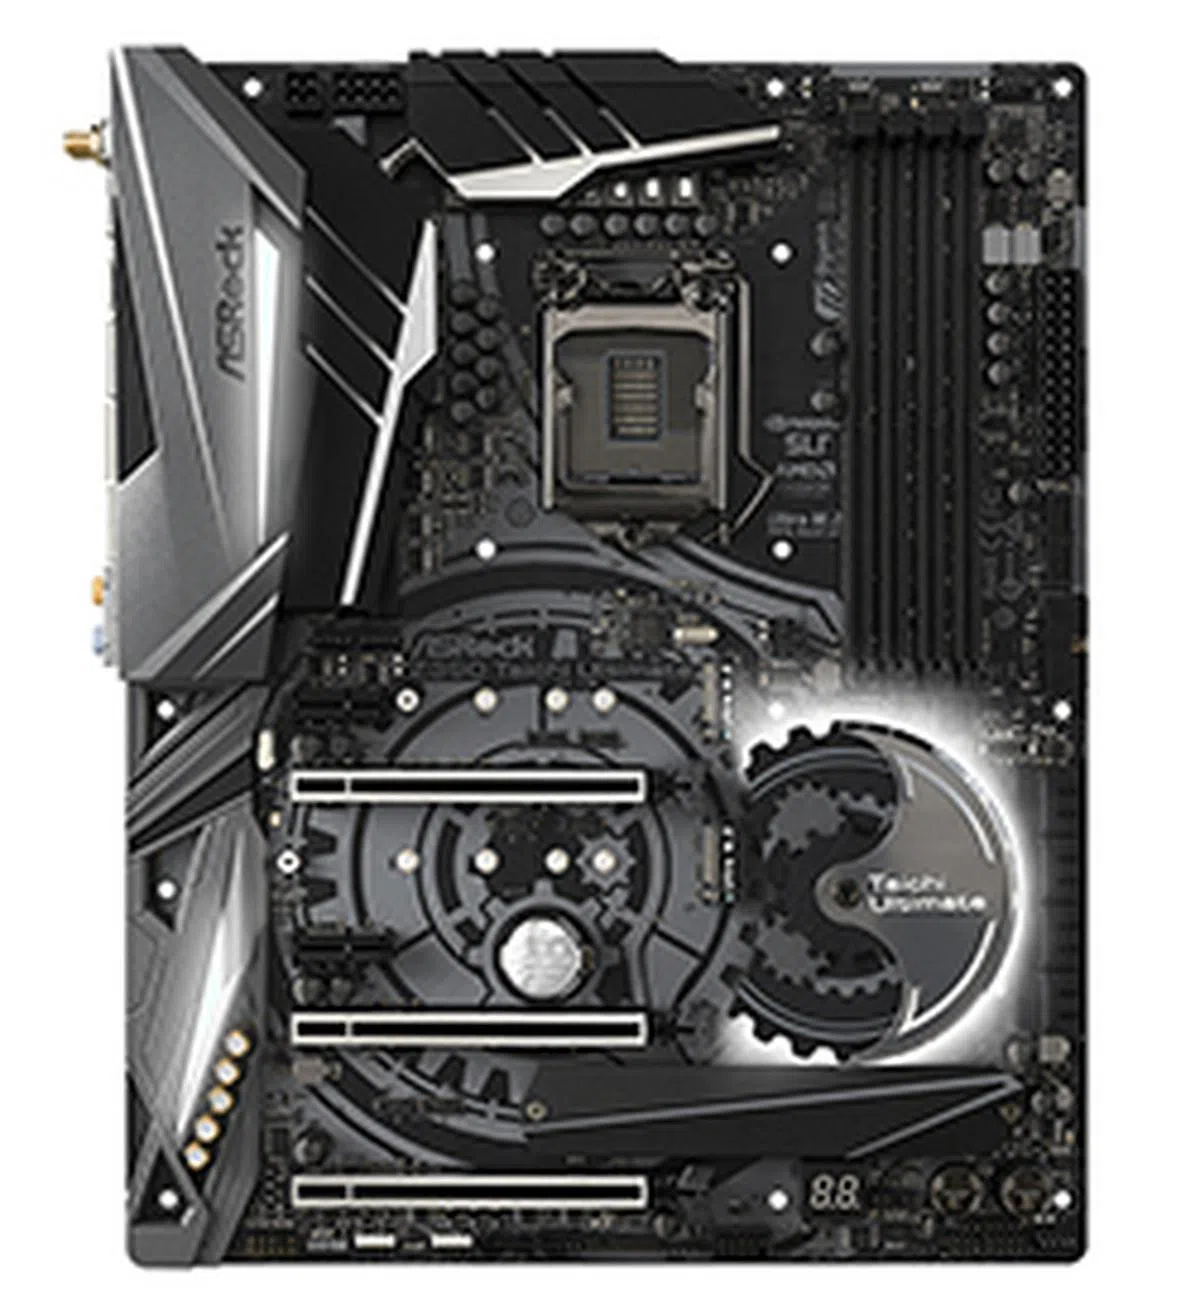
ASRock Z390 Taichi Ultimate

The Z390 Taichi Ultimate's strength lies in its storage and connectivity options.
The ASRock Z390 Taichi Ultimate is the most affordable motherboard in this shootout. At S$499, it is considerably cheaper than its competitors, so it’s shaping up to be a value-for-money option that’s crammed with a ton of flagship-level features.
That said, it still borrows heavily from the Z370 Taichi that came before it. Most of the slots and connectors follow the same arrangement, but a bunch of small upgrades has been made if you look closely. For instance, while the Z390 Taichi Ultimate also uses a 12-phase power design, the MOSFETs are now beefier 40A parts compared to the Z370 Taichi’s 30A components. In addition, the heatsink over the MOSFETs is now larger.

The board sports a 12-phase power design.
On top of that, ASRock also built a 4-pin power CPU power connector to supplement the existing 8-pin connector. In comparison, the other more pricey boards have dual 8-pin connectors here. Compared to the Z370 Taichi, the Z390 Taichi Ultimate adds more fan connectors as well. It now has eight 4-pin headers (including a dedicated water pump connector), up from five from before.

There's just an extra 4-pin power connector for the CPU.
All these changes were probably made with the octa-core Core i9-9900K in mind. Its combination of a high core count and high clock speeds translate into higher voltage levels and increased power draw, so the power circuitry had to be beefed up to better accommodate that.
There have been cosmetic upgrades as well, and the plastic I/O shroud is now outfitted with RGB LEDs that you can customize using ASRock’s Polychrome Sync software. That said, the unique cogwheel design makes a reappearance here again, and the PCH heatsink gives the impression of being comprised of several gears stacked together.

The aesthetic of the Taichi board hasn't changed that much from previous generations and the Z390's take is the most sophisticated yet.
Despite the upgrades to the I/O shroud, this board also remains one of the more plain-looking ones in this shootout. That’s not necessarily a bad thing, but you’ll still be able to dress your system up with extra LEDs with two RGB headers and one addressable LED header onboard.

Two of the RGB headers are located below the bottom PCIe slot.
Another notable change is that the rear USB 3.1 (Gen 2) ports are now being provided directly by the Z390 chipset, which eliminates the need to use any third-party USB controllers for this. However, that’s not to say that the board doesn’t use any third-party controllers at all, and ASRock is relying on the ASMedia ASM1074 hub to provide additional USB 3.1 (Gen 1) headers. A front panel USB 3.1 (Gen 2) Type-C header is also present, courtesy of an ASMedia ASM1562 retimer.
On the storage front, you get three M.2 sockets, but only the one at the bottom comes with a dedicated heatsink. It’s located the furthest from the PCIe slot where you’re unlikely to install your GPU, so this is clearly ASRock’s way of minimizing thermal throttling for your primary drive. All three M.2 sockets also share lanes with specific SATA ports, so if you do install a SATA M.2 drive, you’ll need to check to see which of the eight SATA 6Gbps ports you can no longer use.

The board has eight SATA 6Gbps ports, more than any of the others reviewed here.
Networking options are pretty robust as well. In fact, this is one of the most feature-rich boards in this area, nearly bordering on overkill. The Z390 Taichi Ultimate has no fewer than three LAN ports, comprising two Intel-based Gigabit Ethernet jacks and one 10G port provided by an Aquantia AQC107 controller. The Intel controllers are the I219-V and I211-AT, and they both support teaming functionalities.
This is also where the board differs from the non-Ultimate Z390 Taichi below it. The latter lacks the 10G LAN port, so if you turn out to have a fast enough internet connection, the Taichi Ultimate is the board you want.
On top of that, the Taichi Ultimate boasts upgraded Wi-Fi capabilities. The 2x2 module supports a maximum throughput of up to 1,733Mbps and MU-MIMO, so it’s also compatible with the latest 802.11ac Wave 2 routers.
The rest of the rear panel includes three USB 3.1 (Gen 2) Type-A, one USB 3.1 (Gen 2) Type-C, and four USB 3.1 (Gen 1) Type-A ports. There’s even a legacy PS/2, but most folks probably won’t ever use it. Finally, a tiny clear CMOS button sits at the back as well, a far more convenient location than if it were on the board PCB itself.

Here's a look at the rear I/O ports.
There are also dedicated power and reset buttons at the bottom right corner of the board, which is helpful for enthusiasts using it in an open test bench. The debug LED is found in this area as well, and it’s a useful tool for troubleshooting system errors.

The power and reset buttons are found at the bottom right.
Finally, the Purity Sound 4 audio utilizes Realtek's ALC1220 audio codec and features individual PCB layer for better left/right audio channel separation. You'll also find Nichicon Fine Gold series audio capacitors here, in addition to a TI NE5532 headphone amplifier that's capable of driving audiophile-grade headsets up to 600 ohms.

The Nichicon audio capacitors can be seen here.
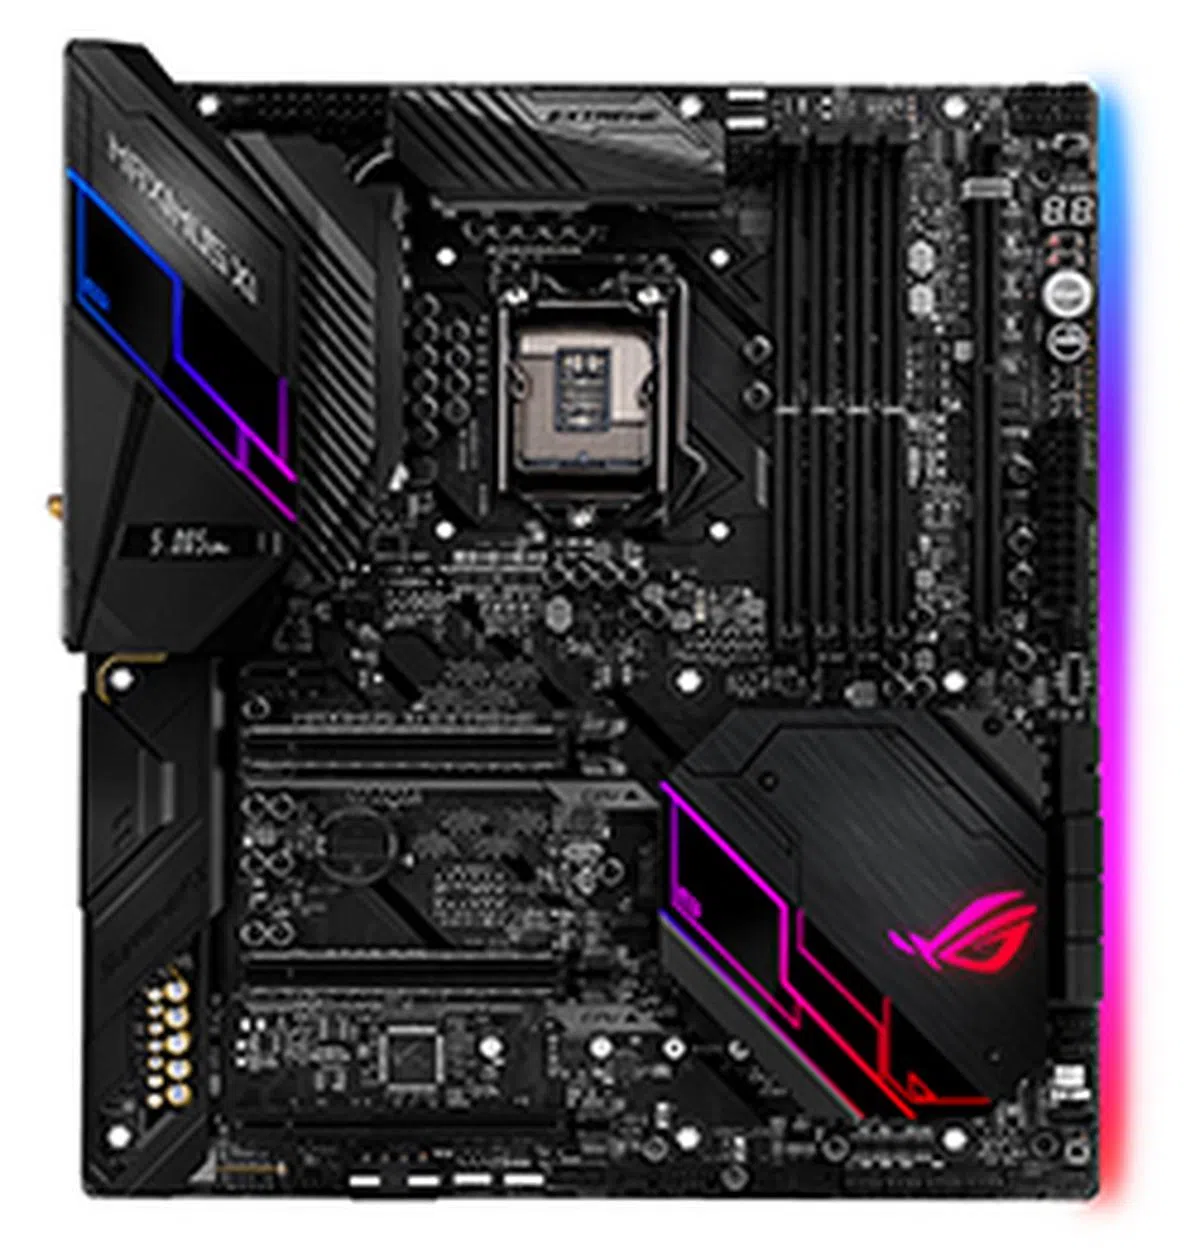
ASUS ROG Maximus XI Extreme

The ROG Maximus XI Extreme was made for extreme overclocking.
The ASUS ROG Maximus XI Extreme sits right at the top of ASUS’ Z390 line-up. The Extreme series has always represented the pinnacle of what the company has had to offer, and it’s often paired with a stiff price that only the most serious of enthusiasts would cough up.
That said, this year’s Maximus XI Extreme is not in fact the most expensive motherboard in this shootout. At S$739, it’s cheaper than both Gigabyte’s and MSI’s offerings, so it’s not even the craziest offering you can spring for.
Still, this is an E-ATX board crammed with a bunch of premium features, many of which are geared toward overclockers. For instance, you get dual 8-pin power connectors for the CPU to ensure that the board can keep up with the higher voltages required. The board is also equipped with a 12-phase VRM design, and the MOSFETs and chokes are cooled by beefy VRM heatsinks that are connected to each other via a single heatpipe.

The board uses a 12-phase VRM design. Also, note the LiveDash OLED display on the I/O shroud that we've covered in detail later in the page.
More importantly, when I said that this is a board designed for overclocking, I really meant extreme overclocking. On the right side of the board, you’ll find an overclocking panel of sorts with DIP switches and dedicated start and reset buttons. Overclockers will find this super handy, as many of the buttons and switches are intended to help you tweak your overclocks and recover from failed settings.
For starters, there’s the Safe Boot and ReTry Buttons. The Safe Boot button forces the system to reboot into BIOS safe mode, where safe settings are temporarily applied to enable you to boot up. However, your overclocked settings are retained, so you can easily modify the settings causing boot failure. The ReTry button comes in when the reset button fails, and it forces the system to reboot continually with the same settings until a successful POST is achieved.

Most of the overclocking controls can be found right here.
Then there’s the Slow Mode switch, which only applies to LN2 cooling. Slow Mode decreases the processor frequency and helps stabilize the system during the extremely high clock speeds achieved during LN2 overclocking. There’s also an LN2 mode jumper, which activates LN2 mode and optimizes the motherboard to handle cold boot issues.
To cap things off, there’s of course dual onboard BIOS, and you can toggle between them using the BIOS button at the bottom right of the board, so you can test out different settings more quickly or recover more easily from failed overclocks.

The BIOS toggle button is located at the bottom right of the board.
A debug LED is located next to the OC panel, but there’s also four LEDs – each one corresponds to the CPU, DRAM, VGA, and booting devices – that will light up when an error occurs in their respective components. The latter provides an easier way to troubleshoot than looking up the error code in the manual, so I can see it coming in handy.
There are a total of 12 4-pin fan headers, which should be enough for most custom liquid-cooling setups. However, the CPU_OPT header is sandwiched between the VRM heatsink and the CPU_FAN header, and there doesn’t seem to be enough clearance for you to hook up a fan to it. Instead, I was forced to utilize the CPU_FAN header for my AIO pump.

There doesn't seem to be enough clearance around the fan headers here.
This isn’t a super big problem as the CPU_FAN header works as well, but it sure is annoying to have one header rendered useless because of the cramped design.
Elsewhere, you also get dedicated connectors for connecting sensors to monitor the temperature and flow rate of your liquid cooling system. There’s even a water block connector for monitoring the temperature, flow rate, and water leak signals of third-party water blocks.
ASUS has dispensed with the so-called armor covering the PCB that’s found on its Code and Formula boards, probably because of the Extreme’s focus on extreme overclocking. You’d have to remove them anyway, and that might explain why the metal backplate on the rear only covers half the board. Still, it does add a welcome bit of structural reinforcement.
That doesn’t mean that the Extreme isn’t visually striking though. The PCH heatsink and I/O shroud glow bright with LEDs, and there’s a subtle underglow on the board’s right edge as well. In addition, the LiveDash OLED display on the I/O shroud is a pretty unique feature that can display things like CPU temperature and clock speeds or even custom graphics. If you’d still like to add more flair to your rig, there are two 4-pin Aura RGB headers and two 3-pin addressable headers for third-party LED strips.
When it comes to storage expansion options, there are just two M.2 sockets. These are hidden underneath the PCH heatsink. They’ll take a bit more work to install, but it does give the board a cleaner look overall once you’re done. Only one of them supports SATA drives though, but they’ll both work with PCIe SSDs.

You'll have to remove the PCH heatsink cover to get at the M.2 sockets.

There six onboard SATA 6Gbps ports.
Should you still want extra M.2 sockets, ASUS has a DIMM.2 slot beside the RAM slots that will take ASUS’ DIMM.2 expansion card. This holds two more PCIe M.2 drives, and it’ll support SSDs up to 110mm long. However, if you do choose to make use of this option, the topmost PCIe 3.0 x16 slot will run in x8 mode only.

The DIMM.2 expansion card slots into the DIMM.2 socket next to the RAM slots.

One M.2 drive goes on either side of the card.
There’s a rich selection of high-speed USB ports at the rear, including one USB 3.1 (Gen 2) Type-C, three USB 3.1 (Gen 2) Type-A, and six USB 3.1 (Gen 1) Type-A connectors. The pre-mounted I/O shield also makes an appearance again, and really helps give the board a more robust appearance and simplifies the installation process. ASUS has included dedicated buttons for clearing CMOS and flashing the BIOS at the rear as well, and it’s nice to see key functions like these within easy reach.

A look at the rear I/O ports and the integrated I/O shield.
The Maximus XI Extreme is equipped with two LAN ports, comprising one Intel I219-V Gigabit LAN and an Aquantia AQC111C 5G port. It’s a little disappointing that there’s no 10G connector, but most users aren’t going to miss it anyway. In addition, there’s Wi-Fi built-in, courtesy of an Intel Wireless-AC 9560 chip that supports a maximum throughput of up to 1,733Mbps and MU-MIMO.
The onboard audio solution has been beefed-up as well, featuring the SupremeFX S1220 codec and an ESS ES9023P DAC. The front panel output is also driven by dual op amps, so you'll be able to power fairly high-impedance headphones from the front headphone jack as well. ASUS also went with Nichicon capacitors, which supposedly produce warmer and more natural sound.

The Japanese-made Nichicon capcitors can be seen here.
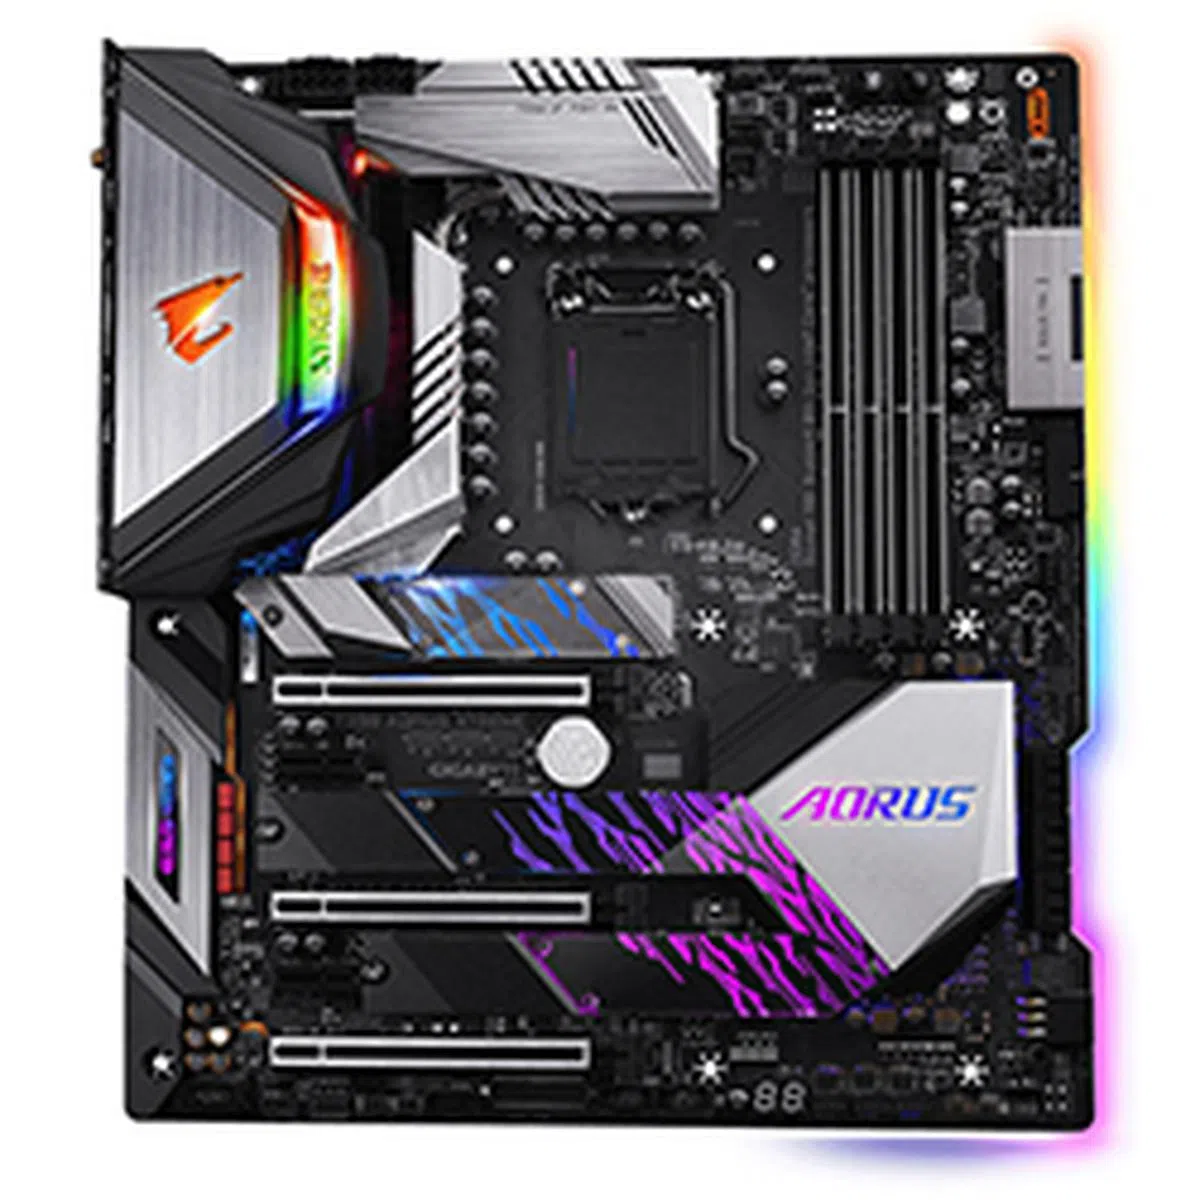
Gigabyte Z390 Aorus Xtreme

The Z390 Aorus Xtreme comes with plenty of customizable RGB lighting.
Gigabyte’s flagship Z390 motherboard stands tall in a very competitive field of Z390 motherboards. At S$799, it’s plenty expensive, but still cheaper than the MSI MEG Z390 Godlike. It comes packing a ton of features as well, including extensive overclocking features, powerful networking options, and plenty of RGB lighting.
Like most of the other boards in this shootout, the Aorus Xtreme’s main focus is overclocking. It has a 16-phase IR Digital VRM that’s in turn cooled by a massive finned heatsink, which should help keep the vital components running cool. The finned design is generally considered superior, as it provides additional surface area for heat dissipation.

The motherboard employs a 16-phase power design.
The rear of the motherboard is covered with a huge aluminum base plate for extra structural rigidity. It serves a purpose for cooling as well, with a thin layer of what Gigabyte calls nanocarbon that supposedly helps improve thermal dissipation. This helps channel heat from the board's components and the back of the PCB to the base plate, which doubles as a passive heatsink.

The back of the motherboard is covered by an aluminum baseplate.
One other thing I like is how the base plate interfaces with the PCB. It does so quite seamlessly, and Gigabyte filled out the gap between the metal and the PCB (it houses the RGB edge lighting) so it just feels like a single, thick edge. This means no sharp edges, unlike on the ASUS motherboard, and it really helps convey an impression of quality and robustness.

The thick edges of the motherboard make it really nice to handle during installation.
In addition, there are a total of eight fan headers onboard, but that can be expanded to 16 if you plug in the bundled RGB Fan Commander. All the fans support both PWM and DC fans as well, so you don’t have to worry about using the correct headers. The Smart Fan 5 software is pretty nifty as well, and you can create custom fan curves for each fan or set them to run in semi-passive mode for less noise when the system is idle.

The RGB Fan Commander lets you add even more fans to your system.
Gigabyte has also provided extra power connectors to supply power for the CPU and GPU during extreme overclocks. You’ll find two 8-pin CPU power connectors and a single 6-pin PCIe connector for the GPU. You probably won’t need these unless you’re pushing for super high overclocks, but they’re a nice addition for enthusiasts looking to take their hardware to the limits. The company says it uses solid pin power connectors as well, which provides a larger contact area for electricity and is better able to sustain higher power and heat.
Furthermore, the 6-pin PCIe connector is more smartly placed than the one on the MSI MEG Z390 Godlike. It is located at the bottom right edge of the board, so you don't have to snake your cables across the board to reach it.
The 24-pin connector is also angled to run parallel with the board, which could help make cable management look neater. That said, the orientation of the connector may pose a problem for certain custom extension cables, often a mainstay in high-end rigs. The clip is located at the top of the connector, but many custom cables are pre-bent in a way that best works if the clip were at the bottom. It’s not a super big problem, but it’s still something to take note of.

The 24-pin power connector sits parallel to the board.
Gigabyte also chose not to carve out an area on the board for dedicated overclocking controls like clock speed adjustments. Instead, it’s moved all that to a dedicated PCB in the form of the OC Touch Panel. This interfaces with the OC Touch connector at the bottom of the motherboard, and it houses controls for tweaking the BCLK and CPU core ratios. There are dedicated DIP switches as well for toggling the CPU’s integrated graphics and setting the board to boot at a safe frequency, or the lowest CPU ratio. In addition, you get six extra 4-pin fan headers and buttons for clearing the CMOS and battery.

The OC Touch Panel comes bundled with the motherboard.
That said, there are still some basic controls that you can fiddle with on the board itself, if you don’t want to bother with the OC Touch Panel. For instance, there are DIP switches to toggle between single or dual BIOS modes and switch between the main or backup BIOS. There’s also an OC button that lets you load up Gigabyte’s optimized overclocking configuration with just one click. Finally, the power, reset, and clear CMOS buttons sit at the top right hand corner.

The OC button provides a fast way to ramp up your CPU clock speeds.
A debug LED is located at the bottom of the board, where you’ll also find status LEDs that correspond to the CPU, DRAM, VGA, and boot device.

The debug LED is located at the bottom of the board.
On the storage front, you get six SATA 6Gbps connectors and three M.2 sockets. The bottom M.2 slot doesn’t support SATA drives however, but they’ll all take PCIe SSDs. In addition, they all have dedicated heatsinks to reduce thermal throttling.

All three M.2 sockets have their own dedicated heatsinks.
The Aorus Xtreme also has one of the richest selections of connectivity options. It is the only board here to feature not one, but two, Thunderbolt 3 connectors. On top of that, there are four USB 3.1 (Gen 2) Type-A, two USB 3.1 (Gen 1) Type-A, and two USB 2.0 ports. There’s also an HDMI output and two RJ-45 ports, one of which supports 10G Ethernet thanks to an Aquantia AQC107 controller.

This is the only board in the shootout to feature two Thunderbolt 3 ports.
Of course, there’s onboard Intel CNVi 802.11ac Wi-Fi as well, which supports a maximum throughput of up to 1,733Mbps.
Another useful feature is something Gigabyte calls USB TurboCharger. This is a front USB 3.1 (Gen 1) connector that hooks up an equivalent port at the front of your chassis. It supports Apple and Android devices that work with Quick Charge 3.0, a nice boon if you often charge your smartphone from your PC.
The audio circuitry is quite impressive as well. It features an ESS Sabre DAC and quality components like TI Burr-Brown op amps, WIMA capacitors, and an anti-pop circuit design to prevent annoying popping noises when plugging in or removing the audio jack. There’s also separate signal processing for the left and right audio channels for cleaner stereo sound.
To cap things off, this is one of the fanciest boards in terms of RGB lighting. The right edge of the board boasts an attractive underglow, and even the I/O shield and M.2 heatsinks are illuminated.
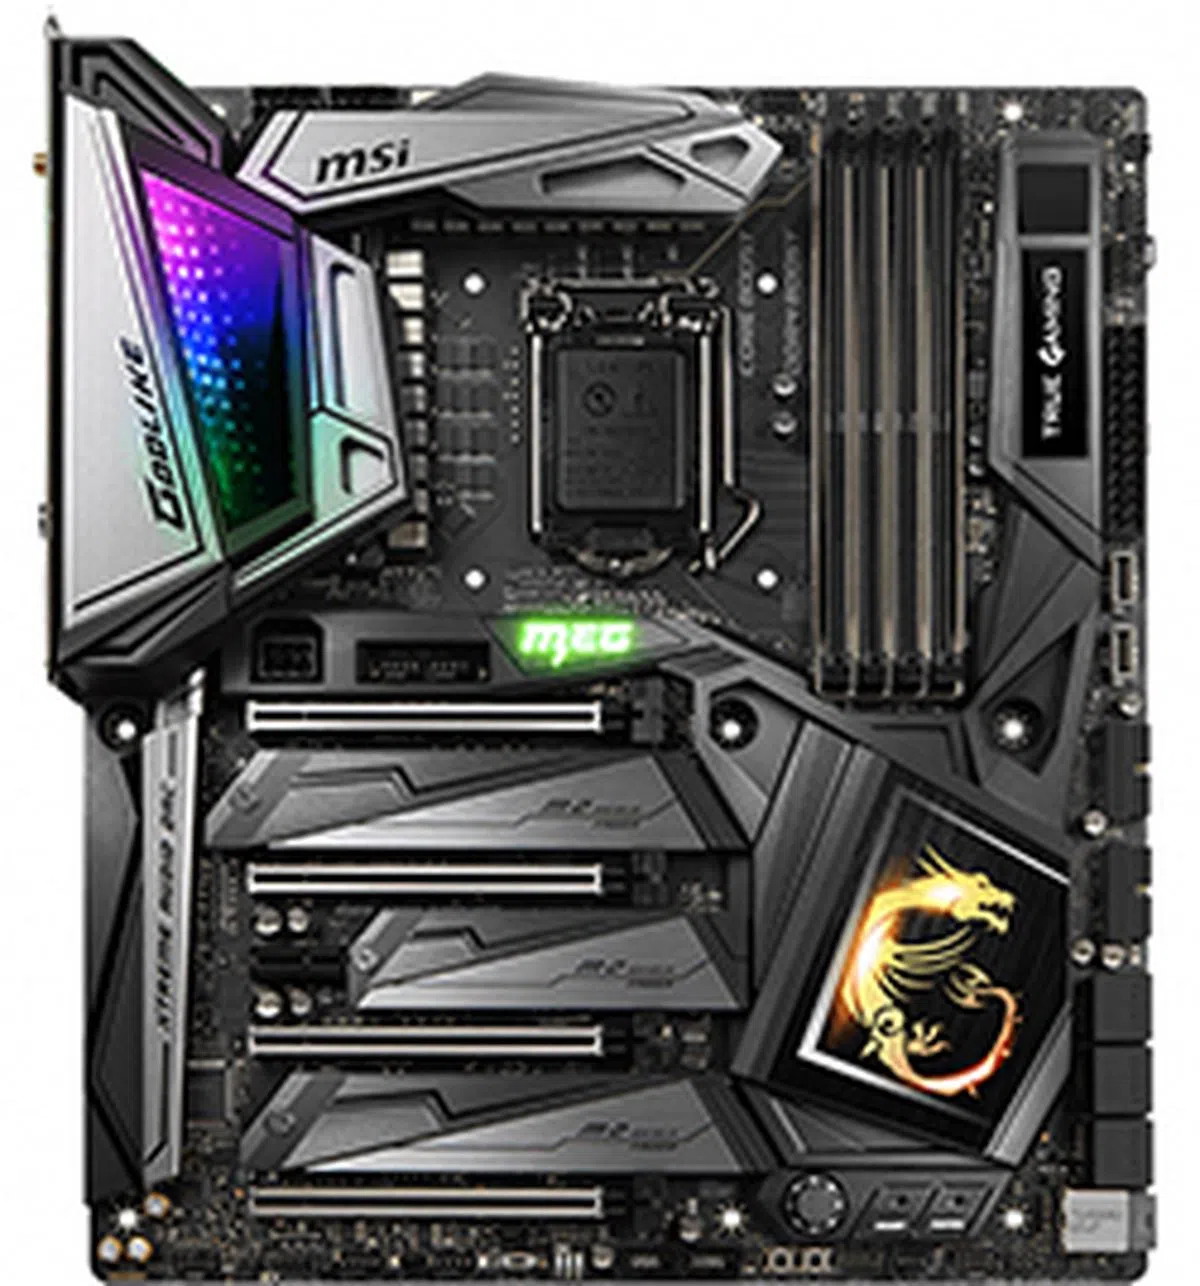
MSI MEG Z390 Godlike

The MSI MEG Z390 Godlike is one of the most feature-rich boards you can get.
The MSI MEG Z390 Godlike is all about spectacle. From its name down to its design (and yes, price), the Godlike wants to capture your attention. Its eye-watering S$859 price tag may not be so pleasing, but this is a motherboard that otherwise tries to cram in just about every feature an enthusiast could need.
This behemoth E-ATX board boasts an 18-phase VRM, with 16 phases dedicated to the CPU alone. In theory, more power phases means cleaner and more reliable power for the CPU, even though it’s often the quality of components and the method of implementation that matters. Either way, MSI’s power design looks impressive on paper, and I’d expect nothing less than top-notch components from a board of this price.

The Godlike board boasts an impressive 18-phase power design.
This is a board made for overclocking, and it also comes with two 8-pin power connectors for the CPU, in addition to an extra 6-pin PCIe graphics power input. The latter is targeted at heavy overclockers using multiple graphics cards, which is precisely the target audience of the Godlike motherboard. However, it’s located above the topmost PCIe 3.0 x16 slot, and it doesn’t seem like you’ll be able to get it connected without a ton of cable clutter.

The placement of the extra 6-pin PCIe power connector isn't optimal from a cable management perspective.
Like most of the other boards here, the VRM circuitry is cooled by massive heatsinks, which may pose a problem if you’re looking to install a really large air cooler. Still, most folks gunning for this tier of boards are likely to opt for an AIO liquid cooling solution, in which case, it shouldn't see too much of an issue.
The I/O shroud features what MSI calls Mystic Light Infinity, which takes the form of an incandescent light show that creates the feel of an infinity mirror when you peer into its depths. In the flesh, it’s stunning, and it’s one of the more unique RGB lighting effects I’ve seen on a motherboard today. The right of the board also houses the Dynamic Dashboard, which comprises an OLED display, much like the one on the ASUS ROG Maximus XI Extreme, and a debug LED display.

The OLED display and debug LED are located to the right of the RAM slots.
The OLED display can show useful information such as CPU clock speeds, temperature, and even error messages. Alternatively, you can upload your own animated GIFs using MSI’s software to make the board truly your own.
You’ll also find four EZ debug LEDs in the area, and they’ll light up when there’s a problem with the CPU, DRAM, VGA, or boot device.
The bottom right corner of the board houses the Game Boost knob, dedicated power and reset buttons, and a bunch of overclocking-related controls. The Game Boost knob is a feature that remains unique to MSI, and it lets you manually select an overclocking stage from 0 to 11. The processor’s voltage and frequency will be automatically adjusted after you power on the PC. Of course, a successful overclock is not guaranteed, and it’ll very much depend on the chip you have and your cooling solution.

The Game Boost knob lets you easily overclock your CPU with step-by-step gradations.
On top of that, MSI has included dedicated buttons for forcing the system into BIOS (without showing any failed overclock message) and retrying your OC settings until a successful boot. A dual BIOS switch, a Slow Mode booting jumper, and 10 fan headers round off the main feature set.
Those looking to set up a custom liquid cooling loop will also appreciate the 3-pin water flow header and dual 2-pin thermal sensor connectors.
Having said that, MSI really decided to cram in just about every feature it can think of. In addition to the six SATA 6Gbps and three M.2 sockets, it’s also included a U.2 port that has also been reinforced with metal. All three M.2 sockets have their own dedicated heatsinks as well, and they all support both PCIe and SATA devices. That’s not all though, and there are heatsinks beneath each slot as well, so MSI clearly put in a lot of effort to ensure that your drives run cool.

All three M.2 sockets are sandwiched between PCIe slots.
The M.2, SATA, and U.2 ports share PCIe lanes though, so you’ll want to check the board’s manual for a combination you can use.

There's also a U.2 port, but most folks probably won't use it.
Round the back, you’ll find an integrated I/O shield and plenty of ports and connectors. There are a total of two USB 3.1 (Gen 1) Type-A, three USB 3.1 (Gen 2) Type-A, one USB 3.1 (Gen 2) Type-C, and two Gigabit LAN ports powered by dual Killer E2500 controllers. Another nice touch is the dedicated 6.3mm headphone jack, which should help accommodate a range of high-end headphones without the need for an adapter.

Here's a look at the rear I/O panel.
There’s support for onboard Wi-Fi as well, by way of a Killer Wireless-AC 1550 adapter that supports a maximum throughput of up to 1.73Gbps. The only thing missing is a 10G LAN port, a surprising omission given everything else MSI has thrown in.
Finally, the Godlike comes with not one, but two, expansion cards. The first is the M.2 Xpander-Z, a PCIe card that provides two more M.2 sockets. That’s a nice bit of added flexibility to have, but what really stands out is the Streaming Boost capture card. It basically lets you plug an HDMI output from another PC, console, or even phone into the card and stream directly from there. Casual users won’t have much use for it, but those looking to get serious about streaming could definitely have some use for it.

MSI made a nice attempt to value-add with two bundled expansion cards.
Test Setup
This is the test configuration for our Intel Z370 motherboard shootout:
- Intel Core i9-9900K (3.60GHz, 16MB L3 cache)
- Thermaltake Water 3.0 360 Riing RGB Edition
- 4 x 8GB G.Skill Ripjaws V DDR4-3000
- NVIDIA GeForce RTX 2080 Founders Edition (GeForce Driver Version 417.35)
- Samsung 860 EVO 500GB SSD
- Windows 10 Home (64-bit)
Here’s also a list of our tested boards for easier reference:
- ASRock Z390 Taichi Ultimate
- ASUS ROG Maximus XI Extreme
- Gigabyte Z390 Aorus Xtreme
- MSI MEG Z390 Godlike
Benchmarks
The list of benchmarks we used is as follows:
- SYSmark 2018
- SPECviewperf 13
- Cinebench R15
- 3DMark
- Ashes of the Singularity: Escalation
- Deus Ex: Mankind Divided
Motherboard features comparison table
[hwzcompare]
[products=654642,654687,654691,654695]
[width=200]
[caption=Test motherboards compared]
[showprices=1]
[/hwzcompare]
Benchmark performance
SYSmark 2018
SYSmark is a general productivity benchmark suite that measures the response times of tasks on a PC using real-world applications like Microsoft Office 2016 and Adobe Photoshop CC and simulated user input. Task response times are used to generate a performance rating that reflects actual user experience, so the faster a PC responds to application workloads, the higher its score will be. The method of measuring response times can take many forms, such as the time it takes for an application to show a pop-up completion message, or how long it takes a progress dialog to disappear and for a user to regain application control.
SYSmark 2018 measures performance in the areas of Productivity, Creativity, and Responsiveness, featuring new, updated applications that better reflect modern usage scenarios.
The ASUS ROG Maximus XI took the lead here, but its advantage was a mere 4 per cent ahead of both the ASRock and Gigabyte boards. For the most part, the boards were pretty evenly matched, and that's something you'll see with the rest of the results. Given that these boards are all the flagships of their respective line-ups, they probably all use top-end components, so there's little to differentiate them in terms of raw performance.


SPECviewperf 13
SPECviewperf is used to assess the 3D graphics performance of systems in professional applications. Each individual workload, called a viewset, represents graphics and content from an actual real-world application. SPECviewperf actually runs a total of eight different viewsets, but we’ve picked the four which have the greatest performance variation across CPUs display here.
The new SPECviewperf 13 incorporates new models and raycasting for volume visualization. The Maya viewset has also been updated with new models based on the SPECapc for Maya 2017 benchmark. All other viewsets have also been recompiled with minor changes.
It's worth noting that the Gigabyte board performed slightly behind the pack here, with larger differences in the 3ds-max-06 and maya-05 viewsets. But even then, it lagged by around 5 per cent or so at most, which isn't really something to get upset about.

Cinebench R15
Cinebench is a benchmark tool used to compare CPU performance across different systems, so we’ll be using it to evaluate how well the Core i9-9900K plays with the different motherboards. The multi-threaded test scenario uses all of the system’s processing power – it can utilize up to 256 threads – to render a photorealistic 3D scene, making use of various algorithms to stress all available processor cores. Conversely, the single-core test stresses just one core.
Once again, performance was really similar across the board in Cinebench, and the variances between the scores are small enough to be attributed to the differences across test runs.

3DMark
3DMark is a synthetic gaming benchmark that tests graphics and computational performance at different resolutions, starting at 1080p and going all the way up to 4K. A series of two graphics test, one physics test, and then a combined test stresses your hardware in turn to assess its performance.
There's again little to remark on here, with virtually no significant differences to be found between the boards.

Ashes of the Singularity: Escalation
Ashes of the Singularity is one of the few CPU-bound games out there, if you’re playing on lower resolutions and settings that is.
Motherboards have never played a super huge role in determining gaming performance, so it should really come as no surprise that the boards are so evenly matched here. Put simply, when you're choosing between these boards, it'll come down to things like design and features more than gaming performance.


Deus Ex: Mankind Divided
The story repeats itself in Mankind Divided, where all four boards turned out numbers within a frame or two of each other.

Temperature, power consumption & overclocking
Temperature
We measured the temperatures of the VRM and PCH heatsinks after running 40 loops of the 3DMark Fire Strike Stress Test. You’ll naturally want lower temperatures since it shows that the respective heatsinks are doing a more effective job of dissipating heat.
The VRM heatsink temperatures are also of particular importance, as they play a key role in cooling the MOSFETs, which can get seriously hot as they pass through high currents as they step down the 12V from the 8-pin CPU power connector to the chip's stock voltage. This affects efficiency and overclocking stability, and is why enthusiasts sometimes opt for liquid cooling for the best results.
The ASUS motherboard probably had the best overall result here.

Power consumption
To test power, we ran the energy-02 viewset in SPECviewperf 13 and recorded the peak power consumption. Idle power consumption was recorded after the system had idled at desktop for a while.
Power consumption numbers are pretty similar as well, but what's surprising is the relatively higher peak power consumption on the ASRock Z390 Taichi Ultimate, considering that it technically had the fewest features of the lot.

Overclocking
The table below shows the clock speeds we achieved, along with the CPU vCore, multiplier, and RAM frequencies. We've also included the respective BIOS versions of the boards for those who are keen to know such details.
Model | BIOS version | Maximum CPU Core Ratio Achieved | BCLK (MHz) | Vcore (V) | RAM frequencies (MHz) | Maximum Overclock Achieved (GHz) | LLC |
ASRock Z390 TaichiUltimate | 1.6 | 50 | 100 | 1.37 | 3000 | 5.0 | Level 2, Auto |
ASUS ROG Maximus XI Extrene | 0602 | 51 | 100 | 1.38 | 3000 | 5.1 | Level 5 |
Gigabyte Z390 AorusXtreme | F4 | 51 | 100 | 1.37 | 3000 | 5.1 | High |
MSI MEG Z390Godlike | 7B10v13 | 51 | 100 | 1.385 | 3000 | 5.1 | Level 5 |
The Gigabyte Z390 Aorus Xtreme had the best overclocking performance. Even though it achieved the same 5.1GHz clock speed as the ASUS and MSI boards, it was able to make the best of it and produce the largest performance increase. The ASUS board was pretty disappointing, as it managed just a meager 2 per cent improvement.
However, the ASUS ROG Maximus XI Extreme provided the best overclocking experience with the most intuitive BIOS interface. All the important controls were located in the same section, eliminating the need to constantly move between different sub-menus.

Conclusion
The Z390 chipset isn't a whole lot different from what Z370 offers, which puts the onus on board manufacturers to switch things up with new designs and more features to entice users. This takes many forms, so you could see everything from additional expansion card options to fancy OLED displays and even more RGB LEDs. It's especially important to form a compelling argument with beefed-up power delivery circuits as well, since the Core i9-9900K will also work with more affordable Z370 motherboards.
Still, when comparing high-end motherboards like the ones reviewed here, the performance numbers barely tell the full story. They're all neck-and-neck in the benchmarks, so the best board is really the one that offers the most compelling mix of features and performance for power users.
Model | Features | Performance | Value | Overall | Price (S$) |
ASRockZ390 TaichiUltimate | 7.5 | 8.0 | 8.0 | 8.0 | $499 |
ASUS ROG Maximus XI Extreme | 8.5 | 8.5 | 7.5 | 8.5 | $739 |
GigabyteZ390 AorusXtreme | 9.0 | 8.5 | 7.5 | 8.5 | $799 |
MSI MEG Z390Godlike | 9.0 | 8.5 | 7.0 | 8.5 | $859 |
And the winner is...
Gigabyte Z390 Aorus Xtreme

Image Source: Gigabyte
The Gigabyte Z390 Aorus Xtreme just screams quality. From its tank-like construction to its beefy, finned VRM heatsinks, the board just feels like an excellent product that's armed to the teeth with useful features. There are thoughtful inclusions like the front USB connector that supports fast charging, in addition to a convenient one-touch OC button and two Thunderbolt 3 ports. The plethora of fan headers and temperature and flow sensors also means that you have plenty of tools to get a custom liquid-cooling setup going, which will pair nicely with the board's strong overclocking capabilities. To cap things off, it also has additional power connectors for both the CPU and graphics cards to better support high overclocks. It's expensive at S$799, but it more than justifies it with good design and performance, which is why we're making it the winner of this shootout.
ASRock Z390 Taichi Ultimate

Image Source: ASRock
At S$499, the ASRock Z390 Taichi Ultimate is the most affordable motherboard in this shootout. However, you do get what you pay for, so the Taichi Ultimate isn't as feature-rich as its rivals. For starters, it has a more modest 12-phase power design and is missing small luxuries like an integrated I/O shield, a dedicated heatsink for each of its M.2 sockets, or onboard overclocking buttons and switches. It's also considerably plainer than the others, and you're not getting any snazzy OLED displays or infinity mirror effects. However, its strength lies in its networking and storage expansion options, including eight SATA 6Gbps ports and three M.2 sockets. It also has three RJ-45 ports, comprising two Intel Gigabit Ethernet ports and one Aquantia 10G port. If overclocking is not a priority for you, this board is a pretty value-for-money option.
ASUS ROG Maximus XI Extreme

Image Source: ASUS
The ASUS ROG Maximus XI Extreme was designed with extreme overclocking in mind. Everything was designed to make it easier for LN2 overclockers, which is why ASUS stripped the board of the "armor" found on the Formula model. There's also an area on the board dedicated to all the overclocking controls and DIP switches, including Safe Boot and ReTry buttons, a Slow Mode switch, and an LN2 mode jumper. However, it wasn't the best performer in the overclocking department, and it doesn't really stand out in any particular way from the competition other than its polished BIOS made for overclockers. The LiveDash OLED display is pretty neat, but the MSI MEG Z390 Godlike has something similar as well. It may be crammed with a ton of features, but at this price point, the same goes for the Gigabyte and MSI boards. At S$739, it's somewhat more reasonably priced than the latter two motherboards, but if you just need a board that gets the basics and core overclocking tools pat down, the ASUS ROG Maximus XI Extreme is a pretty good option considering its asking price.
MSI MEG Z390 Godlike

Image Source: MSI
The MSI MEG Z390 Godlike lives up to its name in more than one way. Its S$859 price tag is not for the faint of heart, and MSI has thrown in just about every feature it can think of. It has an impressive 18-phase VRM, additional power connectors for both the CPU and graphics cards, and plenty of storage expansion options, including a U.2 connector. MSI is also bundling two expansion cards with the M.2 Xpander-Z and the Streaming Boost capture card, a nice attempt at appealing to storage fiends and streamers. The Game Boost knob is also pretty unique, but most enthusiasts will opt to overclock manually anyway. There's no denying that this is a spectacular specimen of a motherboard, but its approach to feature inclusion feels slightly ham-handed, and it seems like Gigabyte has a better selection of features that more users will be able to take advantage of.
 | |
 | |
 | |
 |