Intel Z370 motherboard shootout: New CPUs, new boards
Intel's new 8th-generation processors are pretty great, but you'll need a Z370 motherboard to use them. That said, which motherboard is the best?

You'll need a new Z370 board to run Intel's Coffee Lake chips.
Intel’s 8th-generation processors are veritable multi-threading and gaming beasts, boasting more cores and threads across the entire line-up. The Core i7-8700K tears through triple A titles and content creation tasks with ease, and it’s the first time we’re seeing a mainstream Intel processor with a tantalizing six cores and 12 threads.
There’s just one snag in the scheme of things – you’ll need a new Intel Z370 motherboard to use the new CPUs, even though they’re based on the same LGA 1151 socket as the 7th-generation chips.
That’s because Intel had to make certain under-the-hood tweaks to accommodate the higher core counts and power requirements of the new processors. For example, board makers have had to implement more robust power delivery designs, changes to the CPU package power delivery, and even tighter memory routing for the higher-speed DDR4-2666 memory.
In other words, you’re out of luck if you were hoping to drop a Coffee Lake CPU into your Z270 motherboard.
It’s just a pity that the Z370 chipset doesn’t come with that many new features, although you do get support for per-core overclocking and real-time memory latency controls (which eliminates the need to reboot every time). Motherboard manufacturers have also attempted to value-add with new features, such as additional M.2 heatsinks and more ways to dress up your system with RGB LEDs.
That said, which Z370 board is the best? We’ve rounded up models from ASRock, ASUS, Gigabyte, and MSI to try to answer that question.
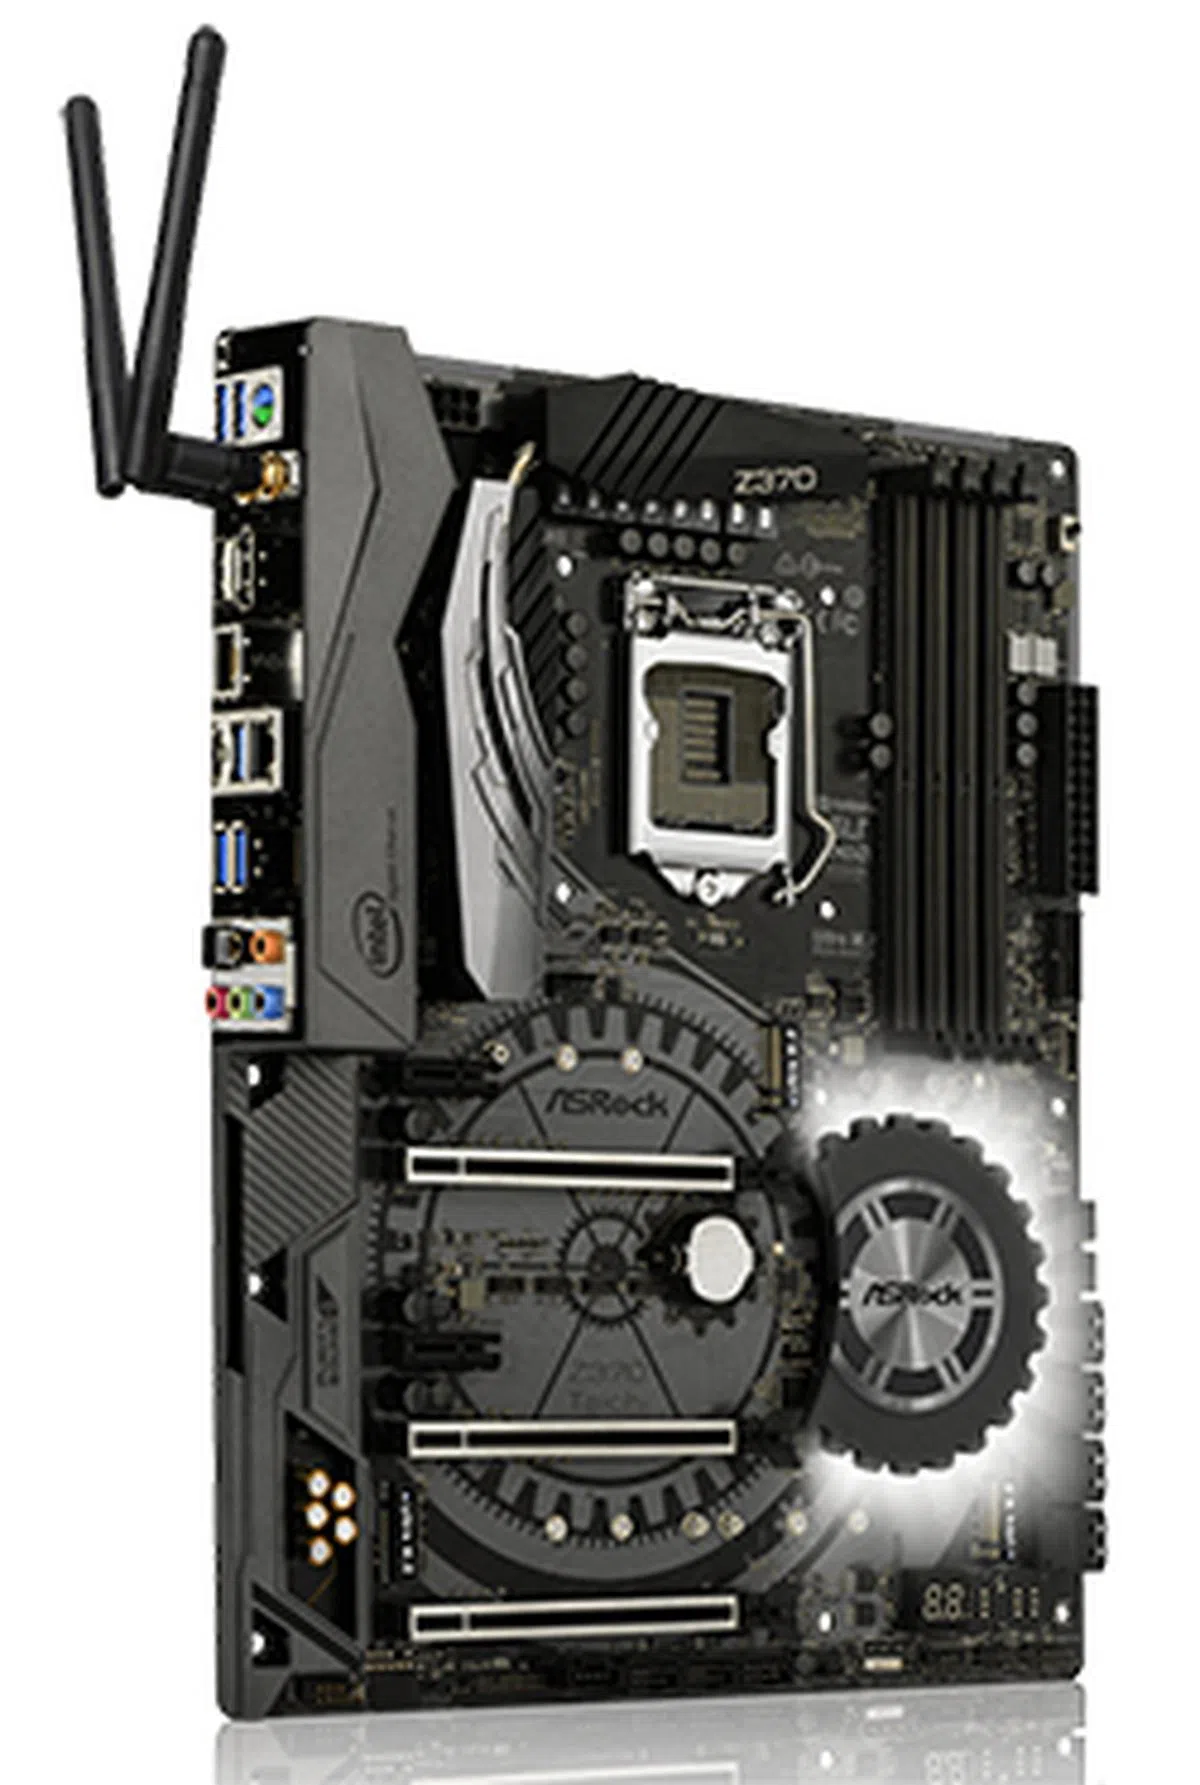
ASRock Z370 Taichi

The ASRock Z370 Taichi finds a nice balance between price and features.
ASRock’s Z370 Taichi is a well-rounded board with great mass market appeal. It combines a rich selection of features with a very palatable price tag, so it quite effectively straddles the line between the mainstream and enthusiast markets.
It comes with most of the features you’d expect, including three metal-reinforced PCIe 3.0 x16 slots, eight SATA 6Gbps ports, and three M.2 sockets. That’s more than enough expansion options for most users, and the eight SATA ports is actually two more than most boards usually offer, thanks to the ASMedia ASM1061 controller.

ASRock has included a total of eight SATA 6Gbps ports, two more than the average board.
However, the Z370 chipset comes with just 30 high-speed input/output (HSIO) lanes which have to be divvied up as PCIe, SATA, and USB 3.0 connections. The three PCIe 3.0 x16 slots get their lanes directly from the CPU, so they’re exempt from the equation, but that still leaves plenty of M.2, SATA, and USB ports to be serviced. Resources have to be shared, so you won’t be able to use all the ports at once.

All three PCIe 3.0 x16 slots are reinforced with metal.
For instance, the first and second M.2 sockets each share lanes with two SATA 6Gbps ports. If either one of them is in use, the other will be disabled. Furthermore, if the third M.2 socket is occupied by a SATA drive, a fifth SATA port will be put out of commission. Most folks won’t have enough drives to notice these conflicts, but it’s something to take note of especially if you intend to install up to three M.2 devices.
In addition, the board features onboard Wi-Fi, which is a nice inclusion given that the pricier ASUS and Gigabyte boards don’t offer it. Most gamers will probably opt for a wired connection, but the added flexibility could come in useful, even if it is a 1x1 module that only supports speeds up to 433Mbps.
The Z370 Taichi is also equipped with dual Intel Gigabit LAN ports that support teaming, so this is one of the most fully featured boards when it comes to networking and storage options.
The board ships with dual onboard BIOS as well, a much appreciated feature at this price point. You’ll have to fiddle with a pair of jumper pins to force the system to boot from the backup BIOS, but this will prove useful when recovering from failed overclocks. Enthusiasts will also appreciate the CLR_CMOS button on the rear I/O panel, so you can easily reset the BIOS settings to their factory defaults.
A switch at the top-right corner enables XMP mode, and there’s a debug LED display to help with troubleshooting.

A debug LED at the bottom right helps with troubleshooting.
The onboard audio circuitry features the usual upgrades that you’d expect, including individual PCB layers for the left and right audio channels and shielding to help isolate the circuitry from interference from the rest of the board. You also get a dedicated TI NE5532 headset amplifier that can power high-impedance headsets of up to 600 ohm.
Unfortunately, that’s where the buck stops in catering to power users. The board is conspicuously missing any physical power or reset buttons, and you get just a single RGB LED header. And while other boards are clad from head to toe in LEDs, it’s only the PCH heatsink that is sporting RGB LEDs on the Taichi.
The 10+2-phase power design is technically comprised of a true 5+2 implementation, where the main CPU rail gets 5 PWM channels. However, each channel outputs to two MOSFET drivers, which effectively doubles the phase count from 5 to 10 for the CPU vCore and gives each phase its own driver.

The board uses a 10+2-phase power design for the CPU and iGPU.
There are just five onboard fan headers, a rather modest number, but the good thing is that they offer hybrid control and can automatically detect whether you’ve got a PWM or DC fan installed (with the exception of the CPU fan header, which operates in PWM mode by default).
Two of the headers also double as water pump headers and can offer up to 1.5A of current, but there’s no high amperage header for up to 3A as on some of the other boards.
The selection of USB ports on the rear I/O is a bit sparse, and you get just four USB 3.1 (Gen 1) Type-A and two USB 3.1 (Gen 2) Type-A and Type-C ports, the latter of which are provided by a separate ASMedia ASM3142 controller. This is the latest controller from ASMedia, and it provides the same dual-lane design as the ASM2142, which enables all ports to enjoy peak bandwidth even when multiple devices are plugged in, but at a much lower power draw.

The board could do with more USB ports at the rear.
That said, ASRock is also providing an internal header by way of a second ASM3142 controller that links up to a front USB 3.1 (Gen 2) Type-C port, thus ensuring compatibility with some of the latest cases.
All things considered, the Z370 Taichi is for the casual user who wants all the essential features and then some. But if you’re looking to get in some serious overclocking with a slick liquid cooling setup or LN2 cooling, you may be better served by looking elsewhere.
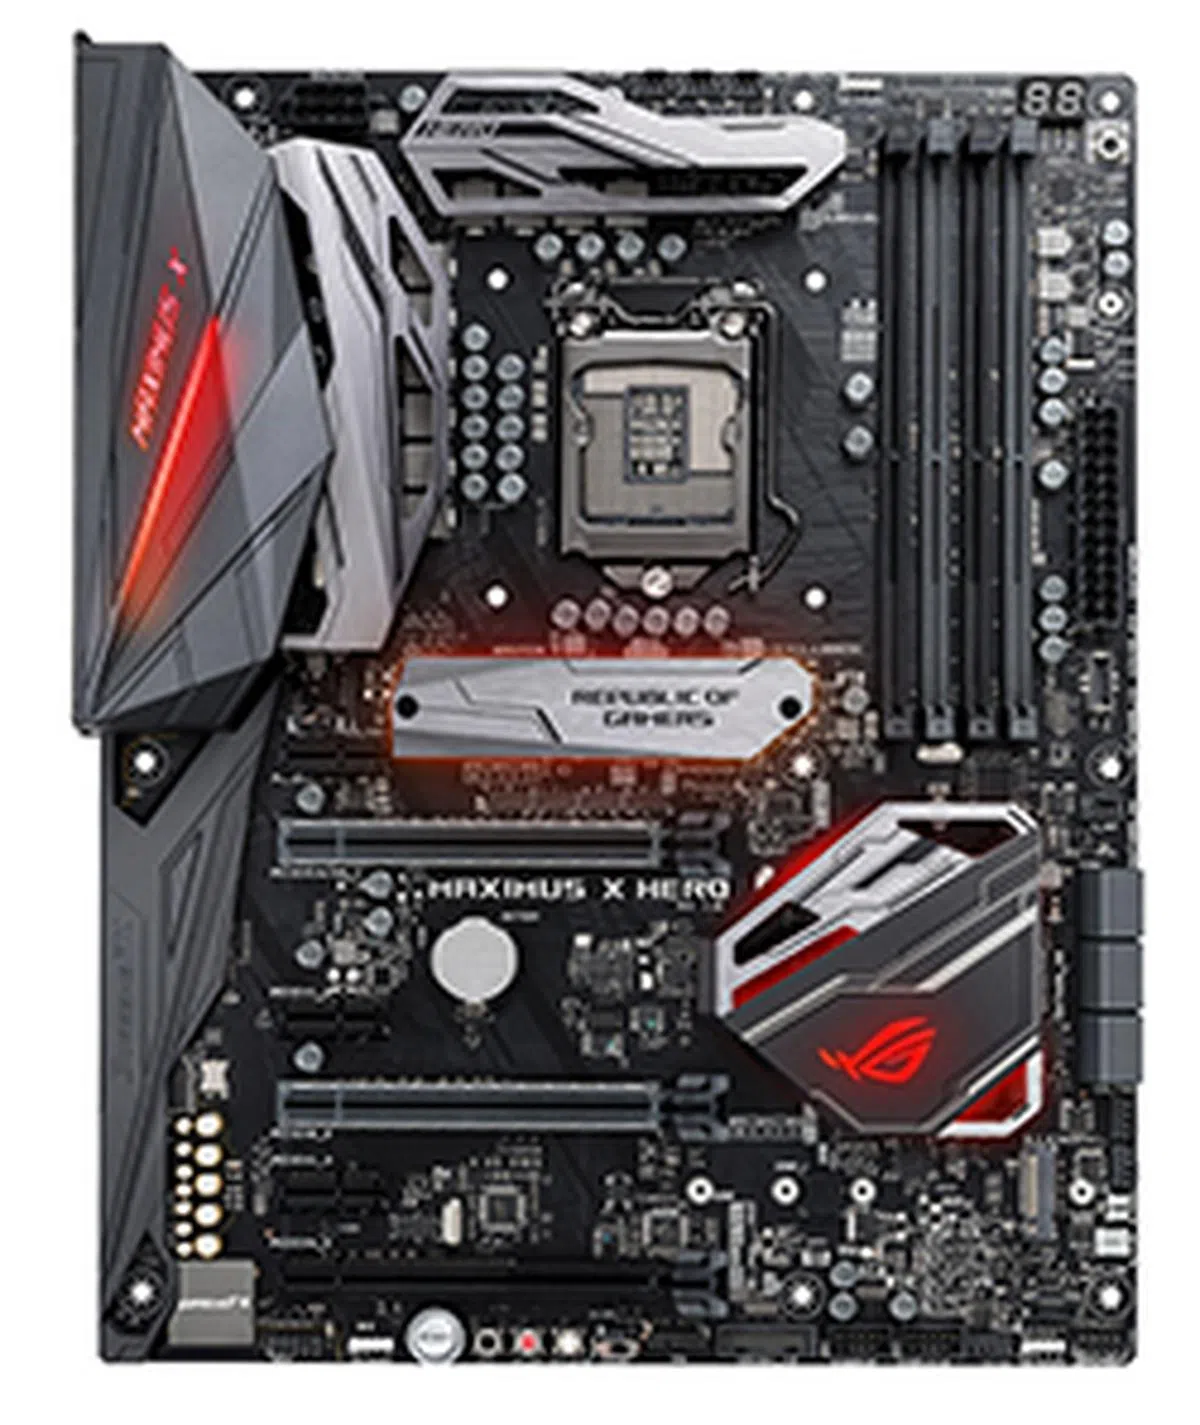
ASUS ROG Maximus X Hero

The ASUS ROG Maximus X Hero is one of the most feature-rich boards in this shootout.
The ASUS ROG Maximus X Hero sits in something of a sweet spot between the mainstream and enthusiast market. To be sure, it skews more toward the latter, but it manages that without an exorbitant price tag that will require you to sell a limb. Even though it is still the most expensive board in this shootout at S$519, it makes up for that with plenty of useful features and an attractive design.
For starters, overclockers will appreciate the hardware controls, including Safe Boot and ReTry buttons and a Slow Mode switch for those looking to push their chips further with LN2 cooling. There’s decent support for liquid cooling as well, with dedicated headers for both AIO and custom pumps.

You'll find the Safe Boot and ReTry buttons at the bottom of the board.
What’s more, you get a so-called water-cooling zone, where you’ll find a flow rate tachometer, two in/out water temperature sensor headers and an integrated water block sensor connector.
The board features a total of eight fan headers, all of which can automatically detect whether you’ve got a PWM or DC fan installed. There are also two high amperage fan headers that can supply up to 3A of current, one of which is the aforementioned dedicated water pump header.

The flow rate and pump headers are located at the bottom right of the board.
ASUS’ Fan Xpert 4 control system offers fine-grained control over each fan, and you can peg fan speeds to a range of sources including the GPU temperature.
All this is underpinned by solid overclocking performance and one of the most intuitive BIOS interfaces around, so overclocking should be quite a breeze. The settings for tweaking the DRAM frequency, voltages, and CPU ratio and BCLK are located on the same page, so you don’t have to bounce around between menus.
The board uses an 8+2-phase power design, less than what the ASRock Z370 Taichi offers on paper, even with the use of phase doublers. But as the overclocking results will show, it’s clearly the quality of the implementation that matters more, and the ASUS board turned out to be one of the strongest overclockers.

ASUS has employed an 8+2-phase power design for this board.
Then there are small quality-of-life features such as large-sized buttons for clearing CMOS and updating the BIOS on the rear I/O, so you won’t find yourself squinting for the right one. The integrated I/O shield is also a great inclusion, and it looks impeccable and simplifies the installation process.

The integrated I/O shield makes the installation process a lot easier.
ASUS has included a good number of rear USB ports, and you’ll find two USB 3.1 (Gen 2) Type-A and Type-C ports, four USB 3.1 (Gen 1), and two USB 2.0 connectors. The USB 3.1 (Gen 2) ports are provided by the new ASMedia ASM3142 controller, the same as the other boards.
There’s a USB 3.1 (Gen 2) front panel header as well, so you’ll be able to take advantage of cases that have a USB-C port up front.
Unfortunately, you’ll also notice the absence of any Wi-Fi antennas, and it’s slightly disappointing to see that the board doesn’t offer onboard Wi-Fi at this price point. Nevertheless, ASUS does offer a variant with wireless capabilities, but that will cost you S$559.
Moving on to the storage features, the topmost M.2 socket features a large, dedicated heatsink that interfaces with the M.2 SSD beneath via a sizeable thermal pad. This particular socket is located between the CPU, GPU, and DIMM slots, so any measure to reduce temperatures and prevent throttling is welcome.

The topmost M.2 socket is equipped with its own heatsink.
The board has just two M.2 sockets, but the bottom one only supports PCIe SSDs. It shares lanes with two SATA ports, so you’ll be down to four SATA connectors if the second M.2 socket is populated. The first M.2 socket will work with both PCIe and SATA drives, but using the latter will disable one SATA port.

ASUS has included a total of six SATA 6Gbps ports.
Another thing that deserves mention is the onboard audio. The ROG Maximus X Hero uses a SupremeFX S1220 codec with an integrated headphone amplifier capable of driving headphones up to 600 ohms. It’s also equipped with an ESS Hi-Fi Sabre ES9023P DAC, Nichicon capacitors, and a de-pop MOSFET that minimizes popping noises when plugging or unplugging devices.
ASUS’ Sonic Studio III audio utility even has an audio routing feature that lets you set the output device by application. This means you can set game audio to go through the front headphone jack, and music through the rear speaker outputs.

You can see here the Nichicon capacitors.
The board supports extensive customizations as well. In addition to seven independent lighting zones, there are three RGB headers that support external LED strips. Two of these headers support Aura Sync-compatible strips from brands like Phanteks and BitFenix, so you can sync up the lighting effects across your entire system. The third header supports strips with up to 60 individually addressable LEDs, which offer a greater degree of customization.
Finally, there’s a 3D-printing mount, so you can further tweak the board’s appearance with custom nameplates, or add more functions with 3D-printed fan holders or cable covers.
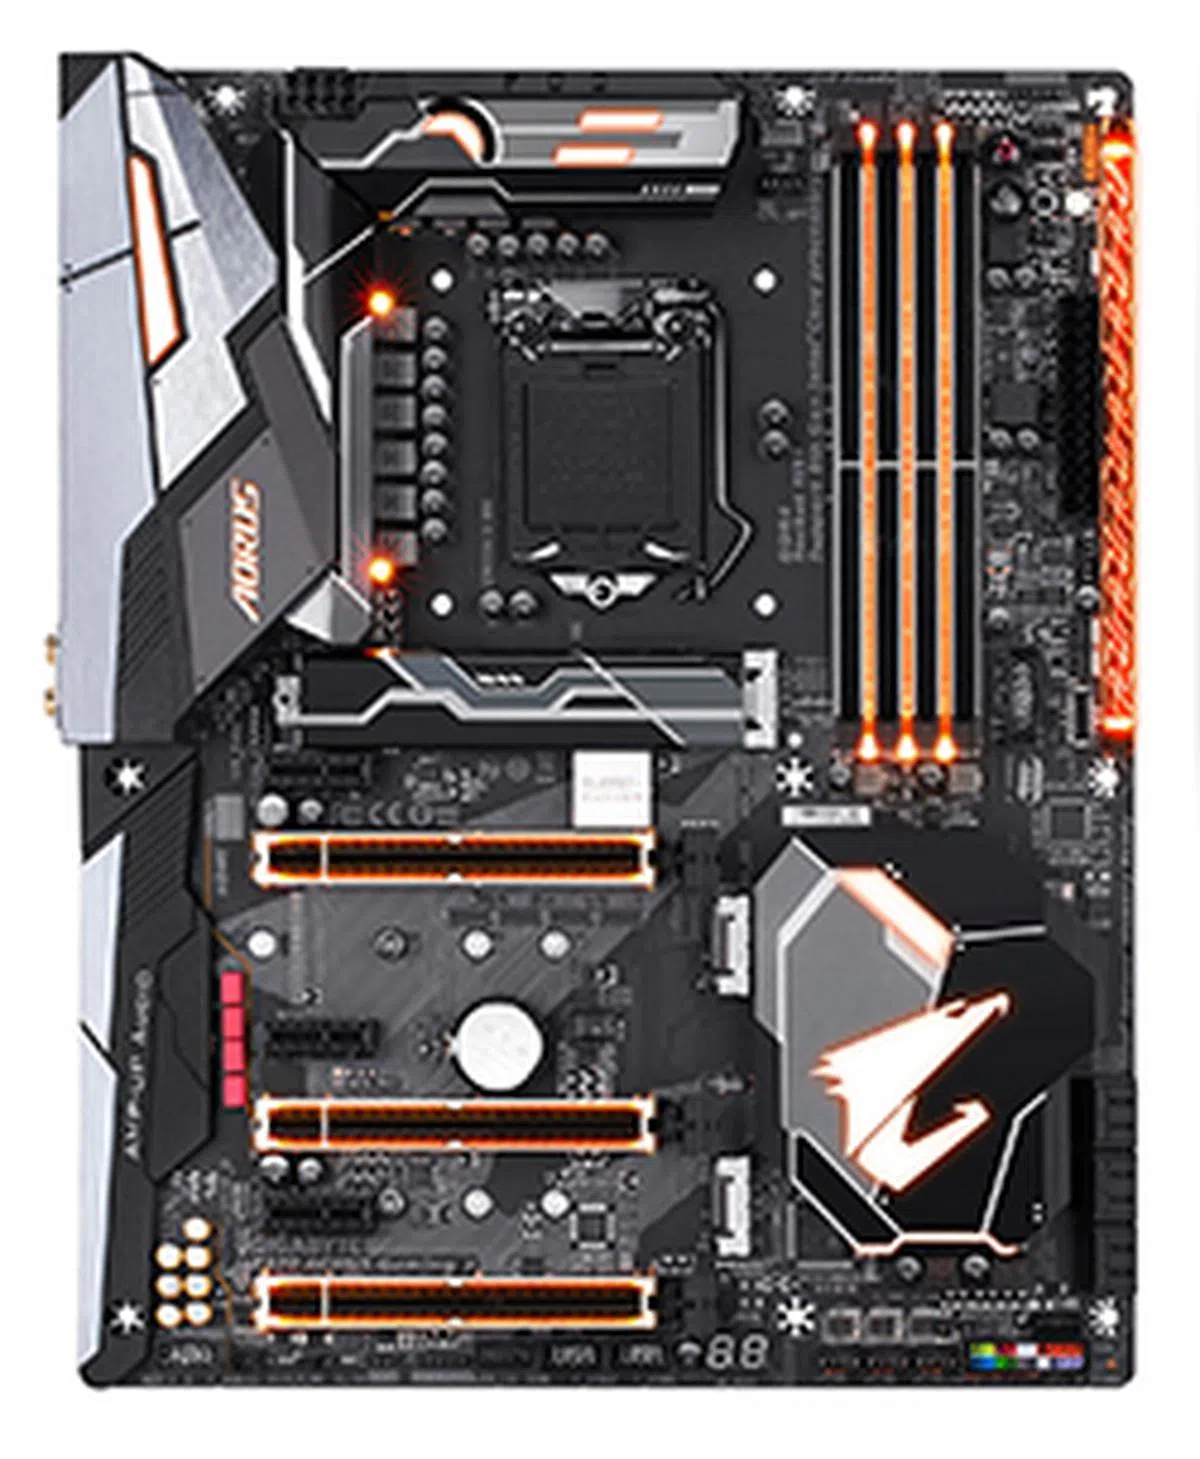
Gigabyte Z370 Aorus Gaming 7

The Gigabyte Z370 Aorus Gaming 7 doesn't disappoint when it comes to features or performance.
The Gigabyte Z370 Aorus Gaming 7 is the company’s flagship Intel Z370 motherboard. It comes with a decent selection of features, boasting generous storage expansion and connectivity options, customizable LEDs, and a beefed-up onboard audio solution.
It’s possible that Gigabyte may release a Gaming 9 board to plug the gap in the ultra-high-end segment, but until then, the Gaming 7 is the most feature-rich Z370 board you can get right now from Gigabyte.
That said, the laundry list of features reads more like that of a balanced all-rounder rather than that of an enthusiast-oriented model. For instance, there are no auxiliary power connectors for the CPU or an LN2 mode switch for serious overclocking. You also won’t find things like DIP switches to disable select PCIe or DIMM slots when you’re troubleshooting or tweaking your system.

The board is fairly reasonably priced for a flagship model. (Image Source: Gigabyte)
However, what the board does have is a solid selection of core features that will prove far more useful to a wider swath of users. This decision is reflected in the fairly reasonable S$435 price tag, and you get everything you need, plus a little icing on the top.
For instance, there may not be any liquid cooling channels carved into the VRM heat sink, but you do still get eight 4-pin fan headers that can be configured to work in both PWM and voltage regulation modes. These headers are strategically spaced out around close to the edge of the board, so you don’t end up with wires running out from the middle of the PCB.
That said, you technically only have seven available headers, as the header next to the EPS12V connector is taken up by the tiny, built-in VRM fan that can spin up to 6,000RPM. This isn’t that common a feature on a motherboard, and it’s designed to turn on only in the most demanding of situations, such as when temperatures rise above 90°C.

A look at the fan under the I/O cover.
However, if you want to have the fan running most of the time, you can probably set a custom fan curve in the BIOS itself. In fact, Gigabyte’s Smart Fan 5 controls let you define a temperature threshold below which your case fans will stop spinning for a more quiet experience.
The fan header located beside the 24-pin power connector is also a high amperage header that supports up to 3A. And together with a second header located at the bottom right of the board, it doubles up as a dedicated water cooling pump header as well.
I mentioned earlier that this board lacks certain features for more extreme overclockers, but that doesn’t mean it’s a slouch either. It is equipped with an 8+2-phase power design for the CPU and iGPU, and uses Intersil’s latest digital PWM and Smart Power Stages to supply up to 60A for each of the eight phases for the CPU Vcore.
These eight phases are achieved using phase doublers though, so there are really only four true phases.

The board features an 8+2-phase power design for the CPU and iGPU.
You also get all the essential buttons, including ones for power, reset, and clearing CMOS. However, we'd have preferred to see the CLR_CMOS button located at the rear I/O instead, as it’d make troubleshooting a lot easier once you’ve completed your build. In addition, you’ll find a one-click OC button in the same area for a quick and hassle-free overclock.

You'll find the buttons for power and reset at the top right.
The Gaming 7 features three full-length PCIe 3.0 x16 slots, and supports up to two-way SLI or three-way CrossFire. As with most boards today, all three slots have been reinforced with metal to ensure that they stand up well under the weight of the heaviest graphics cards.
Gigabyte says it uses a one-piece stainless steel design with additional anchor points for an even stronger implementation.

The PCIe slots are reinforced with metal.
An extra large gap sits between the first and second PCIe 3.0 x16 slots, which is good news for two-way setups as it provides more room for cooling the first card, and makes space for larger and thicker cards. The slots will run in x8/x8 mode when both are filled, while the third slot draws on four lanes from the chipset. This means that it shares bandwidth with all three M.2 sockets and any other device connected to the PCH, and will drop to x2 mode if the third M.2 socket is occupied.
The latter will probably be the most egregious case of bandwidth sharing on this board for enthusiasts, but most folks probably aren’t going to have more than two M.2 drives and two graphics cards at once.
Similarly, the first M.2 socket also shares resources with two of the six SATA 6Gbps connectors, but I don’t see many people having more than four SATA drives. And speaking of the SATA ports, they’re thoughtfully located a little closer to the bottom edge of the board, so your graphics card doesn’t end up blocking access to them.

The six SATA 6Gbps ports are positioned such that they aren't blocked by an overhanging GPU in the first PCIe x16 slot.

A look at the rear I/O panel, where the single USB 3.1 (Gen 2) Type-A port is highlighted in red.
The topmost M.2 socket is equipped with a Thermal Guard that looks inspired by MSI’s M.2 Shield. The M.2 drive is shielded by a metal cover that acts as a passive heat sink for the tiny SSD, which is particularly important given how close it is to heat-generating components like the CPU and GPU.
That said, it’s a little disappointing to not see the other two sockets receive the same treatment.
Finally, the board also has a couple of nice features that tend to slip under the radar. This includes an ESS Sabre 9018 DAC for onboard audio, a second Ethernet port powered by the Killer E2500 Gigabit Ethernet controller, and an internal USB 3.1 (Gen 2) header that feeds a front-panel USB-C port. To cap things off, you can replace the overlay at the top right with your own 3D-printed design, which will change the lighting pattern of the LEDs underneath.

You can replace the overlay with a 3D-printed design of your own making.
MSI Z370 Gaming Pro Carbon

The MSI Z370 Gaming Pro Carbon AC is for those who really love their RGB LEDs.
MSI’s Z370 Gaming Pro Carbon AC is the most affordable board of the lot at just S$349. It’s worth mentioning that MSI does have higher-end Z370 boards available, but we weren’t able to secure one for this shootout.
That said, the Z370 Gaming Pro Carbon AC is more a mid-range board with a focus on aesthetics. There are literally lights everywhere, with LEDs built into the VRM and PCH heatsinks, under the board, and an LED light trail that traces the path of the audio circuitry.
There are even mounting points for 3D-printed accessories, so you can install things like an M.2 fan stand, cable cover, and support bracket for your graphics card.
What’s more, the board features a total of four RGB headers, including two that support individually addressable LEDs. One of the latter – the JCORSAIR1 header located to the right of the DIMM slots – was also designed specifically for the Corsair Lighting Node PRO LED strip or RGB fans (via Corsair’s fan hub), part of a collaboration between MSI and Corsair.

The JCORSAIR1 header sits at the top right.
If you do decide to install a Corsair LED strip or fans, you’ll then be able to control them using MSI’s software. However, it’s not entirely clear that MSI’s decision to focus on Corsair hardware is the best thing, as it shoehorns users into picking a specific brand.
The JCORSAIR 1 header actually supports up to six Corsair fans via a fan hub, but the board itself has a total of six fan headers that support both DC and PWM fans. However, it doesn’t seem like they will automatically detect whether you have a DC or PWM fan plugged in, so you’ll have to manually change the settings in the BIOS.
The headers for the CPU and pump fan are actually set to PWM mode right out of the box, while the system fan headers run in DC mode by default.
Still, MSI has done a great job of cramming as much value as it can into what is a very attractive package. For instance, the onboard Wi-Fi is a nice touch, as some of the pricier boards don’t have this. It’s also equipped with plenty of USB ports on the back, including USB 3.1 (Gen 2) Type-C and Type-A ports, four USB 3.1 (Gen 1), and two USB 2.0 ports.

There's a good number of USB ports available.
That’s more than some of the pricier boards offer, so MSI has paid attention where it counts. However, the board is still missing a USB 3.1 (Gen 2) Type-C front panel header, so you’re out of luck if your chassis has one.
Storage expansion options are also on par with the competition, with six SATA 6Gbps ports (two of which are facing directly upward) and two M.2 sockets. In addition, you get metal-reinforced PCIe and DIMM slots and an M.2 heatsink as well.

The topmost M.2 socket gets a dedicated heatsink as well.
However, there’s a rather complex resource sharing arrangement going on here. If both M.2 sockets are populated with either PCIe or SATA SSDs, you’ll find yourself down by two SATA ports. Alternatively, going with just a PCIe SSD in the first socket will leave all the SATA ports untouched.

Two of the six SATA 6Gbps face upwards.
The onboard audio solution uses a Realtek ALC1220 codec with an integrated headphone amplifier that can drive headphones up to 600 ohms. It also features Nippon Chemi-Con audio capacitors, separate PCB layers for the left and right audio channels, and de-pop protection, which amount to a pretty sweet combination for the price.

Here's a look at the audio circuitry.
Another nice touch is the smattering of useful status LEDs that can help with troubleshooting. The board is missing a debug LED display, but it attempts to make up for that with status indicators built into the PCIe and DIMM slots.
For example, the PCIe x16 LEDs will glow red when the slot is running in x16 mode, and white when it drops to x8, x4, or x1 mode. Similarly, the DIMM LEDs will light up when a memory module is installed, so you can quickly tell if you’ve got a loose connection.
The EZ Debug LEDs come in handy too, where each of the four LEDs corresponds to the CPU, DRAM, VGA, and boot device respectively. A problem with one of these components will cause the LED to light up, so you know where to look.

The EZ Debug LED indicators stand in for an actual debug display.
Having said that, the Z370 Gaming Pro Carbon AC isn’t the best board for enthusiasts. Like the ASRock board, there are no power or reset buttons, and it’s lacking in terms of support for liquid cooling.
The VRM on the motherboard uses an 8+2-phase design, achieved using phase doublers. Furthermore, while overclocking performance is decent, it isn’t quite as good as what ASUS and Gigabyte offer. Overall, this is a good board for the mass market and those who can’t get enough of RGB LEDs, but enthusiasts will probably want to look elsewhere.
Test Setup
This is the test configuration for our Intel Z370 motherboard shootout:
- Intel Core i7-8700K (3.70GHz, 12MB L3 cache)
- Cooler Master MasterLiquid 240
- 2 x 8GB G.Skill Ripjaws V DDR4-3000 at 2,400MHz (Auto timings: CAS 15-15-15-35)
- ASUS ROG Strix GeForce GTX 1080 Ti OC (GeForce Driver Version 388.71)
- Samsung 850 EVO 256GB SSD
- Windows 10 Home (64-bit)
Here’s also a list of our tested boards for easier reference:
- ASRock Z370 Taichi
- ASUS ROG Maximus X Hero
- Gigabyte Aorus Z370 Gaming 7
- MSI Z370 Gaming Pro Carbon AC
While we’d have liked to keep the prices of the boards within a hundred dollars of each other, that proved difficult because of issues with local availability and securing a review unit. Nevertheless, the final selection of boards still stack up pretty well against one another, and they still sit near the top of their respective line-ups.
Benchmarks
The list of benchmarks we used is as follows:
- SYSmark 2014 SE
- SPECviewperf 12.1
- Cinebench R15
- 3DMark
- Ashes of the Singularity
- Deus Ex: Mankind Divided
Motherboard features comparison table
[hwzcompare]
[products=625803,625806,625795,625809]
[width=200]
[caption=Test motherboards compared]
[showprices=1]
[/hwzcompare]
Benchmark performance
SYSmark 2014 SE
SYSmark is a general productivity benchmark suite that measures the response times of tasks on a PC using real-world applications like Microsoft Office 2013 and Adobe Photoshop and simulated user input. Task response times are used to generate a performance rating that reflects actual user experience, so the faster a PC responds to application workloads, the higher its score will be. The method of measuring response times can take many forms, such as the time it takes for an application to show a pop-up completion message, or how long it takes a progress dialog to disappear and for a user to regain application control.
The 2014 SE version of SYSmark adds a new Responsiveness usage model, where the system's ability to react quickly to user input affects the overall user experience. This means situations where the system needs to respond smoothly and quickly, such as with application launches, multi-tab web browsing, file copying, and background app installation.
Unsurprisingly, there’s little to distinguish the boards in SYSmark, and they performed very similarly given the otherwise identical configurations. But even though the Gigabyte board looks like it is the bottom performer in terms of overall scores, the difference between the ASUS ROG Maximus X Hero and the former is just under 3 per cent - which is within a reasonable tolerance of deviation.


SPECviewperf 12.1
SPECviewperf is used to assess the 3D graphics performance of systems in professional applications. Each individual workload, called a viewset, represents graphics and content from an actual real-world application. SPECviewperf actually runs a total of eight different viewsets, but we’ve picked the four which have the greatest performance variation across CPUs display here.
The 3ds-max viewset comes from traces of the graphics workload generated by 3ds Max 2016, while maya-04 is derived from Autodesk’s Maya 2013 application. The catia-04 viewset involves the numerous rendering modes from the CATIA V6 R2012 application, and includes things like anti-aliasing, depth of field, and ambient occlusion. Finally, the sw-03 viewset comes from SolidWorks 2013 SP1, and involves various rendering modes including environment maps
Performance was similarly close in SPECviewperf 12.1, but the Gigabyte board acquitted itself quite well here, coming ahead in the 3ds-max and maya-04 viewsets.

Cinebench R15
Cinebench is a benchmark tool used to compare CPU performance across different systems, so we’ll be using it to evaluate how well our Intel Core i7-8700K plays with the different motherboards. The multi-threaded test scenario uses all of the system’s processing power – it can utilize up to 256 threads – to render a photorealistic 3D scene, making use of various algorithms to stress all available processor cores. Conversely, the single-core test stresses just one core.
A meager 0.97 per cent separates the Gigabyte and ASUS motherboards – the bottom and top performing boards respectively – in the multi-threaded benchmarks. Similarly, there was little to distinguish them in the single-core benchmark.
The Gigabyte board may have ended up at the bottom in both cases, but it’s really nothing you’re going to notice in real-world use.

3DMark
3DMark is a synthetic gaming benchmark that tests graphics and computational performance at different resolutions, starting at 1080p and going all the way up to 4K. A series of two graphics test, one physics test, and then a combined test stresses your hardware in turn to assess its performance.
We’ve also teased out the Physics and CPU scores for the Fire Strike and Time Spy tests and compiled them in separate tables to give a better idea of CPU performance on each board.
The results were similarly unremarkable here, and are pretty much too close to call. 3DMark scores can vary up to 3 per cent between runs, so for all practical intents and purposes, there’s once again no significant difference here.


Ashes of the Singularity
Ashes of the Singularity is one of the few CPU-bound games out there, if you’re playing on lower resolutions and settings that is.
The numbers pretty much speak for themselves, and it’s safe to say that in this case at least, benchmark performance isn’t going to be a major factor in your decision as to where to put your money. What’s more, there was never a single board that consistently took the lead, and they all traded blows for the most part.
These benchmark figures are therefore more useful in sussing out a board that performs below expectations, but they all managed to keep pace with each other.


Deus Ex: Mankind Divided
Deus Ex: Mankind Divided is one of the most demanding games out there right now, where the GPU is a major limiting factor.
The same story repeats itself in Mankind Divided, and there’s really little point in splitting hairs over these minuscule performance differences.

Temperature, power consumption & overclocking
Temperature
We measured the temperatures of the VRM and PCH heatsinks after running 40 loops of the 3DMark Fire Strike Stress Test. You’ll naturally want lower temperatures since it shows that the respective heatsinks are doing a more effective job of dissipating heat.
The VRM heatsink temperatures are also of particular importance, as they play a key role in cooling the MOSFETs, which can get seriously hot as they pass through high currents as they step down the 12V from the 8-pin CPU power connector to the chip's stock voltage. This affects efficiency and overclocking stability, and is why enthusiasts sometimes opt for liquid cooling for the best results.
That said, the Gigabyte board recorded the lowest VRM temperatures, but the highest PCH numbers. The board does come with a fan under its I/O shield for the express purpose of lowering VRM temperatures, so this is probably an example of it paying off in practice.

Power consumption
To test power, we ran the energy-01 viewset in SPECviewperf 12.1 and recorded the peak power consumption. Idle power consumption was recorded after the system had idled at desktop for a while.
The Gigabyte Z370 Aorus Gaming 7 fell somewhere in the middle of the pack. It uses a 10-phase power design for both the CPU and iGPU, the same as the ASUS and MSI motherboards.
Still, even though it consumed marginally more power than the latter two, it did better than the ASRock board. The ASRock Z370 Taichi has 12 phases dedicated to both the CPU and iGPU, so it should in theory have better power efficiency and better power regulation. As a result, it’s to the Gigabyte board’s credit that that wasn’t the case.

Overclocking
In order to assess the respective overclocking performance of the boards, we first tweaked the CPU multiplier ratio and raised the voltage accordingly. After ascertaining that the achieved clock speed was stable, we then proceeded to increase the BCLK value to get smaller overclock increments.
The table below shows the clock speeds we achieved, along with the CPU vCore, multiplier, and RAM frequencies. We've also included the respective BIOS versions of the boards for those who are keen to know such details.
Model | BIOS version | Maximum CPU Core Ratio Achieved | BCLK (MHz) | Vcore (V) | RAM frequencies (MHz) | Maximum Overclock Achieved (GHz) |
ASRock Z370 Taichi | 1.30 | 50 | 101 | 1.38 | 2,626 | 5.05 |
ASUS ROG Maximus X Hero | 0802 | 50 | 103 | 1.38 | 2,678 | 5.15 |
Gigabyte Aorus Z370 Gaming 7 | F5h | 50 | 104 | 1.38 | 2,678 | 5.2 |
MSI Z370 Gaming Pro Carbon AC | 7B45vA2 | 50 | 102 | 1.38 | 2,652 | 5.1 |
The Gigabyte Z370 Aorus Gaming 7 enabled us to achieve the highest overclock here, and we were able to push the CPU to a high of 5.2GHz. Having said that, it’s important to note that this didn’t necessarily mean the absolute best performance, as the ASUS ROG Maximus X Hero squeaked ahead in Cinebench R15, despite managing a top speed of “only” 5.15GHz.
The ASUS also offered a slightly more intuitive overclocking experience because of its BIOS layout. Most of the key settings are located on the same menu page, so you don’t have to toggle between different pages.

Conclusion
As with the move from the Intel Z170 to Z270 chipset, Z370 doesn’t bring a lot that’s new to the table. This means that board manufacturers have had to further value-add with things like M.2 heatsinks and additional customization options. After all, you need a Z370 board to use Intel’s new 8th-generation chips, so something more has to be done to sweeten the deal.
Ultimately, when comparing high-end motherboards like the ones reviewed here, the best board is the one that offers the most compelling mix of features and performance for enthusiasts.
Model | Features | Performance | Value | Overall | Price (S$) |
ASRockZ370 Taichi | 7.5 | 7.5 | 8.0 | 7.5 | $379 |
ASUS ROG Maximus X Hero | 8.5 | 8.5 | 7.5 | 8.5 | $519 |
GigabyteZ370Aorus Gaming 7 | 8.0 | 8.5 | 8.5 | 8.5 | $435 |
MSI Z370 Gaming Pro Carbon AC | 7.5 | 8.0 | 8.5 | 8.0 | $349 |
ASUS ROG Maximus X Hero

ASUS ROG Maximus X Hero. (Image Source: ASUS)
ASUS’ motherboard may be the most expensive, but it justifies that with a winning combination of good looks, strong overclocking performance, and an extensive feature set that will appeal to enthusiasts. It is equipped with useful hardware buttons for those who want to take their processors to their limits with LN2 overclocking, but it also comes with extensive customization options for those who simply want to add some bling to their rig.
For instance, its support for custom 3D-printed nameplates and individually addressable LEDs leave plenty of room to play with. More importantly, it boasts solid overclocking performance and one of the most intuitive BIOS interfaces around, so overclocking should be quite a breeze.
Finally, it is thoughtful in its execution, with an integrated I/O shield and large buttons for updating the BIOS and clearing CMOS that make it a pleasure to install and work with. It offers the complete package, which is why we're making it the winner of this shootout.
ASRock Z370 Taichi

ASRock Z370 Taichi. (Image Source: ASRock)
The ASRock Z370 Taichi is an affordable motherboard crammed with plenty of features. It boasts a good array of storage and network connectivity options, with a total of eight SATA 6Gbps ports (two more than the rest of the boards), onboard Wi-Fi, and dual Intel Gigabit LAN ports.
However, while more casual users will find a lot to like here, enthusiasts may feel a little left out. There are no dedicated power and reset buttons, or anything like what the ASUS board offers. Of course, there’s the price gap to consider, but the fact remains that this is still one of ASRock’s highest end boards.
Furthermore, we weren’t impressed by its lackluster overclocking performance compared to the rest of the boards. It also posted the highest power consumption and heatsink temperatures, so something appears a bit lacking in the design department. Finally, those who enjoy their RGB LEDs will be disappointed as well, as there’s just one RGB header and the only LEDs are built into the PCH heatsink.
Gigabyte Z370 Aorus Gaming 7

Gigabyte Z370 Aorus Gaming 7. (Image Source: Gigabyte)
The Gigabyte Z370 Aorus Gaming 7 is one quality motherboard. There’s something for everyone here, ranging from overclockers to the casual user. Its core feature set checks most of the right boxes with a good number of connectors and storage expansion options.
And if you like to toy around with RGB lighting, you won’t be disappointed either, as the board offers a good selection of customization options, in addition to support for external digital LED strips with individually addressable LEDs. There’s also the swappable overlay on the top right, which you can replace with your own 3D-printed design.
Overclocking performance is solid, and this is a great board to take your CPU to its limits. However, as Gigabyte’s flagship Z370 board, it is lacking in certain features such as dedicated Slow Mode switch for LN2 overclockers, or even a CLR_CMOS button located on the rear I/O. The BIOS interface also feels slightly less polished than the one ASUS offers, so the overall overclocking experience isn’t as seamless.
MSI Z370 Gaming Pro Carbon AC

MSI Z370 Gaming Pro Carbon AC. (Image Source: MSI)
MSI’s Z370 Gaming Pro Carbon AC is the most affordable board of the lot at just S$349. That said, the Z370 Gaming Pro Carbon AC is more a mid-range board with a focus on aesthetics. There are LEDs built into the VRM and PCH heatsinks, under the board, and an LED light trail that follows the audio circuitry. What’s more, there are a total of four RGB headers, including one that supports individually addressable LEDs.
The onboard Wi-Fi is also a nice touch, as some of the pricier boards don’t have this. Having said that, the Z370 Gaming Pro Carbon AC can’t really compare with the other boards in terms of overall features. Like the ASRock board, there are no power or reset buttons, and it’s also missing a debug LED display.
Overall, this is a good board for the mass market, but enthusiasts will probably want to look elsewhere.
 | |
 | |
 | |
 |