
Thermaltake Level 10 GT Battle Edition - Man Your Battle Stations!
The Thermaltake Level 10 GT Battle Edition is a variant of the Level 10 GT chassis. It sports a cool military green and black color scheme, with the same over-the-top design features as the Level 10 GT. We check out the casing in great detail if its worth the premium.

Introduction
Thermaltake is a company that needs no introduction. Its reputation as a manufacturer of high-quality PC chassis, power supplies and cooling solutions has been established over the years with the release of these products in retail channels worldwide to reach enthusiasts and system builders of PC systems. In recent years, Thermaltake has commissioned BMW Designworks to collaborate on one of the most prestigious PC chassis around, the Thermaltake Level 10.
With the synergy created by the their collaboration, Thermaltake and BMW Designworks have created an iconoclastic breed of PC chassis that has taken most expected design concepts of a typical PC casing, and threw them out the window. As such, the Thermaltake Level 10 series of PC chassis is unlike any the PC community has seen. Its distinctive design literally breaks out from the typical box shape structure of a normal PC chassis. The components of a Thermaltake Level 10 casing protrude from where they are placed, breaking out unexpectedly to jar the usual streamlined look of the casing. Its detractors may deem Thermaltake's efforts as an over-the-top exercise of form over function; however, we feel that this inventive series does have a certain appeal and edgy look to it. At the recent Computex 2012, we witnessed the full-range of Thermaltake's Level 10 M gaming mice that can be seen as a natural extension of their collaborative synergy with BMW Designworks to these inputs devices.
For those who've been keenly following the evolution of the Level 10 series of casings, you would recall that only the original Level 10 case was the outcome from the collaboration between BMW Designworks and Thermaltake. The many other editions like the Level 10 GT, Level 10 GT LCS, Level 10 GT Snow Edition and the Level 10 GTS are all designed and made by Thermaltake, but inspired by the original Level 10 chassis.

The Thermaltake Level 10 GT Battle Edition has a well-ventilated side panel with vents that are covered with wire mesh; its front fascia is also ventilated as such.
We have in our labs the Battle Edition of the Thermaltake Level 10 GT. With its heft and military green colors, it is hard not to miss this chassis. Besides its attention-grabbing looks, its S$449 price tag means that to own this chassis, one would have to pay 25% more than a regular Level 10 GT (with a side window) that is priced at S$359. We find out if this variant of the Thermaltake Level 10 GT chassis is a futile tribute to computing excess or if it truly offers something to its target audience of enthusiasts and system builders. Since we've not thoroughly evaluated the original Level 10 GT edition, we'll be taking a close look at the Battle Edition from all angles.
External Design
On first impressions, the Thermaltake Level 10 GT Battle Edition has a plasticky look-and-feel, due to its seemingly obtrusive components and parts that jut out from their places. According to its official specifications, the casing uses SECC that is galvanized steel via an electroplating process with zinc as the coating material. The empty casing weighs about 12.7kg and it features a single carrying handle that runs along its entire depth. Since it is a single grip bar, there is no way to hold this hefty case in a balanced manner; any moving of this chassis will entail using some part of your body to support whatever heft that escapes the lifting efforts of your arms.

From the side, you can tell that the casing has been given the military ammunition box treatment, complete with the classic yellow fonts. On the top, you'll find the plastic carrying handle of the Level 10 GT Battle Edition. It feels rather sturdy though it is made entirely from plastic.
The front fascia of the Level 10 GT Battle Edition has a number of black wire mesh covers that offer direct air intake and front cooling options. There are a total of four 5.25-inch drive bays with easy-to-remove front covers with wire mesh. There is a lone front-facing 3.5-inch drive bay that also has a front cover with wire mesh. Its four front I/O ports are USB 2.0 ones. The power and reset buttons are first from the top of the row, while the headphone and mic jacks take up the bottom. The bottom half of the case is dominated by five quick swap 3.5-inch drive bays - the buttons that are numbered one to five, will release these bays sideways when depressed. The security lock to the side of the front facing 3.5-inch drive bay prevents the quick swap 3.5-inch drive bays from being removed without permission. With the security lock in operation, the buttons cannot be depressed and the drive bays remain in place.

Looking beyond its carrying handle at the top of the chassis, we see wire mesh covered vents that provide air intake. The smaller air intake is not removable; however, the larger air intake features a removable wire mesh. Located behind the mesh is a supplied 230mm cooling fan with LEDs. We shall take a look at it later in the article. The buttons that control this particular fan are located near the top I/O ports that comprise of two USB 3.0 and an eSATA port.

The top of the Thermaltake Level 10 GT Battle Edition features two air intakes and more I/O ports. The top cooling fan control buttons are next to the pair of blue USB 3.0 ports.

The top 230mm cooling fan has three control buttons; two of them control its speed while the third one operates its LED based lighting.
The wire mesh, next to the buttons and ports, cover a number of hexagon air vent cut-outs . The slight indent of the wire mesh may tempt users to use it as a tray for containing their PC knickknacks; however, we do advise against it as these items will reduce the air flow through the air intake behind.

This is is one of the air intake vents of the Level 10 GT Battle Edition next to the top I/O ports which we almost mistook it as a PC accessories tray.
Its larger counterpart features a bundled 230mm cooling fan with LEDs. The fan control buttons that operate it are located next to the USB 3.0 ports. The front cover with the wire mesh is removable with the deft push of a button tucked behind the chassis.

The removable wire mesh sits in front of the supplied 230mm cooling fan. The casing does offer some control over the operation of the cooling fan, in terms of its rotational speed and LED illumination.
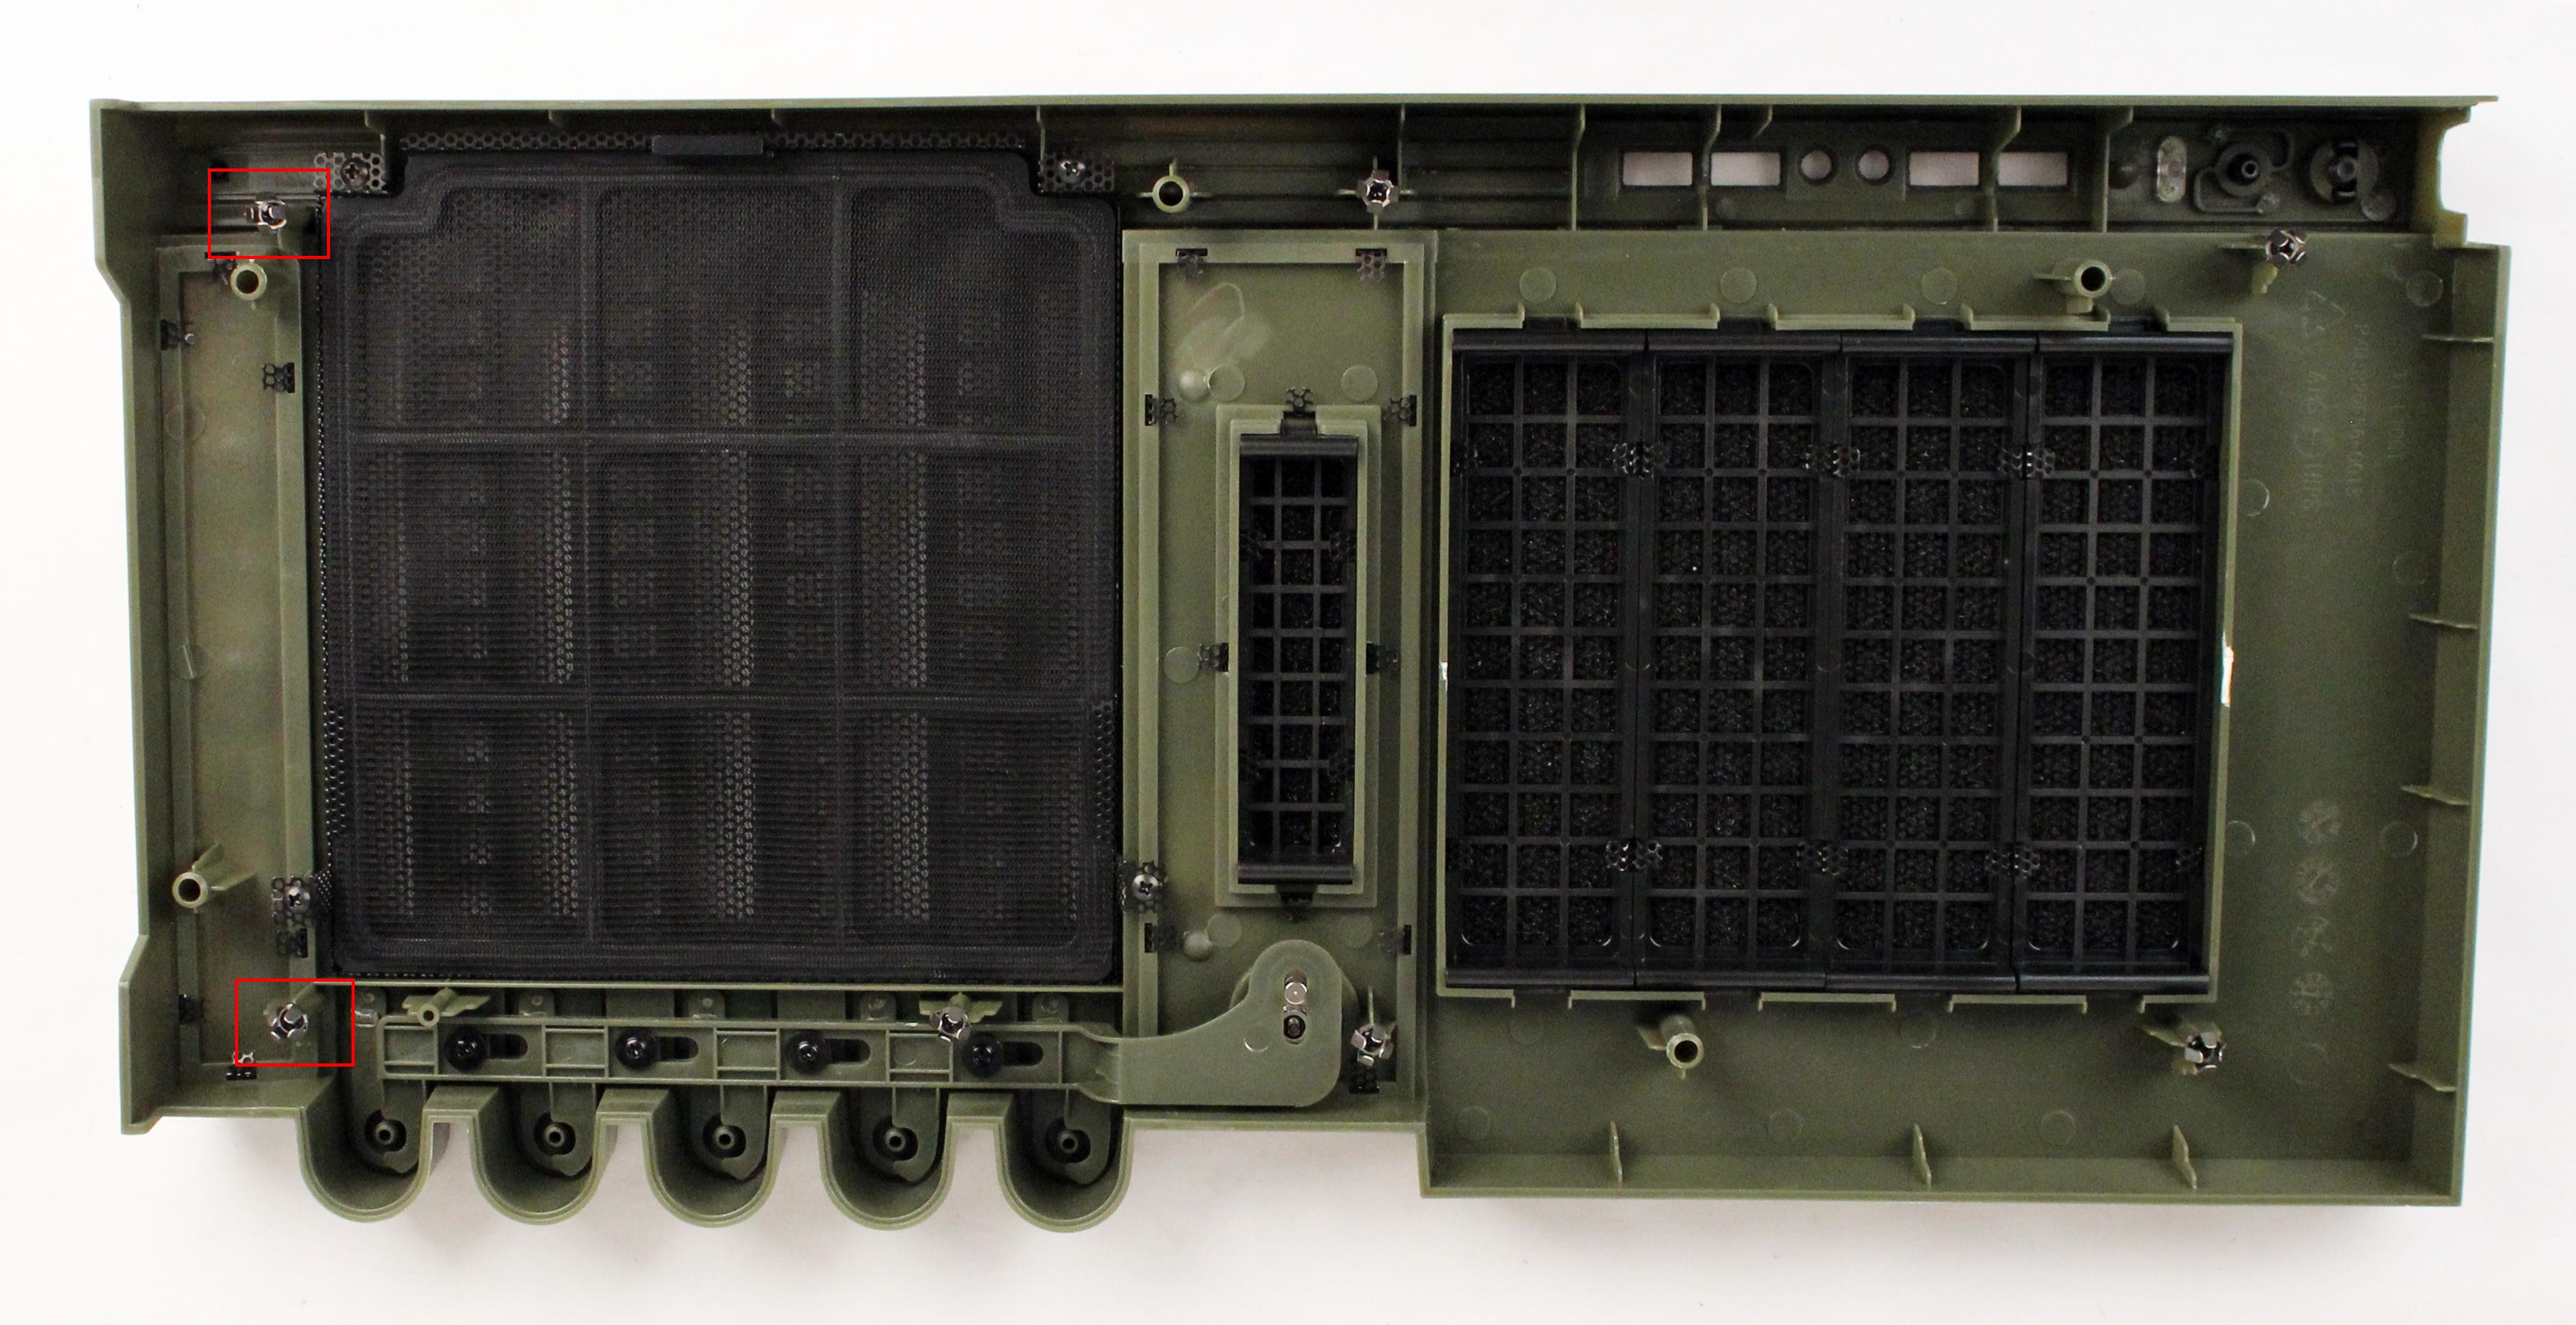
The release button of the removable wire mesh is located at the rear of the casing, tucked near the top edge where the plastic top cover ends. The wire mesh cover is easy to remove for easy maintenance, and even its wire mesh is removable; however, the latter involves prying a number of wire mesh tabs that hold it in place. The bundled 230mm cooling fan is removable as well to allow other cooling options to be installed in its place.

The release button for the top mesh cover of the 230mm cooling fan has been highlighted with the red frame.

With a press of the release button, the wire mesh cover can be removed in a jiffy to reveal the bundled 230mm cooling fan with LEDs. And of course, this allows easy maintenance of the fan and its mesh cover.

The removable wire mesh cover of the top 230mm cooling fan. The wire mesh is held in place by ten wire tabs that can be pried straight so that the wire mesh can be thoroughly cleaned and even replaced.
External Design (Part II)
The rear of the Level 10 GT Battle Edition is quite an imposing sight as well. With its crowning triplet of rubber grommets and eight expansion slots, it presents a busy sight indeed! There is also a supplied rear 120mm cooling fan. From the rear, we see the protrusion that houses the side 230mm cooling fan with a removable fan filter that is neatly tucked into the housing.

There is a bundled 120mm rear cooling fan. There are a number of vents in the form of hexagon cut-outs.

A close-up view of the rear 120mm cooling fan.

The retaining bracket gives additional fastening to the eight expansion-slot covers that are held in place by individual thumbscrews.

The side fan filter pops out, with a quick push of its edge.
The side of the Level 10 GT Battle Edition presents itself as a stark contrast to its opposite facing side; it has small rectangle clear acrylic panel that allows sneak peeks of its installed components. A hinged side panel door that takes up to approximately a third of this facing of the chassis, opens with button, which is housed at the bottom of the chassis. The plastic protrusion that sits in front of the wire mesh is a mount that allows you to hang your earphones over it. There is also a lock-and-key system for the side panel door. The ribbed structure, to the bottom of black wire mesh, comprises five quick swap 3.5-inch HDD bays. To the left of these drive bays; there is a housing for the bundled side 230mm cooling fan with LEDs. There is a lever at the side of the housing that controls louvers within the 230mm fan housing, which controls the direction of the air-intake of this giant fan.

This side of the chassis has a panel that opens from its hinges.
The instructions that are written below the black wire mesh from which the Headset Hanger is attached, pertains to the usage of the quick swap 3.5-inch drive bays. There is a locking mechanism that functions to keep the five 3.5-inch quick swap drive bays in place, preventing any unauthorized removal of the bays. The army soldier figure with a shoulder rocket launcher is purely decorative in nature, so don't pay any attention to it.

This is officially known as the Headset Hanger that allows you to hang a pair of headphones over it. It can be removed for a streamlined look.

The five quick swap 3.5-inch drive bays have a safety lock that will prevent their unauthorized usage.

The housing of the side 230mm cooling fan has a lever at its side to control the direction of the air-intake.

The yellow arrow marks the position of the button at the chassis' bottom, which will allow the side panel to swing open when the button is depressed. We'll take a closer look at the innards in the following pages.
Tilting this behemoth on its side reveals four plastic feet at its bottom. They are able to swivel out at 90 degrees to provide additional stability to the Level 10 GT Battle Edition. There is a removable fan filter that slides out easily from its place. We also see a number of air vents at the casing's bottom; however, there are no supplied cooling fans down here.

The chassis, at its side, with its four feet tucked in. If you look carefully, you may just spot the button that releases the hinged side panel door.

Its feet rotate out at 90 degrees; the bottom dust filter can be slid out with little effort.

With the bottom dust filter removed, we can see a lot of square cut-outs that make up the entire bottom air intake.
Internal Design
The side panel swings out to reveal an interior that has neat compartments in terms of its drive bays, with enough room to fit up to a EATX form factor motherboard. We also noticed the large cut-out at the motherboard panel to accommodate CPU cooling solutions that may require access to the backplates of the boards. There are also a number of rubber grommets for excellent cable management; some chassis manufacturers will provide only the cut-outs, but for casings of such high-end pedigrees, the implementation of rubber grommets will set them apart from those run-of-the-mill counterparts. There is also a bundled top 230mm cooling fan with LEDs and we showed earlier its dedicated control buttons that are located at the top of the casing. There is an identical fan that is housed in the side panel door that is also controlled by those buttons.

With the side panel door ajar, we see the roomy interior of the Level 10 GT Battle Edition chassis.

The side 230mm cooling fan with LEDs is housed in the side panel door. The louvers that are controlled by a lever direct the air flow into the interior of the chassis. Depending on your cooling priorities, you can get it to cool more of your CPU or more of your GPU(s).
There is a 3-pin electrical contact point at the edge of the door. When the side panel door is closed, the electrical circuit is closed, allowing the 230mm side cooling fan to be operated by the fan control buttons. The huge side panel door can be lifted off its hinges for easier access to the interior during installation of components.

The electrical contact that when closed, will supply power to the side 230mm cooling fan. It also allows for control of the fan from the top fan control buttons.

This is the bottom hinge of the side panel door; there is another near the top. Lifting the side panel door off its two hinges is an easy feat.
After removing the side panel door, we peered to the front of the chassis where the drive bays are located. From the top, there are four 5.25-inch drive bays followed by a lone external facing 3.5-inch drive bay. We also spotted five internal quick swap 3.5-inch drive bays that can be removed without having to open the chassis. Such drives are inserted from the front of the chassis after removing their drive covers. Their installations are not entirely tool-free as M3 screws are needed to provide additional fastening to these drives. These drive bay covers have dust filters behind the wire mesh covers and act as front air intake vents. The front fascia cover of the Level 10 GT Battle Edition is easy to remove; we had to pinch a pair of round clips with metal tips and removed the cover with a quick jerk at its bottom hand grip.

From the top, there are four 5.25-inch drive bays as shown on the left; to the right, the lone 3.5-inch external facing 3.5-inch drive bay.

The drive covers can be easily removed by pressing both retaining tabs that are located at each ends of the covers.
Removing the front fascia cover was surprisingly easy although the cover features old-school round fastening clips that have metal tips.

With the front fascia cover removed, we could see the 230mm front cooling fan with LEDs a lot better. We can also see the rear 140mm cooling fan that is a standalone one as it is not controlled by the fan operation buttons.

Shown here is the rear of the drive bay covers - they have dust filters behind their front wire meshes.
For the installation of our 3.5-inch HDD, we had to ensure that the 3.5-inch drive bay was unlocked before we could slide out one of the drive trays after depressing its release button that is located at the front of the chassis. Once removed from its drive bay, we installed our HDD into the tray and secured it without much fuss.

We had to press and hold the front release button before we could slide out the 3.5-inch drive bay tray.

Each 3.5-inch drive tray has a retractable dust cover that snaps over the grip of the tray.

The front and side views of the 3.5-inch drive bay tray. From the front view, you can see the retractable black dust cover for the finger grip of the tray.

The mounting screw holes are meant for securing 2.5-inch drives.

We secured our installed 3.5-inch HDD to the tray with four screws. The same screws are used for securing 2.5-inch drives.

Sliding in the tray with our securely installed HDD.
We removed the other side panel that was held in place by a pair of thumbscrews so that we can get a better look at the rear of the 3.5-inch drive bays. The drives in the drive bay share a single SATA power connector.

A single SATA power cord supplies power to the drives installed at the 3.5-inch drive bays.
Internal Design (Part II)
After the installation of our 3.5-inch HDD, we moved on to our standard ATX motherboard. The standoffs were already in place and due to its ability to accommodate a larger EATX motherboard, we had more than sufficient room to install our standard board. We had to remove the expansion slot retaining bracket before we could remove each individual expansion slot cover that has its own thumbscrew as well. The installation of our standard sized 10.5-inch graphics card went smoothly. At the bottom of the chassis, there are rails to guide the installation of our PS2 ATX PSU. Its installation also went without a hitch.

Getting our motherboard inside and securing it was a walk in the park.

Installation of expansion cards required more work as we had to remove the main retaining bracket before we can remove the individual expansion slot covers.

Installation and securing our 10.5-inch graphics card went smoothly too.

Sliding the PSU in place with the rails for guidance, we secured it in place with four rear screws. There is also an option to install a 120mm cooling fan next to the PSU.

We secured our PSU with four M3 screws.

This was the interior of the chassis after we had installed all our test components. There was so much space, tidying it up wasn't even a necessity.

With the rear panel removed, the view appeared calm even with our components in place. This is mainly due to the panel's excellent power cable management system, with its rubber grommets and cable hooks.
After installing our components, we took a closer look at the operation of the supplied cooling fans of the chassis. To reiterate, there are two bundled 230mm cooling fans with LEDs and a single rear 140mm cooling fan that has no additional feature. The speeds of the dual 230mm fans can be controlled from the top control buttons. These buttons also control the illumination of the LEDs. We powered on our system and found that we could control the rotational speeds of the fans as well as the illumination of their LEDs (including change of colors and even turning them off).

By pressing the fan LED control button, we could change the color of the illumination of the dual 230mm cooling fans. Shown here is the top cooling fan when it was in operation.
Conclusion
The Thermaltake Level 10 GT Battle Edition is quite a remarkable case. On first looks, its green-and-black color scheme may appear dull to some; however, it is actually in line with the military look-and-feel that Thermaltake is attempting to get across. We were initially overwhelmed by its heft, all 12.7kg of it, but our installation experience with the chassis was smooth and without any major glitches. We like its excellent cable management system that comprises panel-cut-outs with rubber grommets for bunching any cables together that happen to pass through any of the cut-outs. Its quick swap 3.5-inch drive bay is easy to use and it comes with a rudimentary security system to prevent any unauthorized removal of the drive trays. The chassis also has a lock-and-key system to prevent access to its interior.

The Thermaltake Level 10 GT Battle Edition is large and loud with its military-theme color scheme. Built solid like a tank, we found it hard to shoot any holes through its armor.
The cooling options of the chassis are excellent. Its triplet 230mm cooling fans with LED illumination, which can be centrally controlled, is a nod to chassis modders who need that extra touch to embellish their gaming systems. The fans are not all cosmetic as they provide cooling to the installed components. The top 230mm fan can be removed to accommodate the cooling fans of closed liquid systems. The only missing fan option is the optional 140mm bottom mounted fan that is next to the PSU.
It is extremely hard to find any fault with the Battle Edition variant from the Level GT 10 series; however, getting your hands on one may be an uphill task. This chassis is retailing at S$449 and we understand that it has been brought to our shores in limited quantities. In comparison with the regular Level 10 GT chassis, paying a 25% premium for this Battle Edition variant is a battle cry that is uttered by only hardcore fans and collectors. Perhaps if the Battle Edition was more radical such as this version, its extra cost might have been easier to stomach.
Our articles may contain affiliate links. If you buy through these links, we may earn a small commission.