Intel X99 flagship motherboard shootout: When the sky's the limit
What do you do when you want to build the most powerful rig that money can buy? You look at one of these motherboards. Intel's X99 platform supports the new 10-core Intel Core i7-6950X and up to 4-way SLI/CrossFire, and these boards are among the best on the market. Here's how they stack up against each other.

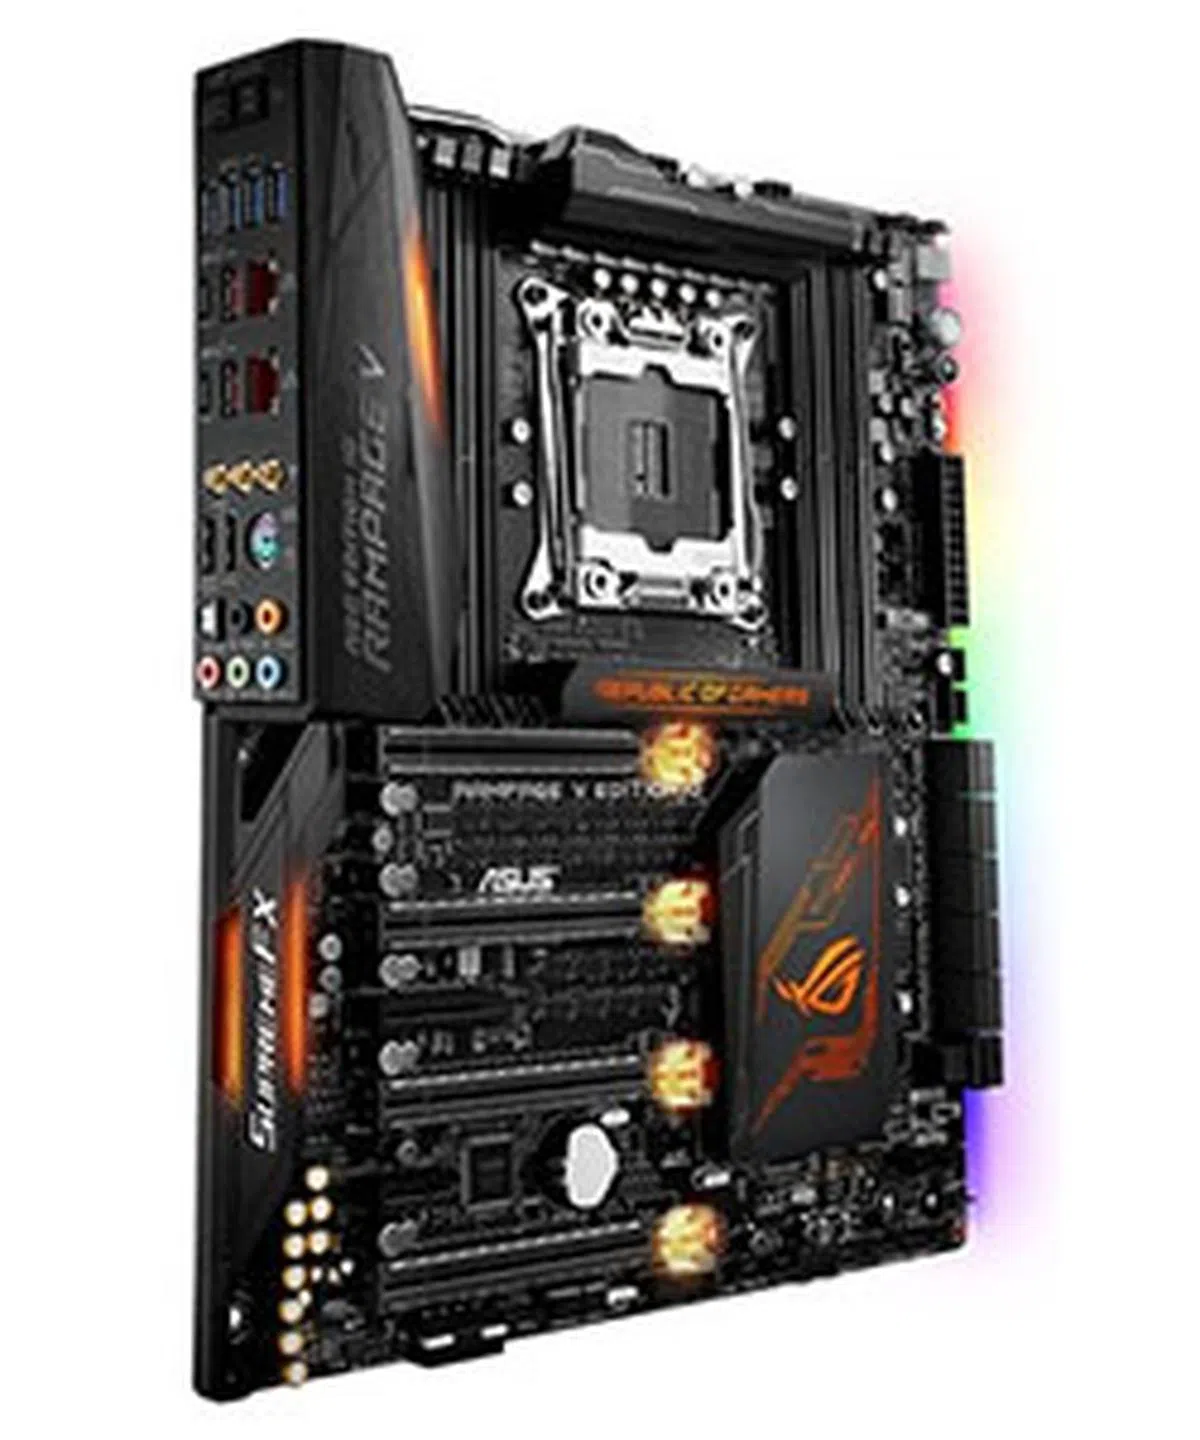
The ASUS ROG Rampage V Edition 10 is one of the most over-the-top boards out there.
Stratospheric pricing, and a ton of features
Intel’s X99 chipset is the go-to platform for the most demanding enthusiasts who require a ton of CPU performance. While certain LGA 2011-v3 socket CPUs – the Intel Core i7-5820K versus the Core i7-7700K for instance – may not always be the best pick if all you’re going to be doing is gaming, the platform still puts a level of CPU performance out of reach of the more mainstream LGA 1151 chips in your hands.
Of course, this is also the platform you’ll need to take advantage of Intel’s crazy new 10-core Core i7-6950X (3.0GHz, 25MB cache), so there’s really no other option at this point in time if you want to go for unrivaled CPU performance.
And that’s exactly what we’re focusing on here – the best performance that money can buy. We’ve done shootouts amongst more mainstream Intel Z170 boards before (see here and here), but this time we’re pulling all the stops out and focusing on the upper echelons of an already pricey chipset.
The motherboards reviewed here (we’ve contenders from ASRock, ASUS, Gigabyte, and MSI), are all top-tier models for their respective brands, and come crammed with the usual assortment of overclocking features, audiophile-grade onboard audio solutions, dazzling RGB illumination.
Most of these boards were released in response to Intel’s release of its new Broadwell-E chips, the better to entice enthusiasts to upgrade. But because they are still based on the two-year-old Intel X99 chipset, board manufacturers have had to do more to stand out, which explains the renewed focus on aesthetics and design we’re seeing here.
In short, if you’ve decided to go all out, these motherboards definitely deserve to be on your shortlist. After all, when you’ve dropped a small fortune on one of the new Broadwell-E chips, perhaps even enough to buy you a cheap PC all on its own, you don’t want to skimp on the thing that’s going to house and bring that CPU to life, do you?
ASRock X99 Taichi

ASRock's flagship X99 board is actually quite affordable.
ASRock’s X99 Taichi stands out as the most affordable option in what is shaping up to be one of the most extravagant selections of motherboards. At S$420, it can even be considered affordable, and is even less than half the price of the ASUS ROG Rampage V Edition 10, the most expensive board we’re reviewing here. Clearly, this was a board priced with the intent of undercutting the competition.
But the price difference side, this is still the top Intel X99 board from ASRock, which is why we’ve deemed it fit to be included in this shootout.
Fortunately, price isn’t the only thing that this board has going for it. If you think yourself worn down by the endless parade of red-and-black motherboards, the Taichi represents a refreshing departure from custom.
While the PCB is predominantly black, it is set against the white I/O cover and audio shielding, in addition to the unique cogwheel emblem on the PCB itself. If you’re looking to build a monochrome-themed system, the X99 Taichi offers itself up nicely.

The unique cogwheel design helps the board stand out in terms of aesthetics.
The board’s name ties in with its design philosophy. This is the cheapest board in this shootout, and as such it isn’t bristling with lights or other superfluous features. Instead, ASRock wanted to create a functional board with all the key features and which could deliver where it mattered. Ultimately, it boils down to walking the fine line between price and performance, hence the reference to the Chinese martial art that teaches its practitioners about finding balance.
The most obvious trade-off, if it can even be called that, is the comparatively few number of PCIe slots. The X99 Taichi has just three steel-reinforced PCIe 3.0 x16 slots, in comparison to the four that are found on most of the other motherboards. It also has two further PCIe 2.0 x1 slots, perhaps for when you want to add on a dedicated sound card or ASRock's own U.2 kit.
The steel-reinforced slots feature additional solder points on the PCB, which ASRock says protects the slots from the weight of heavy graphics cards and prevents signal interference.
However, we’d hesitate to call out the number of slots as a shortcoming. NVIDIA’s decision to limit SLI to just two cards at most on its Pascal GPUs means that three PCIe 3.0 slots is now more than enough for anyone running NVIDIA’s latest cards. Of course, there’s no saying if this will still hold true once AMD’s Vega cards are released, so you may be comfortable with more slots for some future-proofing.
The CPU you choose will affect the distribution of PCIe lanes across the available PCIe slots. A 40-lane CPU will result in a x16/x16/x0 or 16x/x8/x8 configuration from top to bottom, while a 28-lane chip will instead give you a x16/x0/x8 or x8/x8/x8 configuration.
There is also a three-slot spacing between the first and second PCIe 3.0 x16 slots, so there will be ample breathing room should you choose to go with a two-way graphics setup.
In addition, there are two M.2 sockets that work with both SATA and PCIe drives, and you’ll be able to install a U.2 PCIe x4 SSD courtesy of ASRock’s U.2 kit if you so wish. At this point in time however, the only U.2 drive available is the Intel 750 series drive, so this is more of a nice-to-have feature rather than a necessity.

One M.2 socket is located directly above the topmost PCIe slot.
The M.2 slots are strategically located away from heat sources to prevent thermal throttling – one is located above the top PCIe slot while the other is tucked away at the bottom right, just above the debug LED. However, you’ll need a 40-lane CPU in order to use both slots in PCIe x4 mode. If you run just a 28-lane CPU like the Intel Core i7-6800K, the topmost M.2 slot will only support a SATA drive. Each of the slots share lanes with a SATA connector, so that’s something to take note of when installing storage drives.

The other M.2 socket is located at the bottom right, away from heat sources like the GPU.
Having said that, there are a total of 10 SATA 6Gbps ports and one SATA Express connector, typical of most Intel X99 motherboards.

Eight of the 10 SATA 6Gbps ports are located at the edge of the board.

The two remaining ports are located face up below the RAM slots.
The board features a 12-phase voltage regulator for the CPU input voltage, and uses what ASRock has dubbed Super Alloy components. This comprises Ultra Dual-N MOSFETs (UDMs), 60A high-current power chokes, and Nichicon 12K platinum capacitors that combine for more efficient power utilization, more responsive Vcore voltages, and better longevity. That said, this is actually a true 6-phase implementation that has been doubled to 12 using six ISL6611A phase doublers.

The board features a 12-phase VRM design.
On the networking front, the X99 Taichi boasts dual Intel NICs – an I211-AT and I218-V – that support teaming. One oft-cited benefit of Intel NICs is the slightly lower CPU usage compared to solutions from Realtek and Killer, and ASRock is claiming around a three to seven percent usage figure, as opposed to seven to 12 per cent for a Realtek solution.
On top of that, the board has an integrated dual-band Wi-Fi and Bluetooth module, an Intel Dual Band Wireless-AC 3160 to be specific, that gives you more freedom when deciding where to place your rig. A pair of Wi-Fi antennas ship together with the motherboard and you can attach them to connectors on the rear I/O.
That said, one drawback is the limited 1x1 configuration of the Intel wireless module, which limits your maximum throughput to just 433Mbps.
Happily enough, even though this is a relatively affordable board, ASRock hasn’t skimped on the audio hardware. The X99 Taichi’s Purity Sound 3 solution utilizes a Realtek ALC1150 audio codec that supports up to a 115dB SNR, two Texas Instruments NE5532 amplifiers (supports headphones up to 600ohm), and Nichicon Fine Gold series audio capacitors. The audio circuitry is also physically isolated from the rest of the PCB to reduce interference.

The Purity Sound 3 audio solution lets you drive headphones up to 600ohm.
You’ll also find a pair of onboard Type-A and Type-C USB 3.1 (Gen 2) ports built into the rear I/O – courtesy of the third-party ASMedia ASM1142 controller – which should come in handy given the increasing prevalence of USB-C on phones today. We like the inclusion of a Clear CMOS button here as well, as it saves you the trouble of having to fiddle with jumpers on the board itself.

A look at the rear I/O panel. Note the two gold connectors for the Wi-Fi antennae.
Finally, ASRock took care to include dual onboard BIOS, an especially important feature for overclockers who often play around with the BIOS settings.

The dual BIOS chips and switch selector are located along the bottom of the board.
However, one rather conspicuous omission would be the lack of power and reset buttons on the board itself. That’s not going to be a problem once you’ve installed it into your system, but enthusiasts using it in an open test bench aren’t going to be too pleased. Having said that, we can’t complain too much either, given the board’s affordable S$420 price tag.
All in all, ASRock has managed to check all the right boxes by including the features that users will get the most utility out of, like the onboard Wi-Fi, dual M.2 sockets, and dual BIOS. At the same time, it has kept costs down by omitting unnecessary features like RGB lighting, U.2 ports, and additional PCIe slots.
ASUS ROG Rampage V Edition 10

This board was designed to both look pretty and perform well.
The ASUS ROG Rampage V Edition 10 is by far one of the most extravagant boards we’ve reviewed, and that’s in no way an exaggeration. For starters, its S$949 price tag is enough to scare off all but the most dedicated of enthusiasts (there are motherboard + CPU bundles that cost less). But as they say, you get what you pay for, and the Rampage V Edition 10 certainly delivers in terms of features and performance as you'll see in our performance findings page.
ASUS’ Rampage boards have traditionally represented the pinnacle of what the company has to offer, but ASUS has even more reason to pimp out this year’s Rampage motherboard. We first saw the board at Computex earlier this year, where the Taiwanese company wasted no time in reminding everybody that 2016 marks the 10th anniversary of its Republic of Gamers brand.

A metal backplate on the rear has been emblazoned with the ROG 10th anniversary branding.
The ROG Rampage V Edition 10 is thus named to commemorate the ROG’s brand decade in existence, and it comes tricked out with all manner of hardware finery. LED lights are in? The Rampage V Edition 10 has plenty of that. It also comes with a wide range of the latest ports and connectors, in addition to a bunch of overclocking features and premium components.

The all-black color scheme of the board means there's less chance of it clashing with the look of your other components.
In the way of expansion slots, you’ll find four PCIe 3.0 x16 slots, one PCIe 2.0 x4 slot, and a single PCIe 2.0 x1 slot. The distribution of PCIe lanes depends on whether you have a 28- or 40-lane CPU, and there’s a helpful SLI/CrossFire switch included that will make use of the LED embedded under the PCIe slot latches to illuminate the correct slots to install your cards in. For example, a two-way setup will require you to use the first and third slots, while you should populate the top three slots in a three-way configuration.

The SLI/CFX switch sits next to the U.2 connector. You'll also find the dual BIOS button in the same area.
In addition, the PCIe slots use ASUS’ SafeSlot design, which uses a new insert-molding process to bind the slot with fortifying metal, thus providing extra support on all three axes. Like similar implementations from other board makers, this is intended to protect the slots from the weight of heavy cards and improve longevity.
The board supports up to four-way SLI and CrossFire (with a 40-lane CPU), although as we mentioned before, NVIDIA’s move to support only up to two-way SLI with its Pascal cards suggests that this could soon wind up as a token feature.

The board supports up to 4-way SLI/CrossFire. Note the metal reinforcements on each of the PCIe slots.
A 28-lane CPU will have the slots run in x16/x8 or x8/x8/x8 modes if you have up to three graphics cards. On the other hand, a 40-lane CPU will allow the slots to run in x16/x16, x16/x8/x8, or x8/x8/x8/x8 modes, courtesy of the additional PCIe lanes from the CPU.
But if there’s one area that the Rampage V Edition 10 falls short of the other boards, it’s the number of M.2 slots. ASUS has never been one to include a ton of M.2 slots, and there is just a single M.2 socket beside the RAM slots (and only PCIe SSDs are supported) and no PCIe-to-M.2 adaptor included in the box. That said, the location is ideal as it positions the drive away from heat-generating components like the graphics card.

The M.2 socket is located between the 24-pin power connector and the RAM slots.
There is also a U.2 connector next to the SATA ports, which will allow users to plug in a 2.5-inch Intel 750 series SSD without the use of any adapters. Again, this is a rather niche application, but there’s a good chance that there’s an overlap between the user base of that Intel drive and the Rampage V Edition 10.
One thing to note is that the both M.2 and U.2 connectors can be populated simultaneously. Both of them use four PCIe 3.0 x4 lanes each from the CPU, and unless you’re using a four-way x8/x8/x8/x8 graphics setup, they steal lanes from the fourth PCIe slot. This does mean that you’re theoretically able to run four graphics cards and two high-speed storage devices in tandem, which makes for quite an impressive feat.
On top of that, there are a total of 10 SATA 6Gbps ports (there are no SATA Express ports, but realistically that doesn't matter), all of which draw lanes directly from the chipset.

The 10 SATA 6Gbps ports and the lone U.2 port are all located next to each other.
The Rampage V Edition 10 uses an 8+2-phase VRM design – that may appear fewer than what its competitors are offering, but ASUS stressed that it is the design and quality that matters. According to ASUS, the digital power architecture affords full control over the CPU’s Fully Integrated Voltage Regulator (FIVR), and entering manual mode allows overclockers to ignore the behavior of the FIVR and supply steady power to different parts of the CPU.
Furthermore, this is a true 8-phase design, compared to the ASRock X99 Taichi which utilizes a 6-phase design that relies on six phase doublers and two integrated drivers to achieve 12 phases.
ASUS has also used some seriously high-end components in its voltage regulation circuit, including 60A PowlRstage IR3555 MOSFETs, micro-fine alloy chokes for better efficiency, and 10K black metallic capacitors that offer better durability. An extra 4-pin CPU header is also present to supply extra voltage to the CPU during overclocking. In addition, a metal heatpipe connects both VRM heatsinks to help channel heat away from them. The rear I/O shroud is actually comprised of a large aluminum heatsink, so the VRMs can dump a fair bit of heat there via the heatpipe.


There's an additional 4-pin CPU header for extra voltage during extreme overclocking. A metal heatpipe also connects both VRM heatsinks to help with heat dissipation.
That’s not all however, and the board comes with a bunch of extra features to help it stand out from the crowd. This includes a dedicated OC Zone with buttons for LN2 mode, retry, safe boot, and slow mode for extreme overclockers, and PCIe lane and DRAM channel DIP switches to help with troubleshooting.

There's a ton of overclocking controls and switches at the top right, including the debug LED for easier troubleshooting.
The rear I/O is also just bristling with ports and connectors, including two USB 3.1 Type-C ports (black), two USB 3.1 Type-A ports (red), four USB 3.0 ports (blue), and two USB 2.0 ports. It’s nice to see two USB-C ports here, but one glaring omission for a board this expensive is the lack of a dedicated Thunderbolt 3 port (there is a onboard Thunderbolt 3 header for an ASUS ThunderboltEX add-in card). When you’re paying this much, you should literally have nothing missing.
That said, other useful additions include the integrated I/O shield, which saves you considerable trouble during installation. ASUS has also thrown in a dedicated water pump header and high amperage fan header for PWM fans up to 3A or DC fans up to 1A. What’s more, all onboard fan headers are equipped with automatic PWM/DC detection, so you don’t have to worry about compatibility.

There's a whole lot of USB ports on the rear I/O. You can also see here the integrated I/O shield.
In comparison, the Gigabyte and MSI motherboards have separate headers for PWM and voltage-mode fans, so the ASUS board really makes installation a lot simpler because you don’t have to hunt for the correct headers.
We particularly like the 3x3 wireless solution, which supports speeds up to 1,300Mbps. This is the fastest offering out of all the boards, and is courtesy of the Broadcom BCM94360 chip (instead of the 2x2 Intel solution on competing products).

Here's a look at the Wi-Fi antenna that comes with the board.
On the audio front, the SupremeFX audio solution on the Rampage V Edition 10 is in quite a class of its own with premium Nichicon audio capacitors, dual headphone amplifiers, and EMI protection cover. Furthermore, the board ships with the SupremeFX Hi-Fi front panel headphone amp that utilizes ESS’ flagship Sabre 9018K2M 32-bit DAC and high-end amplifiers for even better sound.

The included front panel headphone amp uses a Sabre 9018K2M 32-bit DAC for higher quality audio.
Above all, this is a board designed to look as good as it performs, so you also get five independent zones (expansion slots, PCH heatsink, I/O shroud, ROG logo, and the backplate) of Aura RGB lighting that can also be synced with a compatible ASUS card. In addition, a separate 4-pin header will take up to a 2-meter 5050 RGB LED strip for an added burst of color to the system. Here's a sneak peek of it in action:-

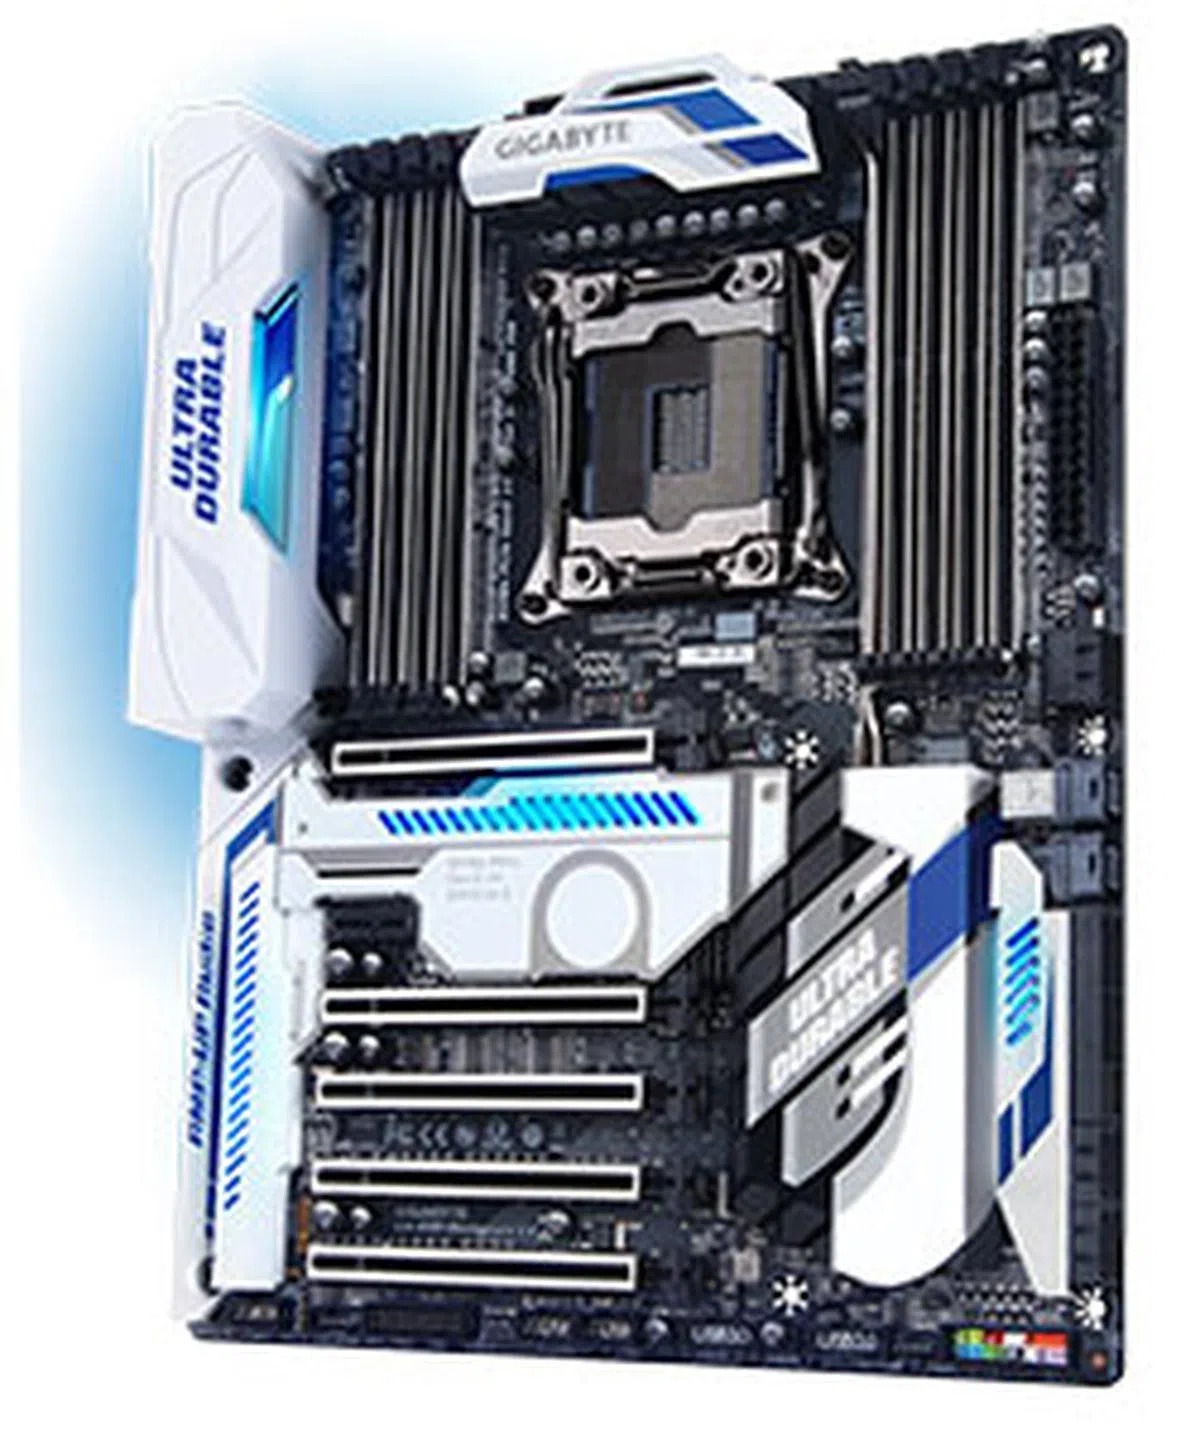
Gigabyte X99 Designare EX

The Gigabyte X99 Designare EX brings back the blue-and-white design from Gigabyte's Ultra Durable series.
The Gigabyte X99 Designare EX comes in at a more reasonable price point. At S$680, it is quite a bit more expensive than the ASRock X99 Taichi, but is still cheaper than the ASUS and MSI motherboards. At the very least, it doesn’t quite make you feel like you have to carve out your kidney to pay for it.
But now onto the board itself. This is Gigabyte’s top X99 refresh model, and it is as feature-rich as they come, with expected dual BIOS support and a plethora of ports. It is also a very opinionated board in terms of design, and the striking blue-and-white color scheme means that you’ll have to pay extra attention to how your other components fit in with the board’s aesthetics.
As it turns out, blue was the original color for Gigabyte’s Ultra Durable motherboards, and Gigabyte’s return to the color on the X99 Designare EX makes it one of your few options if you’re looking for a dash of blue.
Overclockers will be pleased to learn about the high-end components used here, including 50A PowIRstage IR3556 drivers, Durablack capacitors from Gigabyte, and Cooper Bussmann chokes. All this amounts to a true 8-phase VRM, showing the board’s commitment to overclockers even though there’s no additional 4-pin CPU header as on the more expensive boards.

The board features a true 8-phase power design.
The motherboard has a whopping total of five full-length PCIe x16 slots, all of which are, unsurprisingly, reinforced by metal (as are the RAM slots) to protect them against the weight of heavy graphics cards or careless installations. The first, second, and fourth slots are capable of operating at up to x16 speeds, while the third and fifth slots run at x4 and x8 respectively. Some of these slots do share lanes with each other and the SATA Express, U.2, and M.2 connectors, so the final bandwidth allocation depends very much on your graphics and storage setup. For instance, the third slot is actually a PCIe 2.0 slot that draws four lanes directly from the X99 chipset and shares lanes with the SATA Express connector, so both will run in x2 mode with devices installed. The fifth PCIe slot shares the 16 lanes derived from the CPU with the first slot, so installing something in the last slot will drop both slots to x8 mode.
We should also point out that this board is the only one in this shootout to be certified for NVIDIA's workstation-class Quadro GPUs. This model isn't part of Gigabyte's G1 Gaming series either, so it seems like the company is angling the board more toward professionals and power users rather than gamers.

The X99 Designare EX has been certified for use with NVIDIA Quadro GPUs.
That said, there is a PLX PEX8747 PCIe switch that helps split the PCIe lanes and enable more slots and connectors to be populated at the same time. To be specific, it expands 16 lanes from a 40-lane CPU and 8 lanes from a 28-lane chip into 32 lanes for the second and fourth PCIe 3.0 x16 slots, the M.2 socket, and the top U.2 port, which means you can populate all of them simultaneously. But because there are only 32 lanes shared among all these connectors, you won’t be able to use all available lanes at once, and filling up both U.2 and M.2 ports will cause the second and fourth PCIe slots to drop to x8 mode respectively.

There's a total of five full-length PCIe slots!
However, you’ll need a 40-lane processor to use both U.2 ports, with one drawing its lanes directly from the CPU, and the other relying on the PEX8747 chip. A 28-lane CPU like the Intel Core i7-5820K or Core i7-6800K will leave you with just the top U.2 connector, which is the one that derives lanes from the PLX PEX8747 chip. 10 SATA 6Gbps ports (and one SATA Express port) flank the two U.2 ports on the board's right edge.

One M.2 socket 3 sits underneath a metal shield between the first and second PCIe slots, which would sandwich it between two hot GPUs in a two-way setup. The location is far from ideal, and we'd much have preferred that Gigabyte reshuffle the PCIe slot layout and locate the slot further down. A second M.2 socket sits below this, but this is a socket 1 slot occupied by an M.2 Wi-Fi card. The metal shield is held in place by a screw, which can be easily removed.

You can see here the screw holding the metal shield over the M.2 slots in place.

Popping off the shield reveals the M.2 socket 3 and socket 1 slots sitting below. Note the size of the cards that you can install.
That aside, the board also has an Intel Alpine Ridge controller that provides a USB-C Thunderbolt 3 port on the rear, drawing on four PCIe 3.0 lanes from the CPU itself.
The rear I/O is a little sparse in terms of USB ports and you’ll find the aforementioned USB-C Thunderbolt 3 port and USB 3.1 Type-A port (red) there, in addition to five USB 3.0 ports. The white port is for Gigabyte’s QFlash Plus BIOS update feature.

Here's a look at the ports on the rear I/O panel.
The Thunderbolt 3 port helps make up for the scarcity of connectors somewhat – it is capable of driving up to two 4K displays at 60Hz or up to six Thunderbolt 3 devices. This is why Gigabyte has included a DisplayPort input to allow you to hook up your discrete GPU, as Haswell-E and Broadwell-E CPUs lack integrated graphics.
The 2x2 onboard Intel Dual Band Wireless-AC 8260 card supports speeds up to 867Mbps, which still puts it behind the ASUS board. You’ll also find dual Intel Gigabit NICs – an I218-V and I211 chip – on board that support teaming.

The board ships with a single tall antenna for Wi-Fi.
For sound, you get a Realtek ALC1150 codec, high-end Nichicon capacitors, and isolated audio circuitry, which is a pretty much run-of-the-mill affair for a board in this price segment.
The board has a total of five fan headers, including two that double as dedicated water cooling pump headers. While we mentioned that all the headers on the ASUS board could automatically detect and adjust for PWM or voltage fans, the Gigabyte board actually has three different types of fan headers – one PWM-only CPU fan header, two voltage mode headers that drive both PWM and voltage fans, and two dual-mode headers that can be configured manually in the BIOS.
However, one thing to note is that the CPU fan header is a little too close to the CPU socket, so you should probably connect the CPU fan to it first before slapping on a large air cooler. But speaking of cooling, you can also see here the heatpipe running from the VRM to the PCH heatsink, which is a slightly different implementation from the ASUS and MSI boards, which have heatpipes connecting the two CPU VRM heatsinks instead.

The CPU fan header is located at the bottom right corner of the CPU fan socket, which can make the installation of large, bulky coolers slightly tricky.
But even though Gigabyte has managed to cram quite a lot of features on board, it is still missing any onboard power or reset buttons, and add-ons like dedicated LN2 mode switches, which may account for its much more palatable price tag in relation to the ASUS and MSI boards as well. Then again, if you consider this a workstation board by virtue of its NVIDIA Quadro support (as opposed to something designed explicitly for overclockers), the omission becomes less glaring.
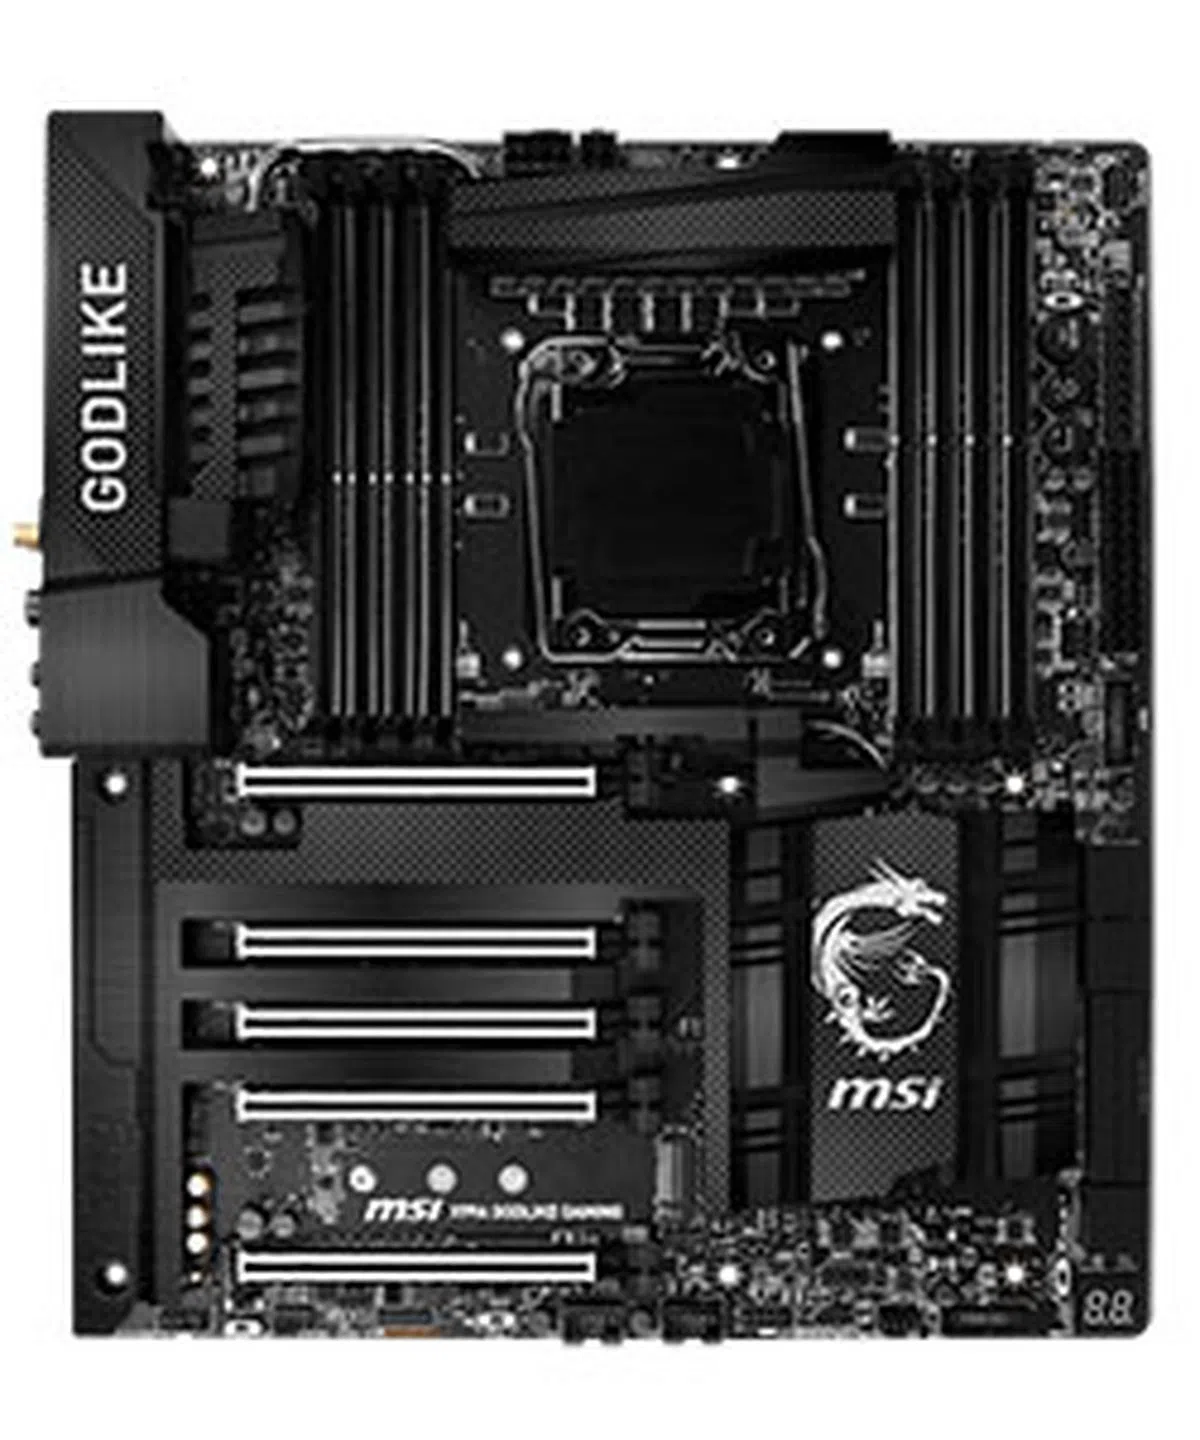
MSI X99A Godlike Gaming Carbon

The MSI X99A Godlike Gaming Carbon is armed to the teeth with gaming and overclocking features.
The MSI X99A Godlike Gaming Carbon is MSI’s top motherboard, combining the features of the original Godlike Gaming board with the signature carbon fiber detailing of its more recent motherboards. This is a nice change, and the retina-searing red of the original has been replaced with a more tasteful look that will likely sit better with more users.
This is a board armed to the teeth with gaming-oriented features, including MSI’s Mystic Light RGB LEDs, but it has overclockers squarely in its crosshairs as well. There’s a 12-phase VRM, a 6mm heatpipe that links the two CPU heatsinks to channel heat away from the VRMs, and an extra 4-pin CPU header to supply extra power to the CPU when gunning for those extreme overclocks. You can see below the 55A DrMOS MOSFETs, which are paired with other premium components like 60A Super Ferrite Chokes from MSI.

The board uses a 12-phase VRM to handle high overclocks.

MSI has included an extra 4-pin CPU header and a heatpipe linking the two CPU heatsinks.
For starters, there is support for up to 4-way SLI and CrossFire with a 40-lane CPU, courtesy of the five PCIe 3.0 x16 slots. These are similarly reinforced by metal as on the competing boards, and the MSI model is the only one to not feature anything short of a full-length x16 slot. In comparison, the ASRock and Gigabyte boards support only up to 3-way GPU configurations.
If you have dual graphics cards, you’ll want to install the cards in the first and fourth slots, as opposed to the first and third slots as on most other boards. This leaves a huge amount of clearance between the two cards, which while good for airflow, may perhaps make for a less attractive look.

All five PCIe 3.0 x16 slots have been reinforced with MSI's Steel Armor.
The PCIe layout has also been optimized for a 4-way SLI or CrossFire setup. Only the third PCIe slot is linked to the M.2 socket, and installing a drive here (as is highly likely) will disable the PCIe slot. This leaves the other four slots free to take your graphics cards of choice, and the defunct third slot (assuming an M.2 drive is installed) also leaves an appropriate amount of spacing between the second and fourth slots. With a 40-lane CPU, the board actually supports up to x8/x8/x16/x8 mode, together with either an M.2 or SATA Express drive running on two PCIe 2.0 lanes.
However, the top PCIe slot is located a little too close to the CPU socket, which means that large CPU coolers like the Cooler Master MasterAir Maker 8 can end up blocking the slot by a hair. While a cooler like the MasterAir Maker 8 is an admittedly large one, we fully expect a top-end board like the Godlike Gaming Carbon to make allowances for premium coolers, so it’s a little disappointing to see the board fall short here.
That said, there are plenty of appealing features on board, including something MSI calls DDR4 Boost, which optimizes the PCB traces and isolates the memory circuitry. This supposedly helps ensure the integrity of the memory signals and enables better performance and stability, especially during overclocking.

MSI says it has isolated the memory circuitry to ensure cleaner signals.
We mentioned an M.2 socket earlier, and this is located just above the last PCIe slot. This is a typical location, but we’d still have preferred to see it set up away from the thick of the action in a multi-GPU setup.

The M.2 slot is located just above the last PCIe slot.
There are no U.2 ports on this board, but we honestly don’t think it will make for that glaring an absence. Still, you'll be able to install a U.2 drive into the M.2 socket using MSI's Turbo U.2 host card. This leaves us with another 10 SATA 6Gbps ports for storage options, including a single SATA Express port.

There are a total of 10 SATA 6Gbps ports but no U.2 ports.
On the rear I/O, there’s a wide selection of USB ports, including four USB 3.0 ports and two USB 2.0 ports. In addition, the ASMedia ASM1142 controller helps provide additional USB 3.1 Type-A and Type-C ports, while the ASM1042AE gives a further two USB 3.0 ports available through an internal header.

The rear I/O panel also houses a dedicated 6.35mm headphone jack for premium headphones.
The onboard Audio Boost 3 Pro solution features MSI staples like Nahimic Sound Technology, which purports to improve audio clarity and offers virtual 7.1 sound. There’s also the usual high-end components you’d expect from a board of this caliber, like dual headphone amplifiers, premium audio capacitors, and an isolated audio PCB that reduces interference.
A nice inclusion is the dedicated 6.35mm headphone jack on the rear I/O, which means you’ll be able to use high-end audiophile-grade cans without the need for an adapter.
One gaming-centric inclusion is the use of dual Killer E2400 Gigabit LAN controllers and the 2x2 Killer Wireless-AC 1535 adapter (up to 867Mbps throughput), making it the only board here to opt out of an Intel networking solution. This avails you of the Killer DoubleShot-X3 Pro network aggregating solution, which lets both LAN connections and the Wi-Fi adapter work together for increased bandwidth.
That said, Intel’s solutions have generally been shown to consume less power and CPU resources and have better drivers, so we’d hold back on considering Killer’s solution as a plus point for the MSI board.

The motherboard ships with two antennas for Wi-Fi reception.
Finally, you get an assortment of overclocking features at the top right hand corner of the board, including MSI’s OC Genie button, voltage readout points, and the power and reset buttons. The OC Genie button is actually a simple, one-click overclocking method that will automatically kick in the next time you reboot the system, but you'll have to power off the system before activating it. A slow mode switch sits at the bottom of the board, mainly for extreme overclockers using LN2 cooling who need to first boot up the system at a stable processor frequency to avoid crashing. To cap matters off, there's a helpful debug LED and dual BIOS switch at the bottom right hand of the board.

The power and reboot buttons are located at the top right of the board.

The BIOS switch and debug LED are located at the bottom right hand corner.
Test Setup
This is the test configuration for our Intel X99 motherboard shootout:
- Intel Core i7-6950X (3.0GHz, 25MB cache)
- 2 x 4GB Corsair Vengeance LPX DDR4-2133 (Auto timings: CAS 15-15-15-36)
- ASUS ROG Strix GeForce GTX 1080 (GeForce Driver Version 355.82)
- Kingston HyperX 3K 240GB SATA 6Gbps solid state drive (one single NTFS partition)
- Windows 10 Home (64-bit)
Here’s also a list of our tested boards for easier reference:
- ASRock X99 Taichi
- ASUS ROG Rampage V Edition 10
- Gigabyte X99 Designare EX
- MSI X99A Godlike Gaming Carbon
As we mentioned earlier, these are all the top-end models from their respective brands, and offer among the richest selection of features you’ll find on just about any motherboard today. The ASRock, ASUS, and Gigabyte models are part of a refreshed range of Intel X99 boards to capitalize on Broadwell-E’s launch, and while the MSI motherboard is a slightly older model released in early 2016, it still represents the pinnacle of the company’s X99 line-up.
Benchmarks
- BAPCo SYSmark 2014 (ver 1.5.1.47)
- SPECviewperf 12.1
- Cinebench R15
- Futuremark 3DMark (2013)
- Middle-earth: Shadow of Mordor
Motherboard features comparison table
Before we move on to look at the performance figures for each board, you can refer to the below table for an overview of each model’s specifications.
The ASRock X99 Taichi is the company’s flagship X99 refresh board, and it stands out because of its affordable price and choice selection of features. Unlike some of its counterparts here, extravagance has no place on this board and it goes after customers with a judicious selection of features that will satisfy the majority of users. On the other hand, the ASUS Rampage V Edition 10 swings the other way with a no holds barred approach to design and price. It packs a ton of features like customizable RGB lighting, a dedicated OC Zone, and a bunch of other bits and bobs that make installation and overclocking the board that much easier.
The Gigabyte X99 Designare EX boasts a striking blue-and-white design, and offers a decent mix of enthusiast-oriented features like a PLX PEX8747 switch (the only board here to do so), two U.2 ports, and an Intel Alpine Ridge controller for Thunderbolt 3 support. Finally, the MSI X99A Godlike Gaming is the closest rival to the ASUS board in terms of price and features, boasting fancy Mystic Light RGB LEDs, a hefty 12-phase VRM, and similar onboard buttons and switches to make life easier for overclockers.
[hwzcompare]
[products=585334,585343,585356,585359]
[width=200]
[caption=Test motherboards compared]
[showprices=1]
[/hwzcompare]
Performance Benchmarks
SYSmark 2014
SYSmark is a general productivity benchmark suite that measures the response times of tasks on a PC using real-world applications like Microsoft Office 2013 and Adobe Photoshop and simulated user input. Task response times are used to generate a performance rating that reflects actual user experience, so the faster a PC responds to application workloads, the higher its score will be. The method of measuring response times can take many forms, such as the time it takes for an application to show a pop-up completion message, or how long it takes a progress dialog to disappear and for a user to regain application control.
Unsurprisingly, there were minimal differences between the systems as the only variable was the boards themselves. That said, the MSI X99 Godlike Gaming Carbon scored a narrow win overall here, thanks to it taking the lead in the Media Creation and Data/Financial Analysis segments.


Cinebench R15
Cinebench is a benchmark tool used to compare CPU performance across different systems, so we’ll be using it to evaluate how well our Intel Core i7-6950X plays with the different motherboards. The test scenario uses all of the system’s processing power to render a photorealistic 3D scene, making use of various algorithms to stress all available processor cores.
Once again, all the boards performed extremely close to each other, but the ASUS ROG Rampage V Edition 10 still managed to eek out a small lead.

SPECviewperf 12.1
SPECviewperf is used to measure the 3D graphics performance of systems in professional applications. Each individual workload, called a viewset, represents graphics and content from an actual real-world application. Compared to SPECviewperf 11.0, this latest version of SPECviewperf includes updated traces from the latest application versions and is designed to provide a more accurate indication of GPU performance in the actual applications.
SPECviewperf actually runs a total of eight different viewsets, but we’ve picked just three to display here. The maya-04 viewset is derived from Autodesk’s Maya 2013 application. Lightwave-01 from PTC is no longer tested – instead, it’s been replaced by creo-01, also from PTC. We also included the new energy-01 viewset, which puts the board through some professional volume rendering applications.
The results were also remarkably close here, with there being less than a point of difference in most cases. These are top-tier boards we’re talking about here, so we fully expect them to be closely matched.

Futuremark 3DMark (2013)
3DMark is a synthetic gaming benchmark that tests graphics and computational performance at different resolutions, starting at 1080p and going all the way up to 4K. A series of two graphics test, one physics test, and then a combined test stresses your hardware in turn to assess its performance. And because of the physics test that keeps the GPU load low while running gameplay physics simulations on the CPU, all three 3DMark Fire Strike tests scores also include an element of CPU performance.
It was also difficult to tease out any significant differences in performance here. However, the Gigabyte board did fall behind its rivals in the Fire Strike test, although it caught up in the more demanding Extreme and Ultra benchmarks.

Middle-earth: Shadow of Mordor
All the boards turned out a very similar performance here, with just minuscule frame rate differences across the board. Clearly, gaming performance is not going to be a key factor in teasing out a winner here, and other features like board layout and overclocking performance matter far more.

Temperature, power consumption & overclocking
Temperature
We measured the temperatures of the VRM and PCH heatsinks after running 40 loops of the 3DMark Fire Strike Stress Test. The ASUS motherboard posted a strong performance here as well, and it was among the coolest boards for both the VRM and PCH measurements. The I/O shroud also happens to house a large aluminum heatsink, so that could account for the lower VRM temperatures as well.

Power consumption
To test power, we ran the energy-01 viewset in SPECviewperf 12.1 and recorded the peak power consumption. The ASRock motherboard came ahead here with the lowest idle and peak power consumption, while the ASUS and MSI boards tied for second place on both figures. However, if you consider what the ASUS motherboard packs, its power consumption performance is definitely top-notch as opposed to the more 'sparse' ASRock board. The Gigabyte board did worst here, with idle power consumption almost 12 per cent higher than the ASUS and MSI models.

Overclocking
In order to assess the respective overclocking performance of the boards, we first tweaked the CPU multiplier ratio and raised the voltage accordingly. After ascertaining that the achieved clock speed was stable, we then proceeded to increase the BCLK value to get smaller overclock increments.
But changing the BCLK values also overclocks the RAM, so we throttled its speed accordingly to maintain system stability. The table below shows the clock speeds we achieved, along with the CPU vCore, multiplier, and RAM frequencies. We've also included the respective BIOS versions of the boards for those who are keen to know such details.
Model | BIOS version | Maximum CPU Core Ratio Achieved | BCLK (MHz) | Vcore (V) | RAM frequencies (MHz) | Maximum Overclock Achieved (GHz) |
ASRock X99 Taichi | 1.40 | 35 | 126 | 1.35 | 2268 | 4.41 |
ASUS ROG Rampage V Edition 10 | 1502 | 35 | 125 | 1.35 | 2251 | 4.376 |
Gigabyte X99 Designare EX | F4c | 35 | 126 | 1.35 | 2268 | 4.41 |
MSI X99A Godlike Gaming Carbon | 2.6 | 35 | 125 | 1.35 | 2251 | 4.376 |
Most of the boards managed to achieve impressive – and again relatively similar – overclocking numbers. Still, the ASUS board inched ahead by a small margin in an extremely competitive field as seen in the below graph. The ASRock X99 Taichi unfortunately lagged behind here, posting only a 13 per cent gain compared to the 25 to 27 per cent improvement achieved by the other boards.
One interesting thing to note is that despite posting the strongest results and the largest percentage jump from stock speeds of 27 per cent, the ASUS motherboard did not actually hit the highest clock speeds. That said, we’d take actual performance over raw numbers any day, and that ASUS did deliver.

Conclusion
Intel's Z270 chipset may be the latest chipset out of the oven, but its X99 platform is still the go-to platform for enthusiasts chasing after serious computing performance. Furthermore, its support for 40-lane chips means that it is the only viable option for extreme three- and four-way graphics configuration.
The chipset was first announced in late 2014, but the release of the new Broadwell-E processors infused new life into the X99 platform. After all, there was the delectable 10-core Intel Core i7-6950X, which suddenly made the only chipset that would accommodate it seem a lot more attractive. Kaby Lake may be a decent successor to Skylake, but there's no beating the Broadwell-E chips when it comes to sheer performance.
As we've mentioned before, most of the boards in this shootout are part of a refreshed Intel X99 line-up intended to capitalize on Broadwell-E's release. They're also the top-tier models of their respective brands, so there's considerable overlap in terms of features. And when it comes to considering performance differences, we're literally splitting hairs here.
That's not to say that there's nothing to help distinguish each board though, and we also paid closer attention to things like design and ease of use. In order to determine the winner, we took into account different aspects of the board in terms of performance and features. The performance score of each board takes into account the board's stock performance, overclocking capabilities, temperature and power performance relative to each other. In addition, we also considered individual board features like onboard PCIe slot layout, connectivity options, and any other standout features.
Model | Features | Performance | Value | Overall | Price |
ASRockX99 Taichi | 7.5 | 8.0 | 8.0 | 8.0 | S$420 |
ASUS ROG Rampage V Edition 10 | 9.5 | 8.5 | 7.0 | 9.0 | S$949 |
Gigabyte X99 Designare EX | 9.0 | 8.5 | 7.5 | 8.5 | S$680 |
MSI X99A Godlike Gaming Carbon | 9.0 | 8.5 | 7.0 | 8.5 | S$839 |

The ASUS ROG Rampage V Edition 10 checks all the right boxes in terms of performance, features, and looks.
The ASUS ROG Rampage V Edition 10 takes the cake because of its zero-compromises approach to performance. It has the most well-rounded feature set out of all the contenders, and the board design shows an attention to detail that makes it clear that it was designed to make things easier for overclockers and enthusiasts. For instance, the dedicated OC Zone comes with buttons for LN2 mode, retry, safe boot, and slow mode for extreme overclockers, and the PCIe lane and DRAM channel switches help with troubleshooting. Couple that with its premium components, thoughtful inclusions like the integrated I/O shield and 3x3 802.11ac Wi-Fi, and five-zone RGB onboard lighting, and you get a very attractive and high-performance board. This is also the board that pushed out the strongest CPU and overclocking performance (even if it did not manage the highest clock speeds), the final point in cementing its place at the top of the pack.
ASRock has consistently played very well in the value segment of the market, and the X99 Taichi is no exception. In a market saturated with high-end and expensive X99 boards – think S$650 and up – the Taichi comes in at just S$420, which sets it up to undercut the competition by a fair bit. Other than price however, the Taichi stands out because of its unique black-and-white design, and a choice selection of features that will still satisfy most users. This includes steel-reinforced PCIe slots, a 12-phase voltage regulator, dual BIOS, and Purity Sound 3 audio that supports audiophile-grade headphones up to 600ohm. That said, overclocking performance is decent, but not outstanding. However, it’s difficult to complain at such an attractive price, and the board quite successfully provides a relatively low entry point to the X99 platform.
Gigabyte’s X99 Designare EX board has a whopping total of five PCIe 3.0 x16 slots, courtesy of a PLX PEX8747 PCIe switch that helps split the PCIe lanes and enable more slots and connectors to be populated at the same time. This is a feature-rich board whose strongest point is its comprehensive selection of ports and connectors and support for multiple graphics cards and storage devices at once. It includes two USB 3.1 (Gen 2) ports (one Type-A, one Type-C with Thunderbolt 3), two U.2 connectors, and one M.2 connector, while the PLX chip helps maximize the number of devices you can install at any one time. Furthermore, it is the only board to be certified for use with NVIDIA's workstation-class Quadro GPUs. Having said that, this seems a board more geared toward professionals and power users than gamers and overclockers.
The MSI X99A Godlike Gaming Carbon is MSI’s top motherboard, combining the features of the original Godlike Gaming board with the signature carbon fiber detailing of its more recent motherboards. Its feature set is similar to most of the other boards we reviewed here, with things like steel-reinforced PCIe slots, dual Ethernet ports, and onboard buttons and controls catered to overclockers. However, it still lost out to the ASUS board because the latter still provides greater functionality with small details like five-zone RGB lighting control, PCIe and DIMM slot DIP switches, and a hefty heatsink under the I/O shroud to help dissipate heat from the VRMs. Overclockers are also more likely to prefer buttons for retry and safe boot as opposed to the OC Genie knob, which boosts the CPU’s base clock without having to enter the BIOS. Finally, ASUS’ UEFI BIOS is just that bit more intuitive to use, which is an important boon for enthusiasts looking to manually tweak their systems.
 | |
 | |
 |  |
 | |